background image

LRF 3013 Integrator Manual 

Document number: TML 913655 ver A 


Public: 13.03.2017 

Confidential & Proprietary 

 Safran Vectronix AG 

– All rights reserved 

page: 18/36


Mechanical stress due to tolerance and thermal expansion coefficient mismatches between the 
module’s  and  application‘s  mechanical  interface  should  be  avoided  as  much  as  possible.  An 
undefined  stress  could  result  in  a  misalignment  of  the  module’s  transmitter  and  receiver 
channel and reduces the range performance. 


Assembly  personnel  must  be  experienced  in  handling  precision,  sensitive  electronic, 
mechanical and optical assemblies. 


Vibration and shocks outside the specified values can destroy or shift parts inside the LRF in a 
way that proper use is no longer possible. 


4.2.3 

Boresighting 

The module receiver and transmitter are boresighted in the factory. For this reason, the module and can 
be mounted and replaced easily. For a professional boresighting of the LRF module with the main optical 
axis of the host system, we recommend the use of a collimato

r and a camera that can see the 1’550 nm 

wavelength of the laser module. Vendors of 1’550 nm cameras (SWIR cameras): 


XenICs (

www.xenics.com

) (e.g. XEVA-1.7-320) 


Sensors Unlimited (

www.sensorsinc.com

) (e.g. 640HS-1.7RT) 


Allied Vision Technologies (

www.alliedvisiontec.com

) (e.g. Goldeye P-008 SWIR) 


Collimators can be sourced from Möller Wedel Opical (

http://www.moeller-wedel-optical.com

). 


Note:  The  LRF  module  provides  a  low  power  continuous  lasing  mode  to make  its  line  of  sight  visible  to 
SWIR cameras. Please see chapter 6.2.5 for details.  


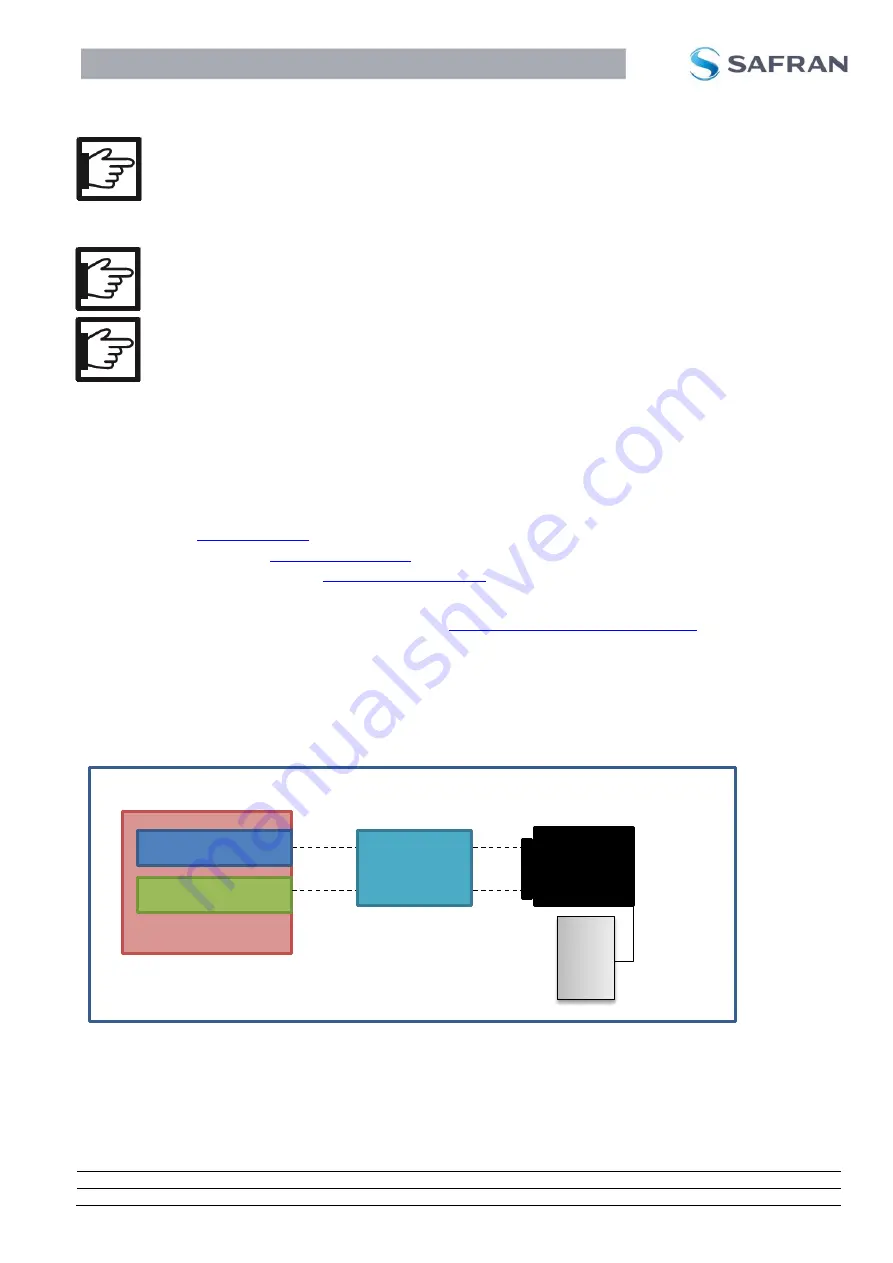
Figure 8 below illustrates the alignment set-up with a collimator and 1550 nm camera. 


Figure 8: Alignment Set-up with collimator and 1550 nm camera 


1550 nm 

Camera 

S

c

ree
n


   Host System 

LRF module 

Main optical axis 

Collimator 

Summary of Contents for LRF 3013

Page 1: ...Document number TML 913655 ver A Public 13 03 2017 Confidential Proprietary Safran Vectronix AG All rights reserved page 1 36 Integrator Manual LRF 3013...

Page 2: ...e end user is allowed to be copied into user instructions of the host system Warranty Safran Vectronix AG provides this publication as is without warranty of any kind either express or implied includi...

Page 3: ...are in place Always keep the instructions in direct access for users and any personnel working with the instrument Power the LRF module only within the specified voltage and power range Handle the LRF...

Page 4: ...module packed in a dry clean condition Remove power prior to prolonged storage Observe the specified storage temperatures Do not expose the LRF module to strong mechanical shocks Do not expose the LR...

Page 5: ...ps without LRF Interface Kit 16 3 4 Checklist in case of problems with LRF modules 16 4 Integration 17 4 1 Mechanical Mounting Handling 17 4 2 Design recommendations 17 4 2 1 Preparation 17 4 2 2 Moun...

Page 6: ...Proprietary Safran Vectronix AG All rights reserved page 6 36 6 2 5 Low Power Continuous Lasing Mode 30 6 3 Power on 30 7 Maintenance 31 7 1 Cleaning 31 7 2 Service 31 7 2 1 Service Levels 31 8 LRF I...

Page 7: ...is class 1 eye safe according to IEC 60825 and ANSI Z136 1 2007 1 1 Main Elements and functions of the LRF Module 1 1 1 Main parts a receiver containing electronics and a receiver diode a transmitter...

Page 8: ...are sent through the objective lens to the target For a good result most of the laser pulses have to hit the target The main part of the laser light is absorbed or diffusely reflected by the target an...

Page 9: ...formance depends on visibility target size and albedo reflectivity and is calculated relating to a certain detection probability e g 90 Visibility The visibility is the greatest distance from an obser...

Page 10: ...lected away e g on water or pitched roofs 90 is optimal Object Hardness The accuracy of soft objects like snow smoke clouds etc depends on the condition of the object itself Hard objects allow a longe...

Page 11: ...connect your LRF Module to your PC By following the steps below you can perform your first measurements very quickly and easily Figure 7 Setup of using LRF with the Universal Interface and PC 1 Plug...

Page 12: ...7 Confidential Proprietary Safran Vectronix AG All rights reserved page 12 36 Click Finish to complete the setup program Read and either accept or decline the terms of use If declined the program will...

Page 13: ...LRF Module 6 Switch the Universal Interface on by pressing the ON OFF button The status indicator light will illuminate flashing approximately once per second showing that the LRF is being powered If...

Page 14: ...t the Terminal Software is installed on your PC and the LRF Module is connected correctly to your PC The below mentioned guide shows how to use the Terminal Software Select the module you are using fr...

Page 15: ...ues are saved If not found try once more If the module is still not found enter the interface values manually Press OK to return to the main screen Press Connect The Connect button will change color U...

Page 16: ...ly must not exceed the range of 4 5 16 V The default Baud rate for LRF 3013 modules is 57 600 Bd First range measurements can be performed by sending the software commands Md1 CR to the LRF module To...

Page 17: ...m of the LRF module 4 2 Design recommendations The mechanical interface drawing of LRF 3013 can be found in the appendix chapter 9 2 4 2 1 Preparation The surface that the LRF module will be mounted o...

Page 18: ...itter are boresighted in the factory For this reason the module and can be mounted and replaced easily For a professional boresighting of the LRF module with the main optical axis of the host system w...

Page 19: ...t penetrating the optical system and should be removed just before the application is sealed and purged With respect to dust the unit is recommended to be handled observing standard practices for sens...

Page 20: ...rom transmitter to receiver The two windows have to be aligned with a wedge error of less than 10 seconds of arc Figure 10 Tilted window view from side Figure 11 Optical isolation of transmitter and r...

Page 21: ...the system connector s pin out and the description of each signal Pin number Signal name Type Description 1 2 3 PWR_IN Power Connect to the power supply of the system 4 5 6 7 GND Power Connect to the...

Page 22: ...Make sure the UART lines are in a high impedance state if the LRF module is not powered PWR_IN Following diagrams below show typical power consumption and timing behavior of a range measurement event...

Page 23: ...w 500 ms The average current consumption during lasing is 250 mA 130 mA current consumption when LRF Module is powered on but inactive Ca 15 A current consumption when the LRF Module is power off Figu...

Page 24: ...ve a defined command e g Md1 CR for a range request Power has to be applied at the PWR IN pins before 5 3 Serial Interface UART The UART interface uses the pin 9 UART TX and pin 10 UART RX of the syst...

Page 25: ...ted upon power up Pin 8 confirming that the system has successfully booted and is waiting for a command 6 1 1 Command structure The commands are strings of characters with the following structure Char...

Page 26: ...send a new command to the LRF module 6 1 3 Timing constraints No timing constraint exists between consecutive characters of a message when powered the microcontroller is always waiting for a new char...

Page 27: ...equest measurement commands with a maximum frequency of 2 Hz The LRF Module does not ensure that the maximum measurement frequency of 2 Hz is maintained Keep in mind that eye safety of the host system...

Page 28: ...Read out of SW versions HW configuration and serial number Iv CR Output Field Line Value Description Product Prod LRF MB ModC 910994 CR LRF product type with PLM number Article number Article Num nn...

Page 29: ...value 0D is the carriage return 6 2 4 Built In Self Test Table 3 Built In Self Test Command Input Input Description Tb1 CR It starts a self test sequence Command Output Char Num Value Description 1 t...

Page 30: ...n have the following values 0 Deactivate LPCL mode 1 6 Activate LPCL mode with growing energy 6 results in the highest energy for this mode Command Output None View in a terminal program Legend Tl1 3...

Page 31: ...ssible Allow the device to dry fully before packing Blow out dust carefully with clean air and leave to dry 7 2 Service 7 2 1 Service Levels During the design phase of the LRF modules the ILS principl...

Page 32: ...Universal Interface Box and below Quick Start Guide Battery 9V USB Interface cable External battery power supply cable Flex cable to connect the LRF Module to the Universal Interface Box Figure 16 LRF...

Page 33: ...eserved page 33 36 9 Appendix 9 1 System Connector Following drawing indicates the design requirements for the flex cable which needs to be attached to the system connector of the LRF module Conductor...

Page 34: ...LRF 3013 Integrator Manual Document number TML 913655 ver A Public 13 03 2017 Confidential Proprietary Safran Vectronix AG All rights reserved page 34 36...

Page 35: ...LRF 3013 Integrator Manual Document number TML 913655 ver A Public 13 03 2017 Confidential Proprietary Safran Vectronix AG All rights reserved page 35 36 9 2 Mechanical Interface Drawing...

Page 36: ......

Reviews: