


User Manual
V1.7 2019 Copyright SafeWaze
Page 11
damaged or has experienced Fall Arrest Forces. If either of these conditions exist,
the Chain Anchor must IMMEDIATELY be removed from service and destroyed.
Other approved anchorage connectors, which meet the 5,000 lbs strength requirement,
may be used in place of the supplied 018-4000 Chain Anchors. See anchorage
connector user instructions for proper installation.
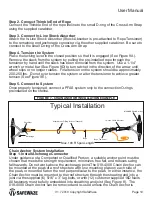
Step 2. Connect Thimble End of Rope
Connect the Thimble End of the rope lifeline to the small O-ring of the Chain Anchor
using the supplied carabiner.
Step 3. Connect In-Line Shock Absorber
Attach the In-Line Shock Absorber (Shock Absorber is pre-attached to Rope Tensioner)
to the remaining end anchorage connector via the other supplied carabiner. Be sure to
connect to the small D-ring of the Cross Arm Strap
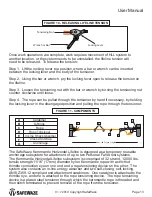
Step 4. Tension the System
Place the locking lever in the closed position so that it is engaged (See Figure 9A).
Remove the slack from the system by pulling the pre-installed rope through the
tensioner by hand until the slack has been removed from the system. Use a 1-1/4”
wrench or metal bar (See Figure 9D) to turn ratchet in the direction of the arrow until
wheel slips or no longer rotates. Final tension on the system should be approximately
200-250 lbs. Do not over tension the system or alter the tensioner to achieve greater
tension (See Figure 9E).
Step 5. Connect to System
Once properly tensioned, connect a PFAS system only to the connection O-rings
preinstalled on the lifeline.
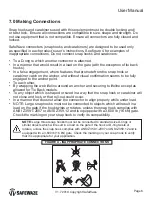
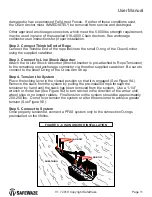
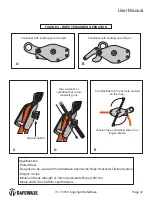
FIGURE 8 - CHAIN ANCHOR INSTALLATION
SHEATHING
LAG BOLT
LAG BOLT
TRUSS