


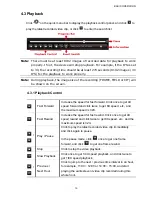


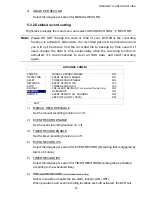

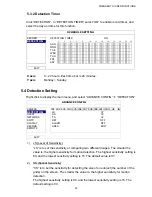

CONNECTION AND SETUP
7
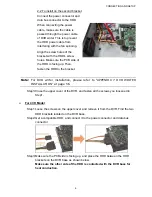
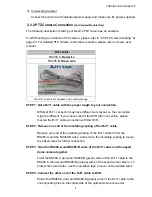
Step4: Align the screw hole on the each bracket with the screw hole on the each side of
the HDD as shown below, and fix the HDD to the bracket with a HDD screw
supplied.
Step5: Close the upper cover of the DVR, and fasten all the screws you loosened in Step 1.
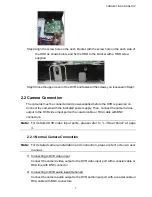
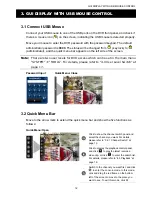
2.2 Camera Connection
The cameras must be connected and power-supplied before the DVR is powered on.
Connect the camera with the indicated power supply. Then, connect the camera video
output to the DVR video input port with a coaxial cable or RCA cable with BNC
connectors.
Note:
For detailed DVR video input ports, please refer to “1.3 Rear Panel” at page
3.
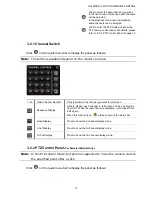
2.2.1 Normal Camera Connection
Note:
For detailed camera installation and connection, please refer to its own user
manual.
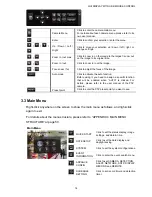
1) Connecting to DVR video input
Connect the camera video output to the DVR video input port with a coaxial cable or
RCA line with BNC connector.
2) Connecting to DVR audio input (Optional)
Connect the camera audio output to the DVR audio input port with a coaxial cable or
RCA cable with BNC connectors.
Summary of Contents for SVD-I8
Page 1: ......
Page 42: ...REMOTE OPERATION 37 ...
Page 94: ... ጤᖙ 28 6 1 2 ࠫ ࣨ១տ ࠉᖕଡԳࠌ ش ክΔ ٥ ࠟڶ ጟ ࠫ ࣨ ࠎױ ᙇᖗΖ ១ ठ ቃ ...
Page 100: ... ጤᖙ 34 ...
Page 102: ... ጤᖙ 36 ԫ E MAP ᆢิ ڇ ᆢิ ټ ጠՂਊ ݶق ᙇ Δྥ ᙇᖗጓᒠ E MAP ࢨ ନ E MAPΖ ...
Page 128: ...DVR 䉕 䈜䉎೨䈮 9 11 DC 19V 䈘䉏䈢䉝䉻䊒䉺䊷䈮ធ 䈚䉁䈜䇯 12 㔚Ḯ 䇸 䇹䈪㔚Ḯ䈏 䉍䇮䇸 䇹䈪㔚Ḯ䈏ಾ䉏䉁䈜䇯 ...
Page 155: ...䊥䊝䊷䊃ᠲ 36 6 1 2 䉮䊮䊃䊨䊷䊦䊌䊈䊦䈱 ⷐ 2 䈧䈱䉮䊮䊃䊨䊷䊦䊌䊈䊦䈏 น 䈪䈅䉍䇮䈍 䈇䈱 ᘠ䈮ᔕ䈛䈩ಾ䉍ᦧ䈋䉎䈖䈫䈏 䈪䈐䉁䈜䇯 ᤃ䊋䊷䉳䊢䊮 䊂䊐䉤䊦䊃 ...
Page 161: ...䊥䊝䊷䊃ᠲ 42 ...
Page 164: ...䊥䊝䊷䊃ᠲ 45 ...
Page 223: ...FONCTIONNEMENT À DISTANCE 42 ...
Page 284: ...FERNGESTEUERTE BEDIENUNG 42 ...
Page 345: ...OPERACIÓN REMOTA 42 ...
Page 406: ...FUNZIONAMENTO REMOTO 34 ...