7
F
F
F
11
12
13
13
11
12
G
H
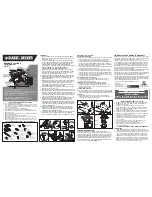
STEP5
: Insert Leg (LT18A1) into Moun�ng Plate, �ghten by rota�ng .
the leg clockwise.
STEP6
: insert Shelf Pin (HW7) into the between Side boards and Center boards
on the desired level. Then place the Adjustable Shelf (F) onto the Shelf Pin.
Place your furniture on level floor. The legs come with
adjustable leveller,adjust it as needed un�l your furniture
sit steady on the floor.
STEP7
: Insert Sliding Top (HW8) and Sliding Bo�om (HW9) using
Screw M3.5x13mm (HW10) into Door Le� (G) and Door Right (H).
Tighten with a screwdriver.
STEP8
: Insert Handle (HW11) and Screw M4x25 mm (HW12)
into Door Le� dan Door Right. Install Stopper (HW13).
LT18A1
LT18A1
LT18A1
LT18A1
G
H
10
8
8
10
9
9
Laminate
Laminate
Laminate