background image

Playback

11

A B

A B

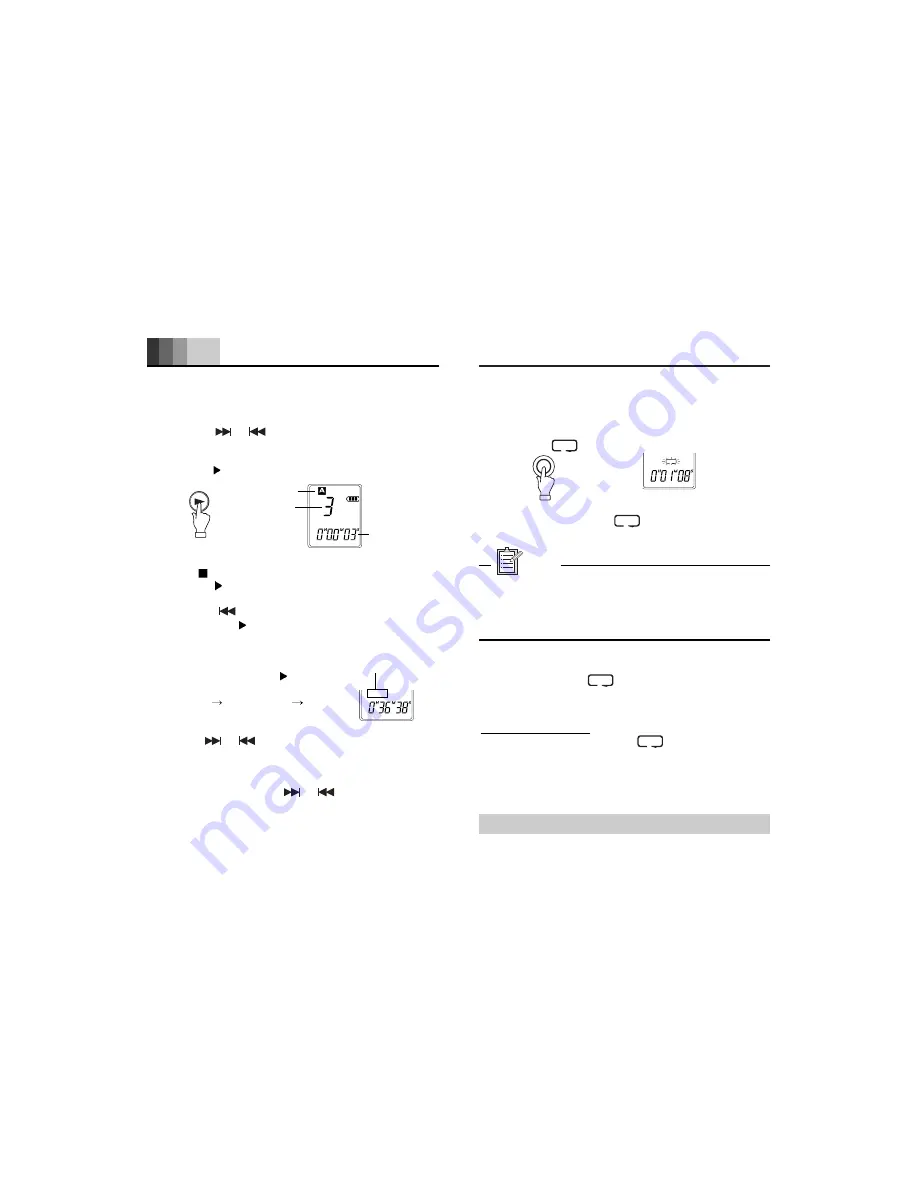
Repeat playback

A-B repeat:

1.  During playback, press the FOLDER/REPEAT button

at the beginning of the section you want to repeat
(Point A). "            " blinks.

2.  Press the FOLDER/REPEAT button again at the end

of the section (Point B)."            " remains lit. The specified
section is played back repeatedly.

.  If the end of the file is reached before pressing the

FOLDER/REPEAT button to set Point B, it is
automatically set to Point B.

.  A-B repeat can be set within the selected file.

File repeat:

During playback, press and hold down the FOLDER/
REPEAT button until "           " appears.
The current file is played back repeatedly.

Folder repeat:

In the File repeat mode, press and hold down the
FOLDER/REPEAT button until "             " appears.
The whole files of the current folder are played back
repeatedly.

To return to normal play:

Press the FOLDER/REPEAT button again.

Dividing a file: (See page 20.)

Note

A B

1.  Press the FOLDER/REPEAT button repeatedly to

select the folder ("A", "B", "C" or "D") in the stop mode.

2.  Press the         or        (SKIP/SEARCH) button to

select the desired file.

3.  Press the 

(POWER/PLAY) button to start playback.

Stopping playback

Press the 

(MENU/STOP) button during playback.

.   Press the 

(POWER/PLAY) button to resume

playback.

.   Press the         (SKIP/SEARCH) button 

once

, and

then press the 

(POWER/PLAY) button. Playback

starts from the beginning of the selected file.

Fast/Slow playback

During playback, press the 

(POWER/

PLAY) button to select playback speed.

FAST

(Fast) 

SLOW

(Slow) 

Normal

File skip

Press the       or       (SKIP/SEARCH) button during
playback.

File search

Press and hold down the       or      (SKIP/SEARCH)
button during playback. When the button is released,
playback will continue.

SP H I

Folder name

File  number

Elapsed

playing time

Speed display

FAST

12

Summary of Contents for R200

Page 1: ...elf with the instructions and functions explained In this manual begone operating the product will ensure proper use of the product Please fill in and keep the warranty included in this maunal from your product distributor SAFA MEDIA Co Ltd 2F Romanson B D 77 1 Garak dong Songpa gu Seoul Korea Tel 82 2 3400 5240 Fax 82 2 3401 4142 http www safa co kr SF69 00602A ...

Page 2: ... connection cable x 1 Earphone x 1 CD ROM USB Driver Plug In Software x 1 Line cable Pin Mic Battery Tel Adapter Option Tel cable Option Contents Accessories 2 Name of each part 3 Before use 4 Inserting battery 4 Battery indicator 4 Turning the power on and off 5 Hold function 5 To adjust the volume 5 Date and time setting 6 Using an earphone 7 Using an external microphone 7 Selecting display 7 Re...

Page 3: ...e unit will not be used for a month or longer AAA alkaline battery supplied SPENT OR DISCHARGED BATTERIES MUST BE RECYCLED OR DISPOSED OF PROPERLY IN COMPLIANCE WITH ALL APPLICABLE LAWS FOR DETAILED INFORMATION CONTACT YOUR LOCAL COUNTY SOLID WASTE AUTHORITY IMPORTANT NOTE 12 13 14 15 16 1 2 3 4 5 6 7 8 9 10 11 HQ SP SLOW AM PM FORMAT FAST A 1 B HI LP LO VAS REC REMAIN TM 1 External microphone jac...

Page 4: ...cted file number and total playing time appear Resume function If the battery was changed dAtE blinks the date and time setting mode Follow the steps 3 6 on page 6 To turn the power off press and hold down the POWER PLAY button for at least 2 seconds The clock display remains lit if it is set Auto power off function If you do not use the unit for 15 minutes the power will be automatically turned o...

Page 5: ...y dangerous situations by drowning out surrounding sounds Use caution when driving bicycling or jogging while operating the unit and obey all applicable laws Do not play your earphone at a high volume level Hearing experts advise against continuous extended play If you experience a ringing in your ears reduce the volume or discontinue use Using an external microphone Connect an external microphone...

Page 6: ...vel VAS 1 minimum VAS 5 maximum when recording begins Selecting recording LED on off See page 21 SP HI VAS Selecting the folder Press the FOLDER REPEAT button repeatedly to select the folder A B C or D in the stop mode Selecting the microphone sensitivity See page 20 Starting recording 1 Press the REC PAUSE buton Recording starts with new file number 2 Press the MENU STOP button to stop recording ...

Page 7: ... are played back repeatedly To return to normal play Press the FOLDER REPEAT button again Dividing a file See page 20 Note A B 1 Press the FOLDER REPEAT button repeatedly to select the folder A B C or D in the stop mode 2 Press the or SKIP SEARCH button to select the desired file 3 Press the POWER PLAY button to start playback Stopping playback Press the MENU STOP button during playback Press the ...

Page 8: ...e MENU STOP button before step 5 Only the unit can format the data Do not use your PC to format SP HI SP HI Erasing the selected file 1 Press the FOLDER REPEAT button repeatedly to select the folder A B C or D in the stop mode 2 Press the or button to select the file to be erased 3 Press the ERASE button once The file number and ERASE blink 4 While the display is blinking press and hold down the E...

Page 9: ...f Alarm timer on the previous page 2 Press the or SKIP SEARCH button repeatedly to select On tIMER Then press the POWER PLAY button SP HI SP HI SP HI SP HI The hour display blinks appears Before setting the timer see Date and time setting on page 6 first Alarm timer When the alarm time arrives beep alarm will be activated 1 In the stop mode press and hold down the MENU STOP button for at least 2 s...

Page 10: ... recording The timer recording does not work and blinks 3 Press the or SKIP SEARCH button and press the POWER PLAY button to select the timer on time hour minute The recording time blinks 4 Press the or SKIP SEARCH button repeatedly to select the desired recording time Recording time approx 30M 30 minutes 60M 60 minutes 120M 120 minutes ALL Recording will continue until the MENU STOP button is pre...

Page 11: ...the beep sound Turning on and off the beep when buttons are pressed Note SP HI y execute file division in this position n return to menu screen HI High sensitivity Lo Low sensitivity On Beep on OF Beep off SP HI SP HI Common procedures of menu setting 1 In the stop mode press and hold down the MENU STOP button for at least 2 seconds The menu setting display appears 2 Press the or SKIP SEARCH butto...

Page 12: ...indows environments Standby suspend and other modes may not work properly with your particular environment If this is the case do not use those modes This unit cannot play back MP3 and WMA files Supplied CD ROM There are USB Driver and Plug In Software in the CD ROM Reproduction of this CD ROM is forbidden This CD ROM shall not be copied and reprinted Note VAS Voice activated system See VAS Voice ...

Page 13: ...e Software For Windows XP Me 2000 Skip this section and see Connect the unit to your PC on page 26 first For Windows 98 98SE 1 Turn on your PC and Windows is started Do not connect the unit to the PC yet 2 Load the supplied CD ROM in the CD ROM drive of the PC InstallShield Wizard screen appears automatically If the screen is not displayed double click Setup exe file in the CD ROM InstallShield Wi...

Page 14: ... The unit will operate without battery while the unit is connected to the PC Pay attention to the direction of the terminal Note Original USB connection cable supplied B How to check whether USB driver has installed correctly or not 1 Connect the unit to the PC See page 26 2 Right click My Computer select Properties open System Properties 3 Click Device Manager 4 Double click Disk drives double cl...

Page 15: ...op 2 Click 1 Select Selecting the action Windows is to take After connection the following screen will appear Windows XP only For Windows Me 2000 98 98SE this operation is not needed The screen shots are of Windows XP Adjust your settings to match your PC s environment In this manual Take no action is selected Always do the selected action is checked and OK is clicked This completes the connection...

Page 16: ...s displayed on your PC may not exactly correspond to those shown in this manual depending on the OS version and manufacturer Click Start then right click My Computer and select Explore from the menu that appears Explorer will start up 2 Select 1 Right click 4 Confirm that SAFA IC Recorder USB Device is in the list and click OK 5 Disconnect the unit from your PC 2 Click 1 Confirm 30 ...

Page 17: ...ar in My Computer in Windows when the unit is connected to your PC VOICE_IC folder Files recorded using the unit are stored here Files recorded in the internal memory A folder are stored in the A folder inside the VOICE_IC folder with the name IC_A_XXX file number ZVR This also applies to the B C and D folders The A B C and D folders can hold up to 99 files each Only those files in the VOICE_IC fo...

Page 18: ...o do this See http www microsoft com windows windowsmedia to download the Windows Media Player Installing the Software For Windows 98 98SE There is no need to install the supplied CD ROM again Because it is already installed in Installing the Software on page 23 Skip this section and see Playback on page 35 For Windows XP Me 2000 1 Load the supplied CD ROM in the CD ROM drive of the PC InstallShie...

Page 19: ...er 35 3 Click and select Removable Disk E 4 Click Files of type and select Any File x x 2 Select 1 Click 1 Click 2 Select Playback 1 Select All Programs Windows Media Player from Start menu Windows Media Player starts 2 Select Open from File menu Select 36 ...

Page 20: ...See page 14 Using your PC to do the formatting might stop the unit from recording normally If you accidentally formatted using your PC reformat it using the unit 5 Select the playback file click Open 6 Read the message first Click Don t ask me again for this extension click Yes Playback starts 1 Select 2 Click 2 Click 1 Select 38 ...

Page 21: ...e names is already taken so the Removable Disk cannot be created Change the network drive assign ments and reconnect Talk to your network administrator about reassigning network drives Symptom Possible cause Corrective action The unit does not start No sound Buttons do not respond dAtE blinks when the power is turned on Battery is not inserted properly or is ran out Internal memory error Reinsert ...

Page 22: ...play back the trans ferred file from PC The PC cannot play back the trans ferred files from the unit The file name is wrong Changing file name using your PC will render file unplayable Return the file name to IC_X folder name _XXX file number ZVR See page 31 The file is not a playable format Transfer the file by recording the unit Windows Media Player or Plug In Software is not installed Confirm W...

Page 23: ...ox 1 2 x 4 2 x 0 6 30 x 107 5 x 16 mm Weigh t Approx 1 oz 33 g without battery Specifications 43 Because its products are subject to continuous improvement SAFA reserves the right to modify product designs and specifications without notice and without incurring any obligation Important information 64MB 128MB Recording time approx HQ High quality SP Standard LP Long 4h 30 minutes 22h 30 minutes 36 ...

Reviews: