background image


51 


G

ENERAL INFORMATION AND SECURITY PRECAUTIONS


The following general safety prescriptions should be followed in any way possible :  

-


Please read the complete manual before first use 

-


By heating the stove certain parts, such as the 

doors, handles, window, exhaust pipes,… can 

become very hot. Therefore it is prohibited to touch these parts without proper protection ( 
heat-resistant gloves ) 

-


Point out this danger to your children and make sure they keep a proper distance when the 
stove is being used 

-


Objects that aren’t heat

-resistant should be kept away from the stove 

-


Don’t put any kettles on top of your stove


-


Clothing of any kind must be kept away on a safe distance 

-


While in use, keep all flammable or explosive materials out of range 

-


Only use the correct fuel for your stove. Not all material is suitable 

-


Any modification on the stove is prohibited  

-


Use original spare parts only coming from the manufacturing company 

-


This stove is not equipped to be connected with other ones on the same conduct 
 

De  Saey  Duo  was  solely  made  to  burn  wood,  briquettes  and  cool  and  only  to  work  in  a  closed 
environment. 


4.1 

Risks of fire 


The main parts of the Saey Duo, especially the door, front, upper side and fume conducts can become 
really hot. A heat-resistant glove should be used for controlling the stove.  Pay attention that all children 
keep a safe distance from the stove.  


4.2 

Risks by badly sealed door  


Make sure to seal the door in a good way so no fumes or smoke can escape in the living space. 
Exhaust fumes and depression can form a reason so that smoke and other gas enters the living room. 
Therefore pay attention never to open the front door before the wood has burnt completely down.  


4.3 

Risks of insufficient supply of air  


Stoves need air to be able to burn, which they pull out of the living space. Therefore sufficient fresh air 
should be supplied from outside.  For the same reason, it is advised that all ventilation systems work on 
minimum power, or even better, should be p

ut off ( ventilation, kitchen hood… ) 


Summary of Contents for DUO

Page 1: ...SAEY DUO MULTI FUEL NL Installatie en gebruiksaanwijzing FR Notice d installation et d utilisation EN Installation and user manual ...

Page 2: ...2 ...

Page 3: ...3 ...

Page 4: ...D 22 8 STORINGEN OORZAKEN EN OPLOSSINGEN 25 9 ONDERDELENTEKENING EN VERVANGONDERDELEN 26 10 GARANTIE 27 11 SERIENUMMER 27 FRANÇAIS 1 INTRODUCTION 28 2 EMBALLAGE ET CONTENU 28 3 CARACTÉRISTIQUES TECHNIQUE 29 4 INFORMATIONS GÉNÉRALES ET CONSIGNES DE SÉCURITÉ 30 5 CONSIGNES D INSTALLATION 32 6 CONSIGNES D UTILISATION ET RECOMMANDATIONS 34 7 ENTRETIEN 43 8 PANNES CAUSES ET SOLUTIONS 46 9 VUE ÉCLATÉE E...

Page 5: ...G AND DELIVERY CONTENT 49 3 TECHNICAL INFORMATION 50 4 GENERAL INFORMATION AND SECURITY PRECAUTIONS 51 5 INSTALLATION GUIDELINES 53 6 USER S GUIDE 56 7 MAINTENANCE 64 8 TROUBLESHOOTING 67 9 SPARE PARTS 68 10 WARRANTY 69 11 SERIAL NUMBER 69 ...

Page 6: ...e informatie en suggesties om uw kachel correct te gebruiken We zijn dan ook overtuigd dat u vele gezellige dagen tegemoet gaat en wensen u veel succes 2 VERPAKKING EN LEVEROMVANG Wij besteden de grootste zorg om uw nieuwe kachel in de best mogelijke verpakking te leveren om zo de kans op beschadiging te verkleinen Bedankt om daarom bij ontvangst zeker uw kachel te controleren op schade en volledi...

Page 7: ...uwtrek limieten Pa Hout 12 20 Pa Kolen 13 21 Toevoer verse lucht m h 30 Brandstof Brandstof Brandhout houtbriketten en antracietkool Max capaciteit brandhout Kg 2 3 Verbruik bij nominaal vermogen Kg h 2 5 Max capaciteit houtbriketten Kg 2 1 Verbruik bij nominaal vermogen Kg h 2 3 Max capaciteit Antracietkolen Kg 5 6 Verbruik bij nominaal vermogen Kg h 1 2 Afmetingen Max lengte houtblokken cm 40 Af...

Page 8: ...dbare of explosieve materialen in dezelfde of naburige ruimten gebruiken Dit toestel is geen allesbrander Gebruik enkel de geschikte brandstoffen Er mogen geen wijzigingen aan het toestel worden aangebracht Gebruik enkel de originele wisselstukken van de fabrikant Deze kachel is niet geschikt om te installeren op een rookkanaal waarop meerdere kachels zijn aangesloten De SAEY Duo is enkel geschikt...

Page 9: ...unstige weersomstandigheden sterke wind nevel storm kan dit tot slecht functioneren van uw schoorsteen leiden Dit onderdeel is bij de inwerkingstelling van uw toestel zeker noodzakelijk Bij lange inactiviteit van uw kachel kunnen er in uw schoorsteen afvoerkanaal of andere leidingen verstoppingen voorkomen Let erop dit regelmatig na te kijken Jaarlijkse reiniging van uw rookkanaal is wettelijk ver...

Page 10: ...verstelschroeven Regel deze indien nodig bij zodat het toestel zo vlak mogelijk geïnstalleerd staat Het regelen kan met een platte sleutel De Schoorsteen Voordat een kachel op een schoorsteen aangesloten wordt moet gecontroleerd worden of de afmetingen en de kwaliteit van de schoorsteen beantwoorden aan de lokaal geldende voorschriften De afmetingen moeten desgevallend berekend worden De kachel ka...

Page 11: ...buiten de woning TIP Hou rekening met andere haarden of luchtafvoerinstallaties in dezelfde ruimte of met dezelfde verbrandingsluchtverbinding Deze kunnen een storend effect hebben op de werking van de kachel Indien er 15 minuten na het ontsteken nog steeds terugslag is van de rookgassen door de weersomstandigheden mist storm dient men het aansteken te stoppen tot er weersverbetering is OPGELET Er...

Page 12: ...zijn altijd minimum afstanden Spring hier altijd zorgvuldig mee om en respecteer deze waar mogelijk De kachel mag ook nooit op brandbare materialen of ondergronden worden geplaatst Voorzie onder de kachel steeds een niet brandbare bodem zoals een hittebestendige vloerplaat Gelieve de volgende veiligheidsafstanden te respecteren tot brandbare materialen rond de kachel ...

Page 13: ...iketten en antraciet toegelaten Optimale brandstofeigenschappen voor de SAEY Duo Maximale lengte houtblokken 40 cm Maximale omvang ca 25 cm Maximaal restvocht 20 Antraciet 20 30 De juiste brandstofhoeveelheid Gelieve onderstaande tabel te consulteren Max capaciteit brandhout Kg 2 3 Verbruik bij nominaal vermogen Kg h 2 5 Max capaciteit houtbriketten Kg 2 1 Verbruik bij nominaal vermogen Kg h 2 3 M...

Page 14: ...n de oorzaak vormen van vuile kachelruiten Droog Hout met een maximale vochtigheid van 20 Vochtig hout brandt doorgaans slechter en heel onzuiver In het algemeen bereikt men droog hout na een 2 3 jarige stapeling in een goed verluchte opstelling Als u brandt met houtbriketten gebruik dan geschikte briketten die uit zuiver hout bestaan Hou er rekening mee dat als u met geperst hout of houtbriketten...

Page 15: ...dgreep asladedeur 5 Vuldeur altijd rechts 6 Sluiting vuldeur 7 Vuldeksel De kacheldeur en vuldeur zijn bij levering altijd gesloten Bij het toestel wordt een bedieningshendel geleverd zodat u de sloten makkelijk kan openen en sluiten Let erop dat bij inwerkingstelling de sloten van beide deuren steeds goed gesloten zijn 8 Bedieningshendel De kachel en bedieningshendel kunnen bij gebruik heel warm ...

Page 16: ...ing Deze regeling werkt met verschillende posities Belangrijk De SAEY DUO is uitgerust met een enkele hendel voor het regelen van de toevoerlucht die zowel de luchttoevoer regelt bij het gebruik op hout en antraciet De bedieningshendel kan worden gedraaid van links naar rechts waarbij de middelste positie de nulstand is In de nulstand midden positie van de regeling is de luchttoevoer gesloten met ...

Page 17: ...trek is kan deze worden verminderd door deze regelaar aan te passen Stel het Bimetaal zo in dat de kachel op volle kracht en dus maximale warmteafvoer nog steeds genoeg luchtstroom heeft OPEN In de rechterpositie zoals aangegeven op de figuur 2 maximale warmte GESLOTEN In de linker positie lagere warmte 6 4 Stoken met Hout Voor het stoken met brandhout moet u de kolenbunker 1 verwijderen door het ...

Page 18: ...met de bedieningshendel Verder branden Hoe verder we gaan in de verbranding hoe meer de regeling van de verbrandingslucht naar links zal staan Wanneer we hout willen bijvullen plaatsen we de verbrandingslucht weer helemaal open naar rechts U mag hout bijvullen via de vuldeur maar zorg ervoor dat er in het vlammenbeeld zo goed als geen vlammen meer zichtbaar zijn Open de deur steeds voorzichtig Ind...

Page 19: ...list om de kachel te laten uitdoven en er geen geel witte vlammen meer zichtbaar zijn mag u de verbrandingslucht in het midden plaatsen nulstand Op de bodem van het houtrooster zullen zich nog resten bevinden van hout en houtskool Dit is uiterst normaal Laat deze voldoende afkoelen vooraleer u de as verwijdert en overgaat tot reiniging van uw kachel 6 5 Stoken met Kolen Wanneer u de SAEY Duo op an...

Page 20: ...teken van het vuur laat u de kacheldeur of asladedeur een kleine 5 minuutjes geopend op een kleine kier Wanneer het vuur voldoende vertrokken is sluit u de kachel deur stevig Laat het vuur verder branden tot het aanmaakhout is opgebrand en verandert in gloeiende stukken Nu kan u het vuldeksel openen met de hendel en de kolenbunker opvullen met ongeveer 1 kg antraciet en sluit onmiddellijk het vuld...

Page 21: ...geven maximale hoeveelheid antraciet in een correct installatie zou u normaal tussen 4 en 5 uur moeten kunnen stoken Om het vermogen te verminderen moet u enkel de luchtregelaar iets meer naar rechts verplaatsen wel steeds aan de linkerhelft blijven van de nul positie Laat de deuren altijd gesloten tot de volgende keer dat u de kachel zal bijvullen Uitdoven Wanneer u beslist om de kachel te laten ...

Page 22: ...en nog houtskool of antracietresten overblijven van vorige verbranding Het is niet altijd nodig deze te verwijderen Bij een volgende verbranding zullen deze gewoon mee opbranden en het zal de kachel zelf extra aansturen zodat het hout de juiste verbrandingstemperatuur kan bereiken Legen van de aslade De aslade mag maximaal gevuld zijn tot aan de bovenrand met as Er mogen zich geen slakkenkegels vo...

Page 23: ...e volgende stap is het verwijderen van de stenen aan de zijkant 3 Til deze lichtjes op en trek de onderkant naar binnen verwijder vervolgens de steen Nu kun je de vuurkorf zien deze bestaat uit twee delen Til het eerst het linker 4 deel uit de kachel en dan het rechter deel 5 Draai de schroeven vervolgens los om de schudrooster te verwijderen Nu kan de verbrandingskamer en het rookkanaal grondig m...

Page 24: ...antenpapier in de witte as van de afgekoelde kachel en wrijf dit op het glas De as zorgt voor een licht schurend resultaat op het glas zonder krasvorming Vervolgens wrijf je met een ander vochtig doekje de ruit opnieuw proper Tenslotte blink je de ruit op met een droge propere en zachte doek Er bestaan in de handel ook aangepaste reinigingsproducten voor kachelruiten U kan deze uiteraard ook gebru...

Page 25: ...genoeg Alleen geschikt hout gebruiken Te veel hout Niet meer dan 2 3 stukken max bijvullen Te weinig verbrandingslucht Diameter circulatie controleren Extra leiding met verbrandingslucht voorzien Ventilatiesystemen van de woning uitzetten Rookontwikkeling bij eerste gebruik Uitdrogen van de gebruikte grondverf Verdwijnt na een tijdje Is ongevaarlijk Condensvorming Hoog temperatuurverschil Deur in ...

Page 26: ...mmer 1 Handgreep compleet 1005 04111 2 Sluiting vuldeur compleet 1005 04112 3 Kachelruit 1005 04170 4 Rooster 1005 04172 5 Rugsteen 2 stuks 1005 04171 6 Zijsteen 1005 04173 7 Vuurkorf link 1005 04168 7 Vuurkorf rechts 1005 04160 8 Kolenbunker compleet 1005 04175 9 Vlamkeerplaat 1005 04177 10 Binnenplaat vuldeur 1005 04120 11 Houtvanger 1005 04174 12 Bedieningshendel 1005 04122 13 Aslade 1005 04167...

Page 27: ...ie is niet geldig op gebreken die het gevolg zijn van een foutieve installatie verkeerd gebruik wijzigingen aan het toestel uit elkaar halen van het toestel slijtage of een gebrek aan onderhoud Op het karkas van uw kachel geven wij u 5 jaar garantie Alle garantieaanvragen dienen steeds via uw verkooppunt te gebeuren Garantie wordt enkel verleend door de installateur waar de kachel werd aangekocht ...

Page 28: ...ode d emploi contient des informations et des suggestions importantes afin d utiliser au mieux votre poêle Nous sommes convaincus que vous allez profiter de votre nouveau poêle SAEY et de pouvoir partager ensemble des moments privilégiés auprès de la chaleur de votre poêle 2 EMBALLAGE ET CONTENU Nous prenons grand soin de livrer votre poêle dans un emballage exceptionnel afin de réduire le risque ...

Page 29: ...ois 8 6 g s Charbon 9 4 Limites tirage cheminée Pa Bois 12 20 Pa Charbon 13 21 Arrivé d air M h 30 Carburant Carburant Bûches ou briquette de bois et charbon anthracite Capacité max bûches Kg 2 3 Consommation à puissance nominal Kg h 2 5 Capacité max briquettes de bois Kg 2 1 Consommation à puissance nominal Kg h 2 3 Capacité max charbon anthracite Kg 5 6 Consommation à puissance nominal Kg h 1 2 ...

Page 30: ... la même pièce ou pièces voisines Cet appareil n est pas un brûle tout Utilisez exclusivement le combustible approprié Aucuns changements et modifications ne peuvent être apportés à l appareil Utilisez uniquement les pièces d origine du fabricant Ce poêle ne peut être raccordé à un conduit de fumées auquel sont raccordés plusieurs poêles Le SAEY Duo est uniquement approprié à brûler des bûches bri...

Page 31: ...pête cela peut entraîner des disfonctionnements de votre cheminée Ces informations sont dans la mise en fonctionnement de votre appareil certainement nécessaire Lors de longues périodes d inactivité de l appareil des obstructions peuvent se produire dans votre cheminée conduit de fumées ou autre N oubliez pas de contrôler régulièrement Un ramonage de votre cheminée par un professionnel est indispe...

Page 32: ...oêle peut directement être raccordé à la cheminée Le diamètre du conduit de sortie doit correspondre au diamètre du conduit de raccordement au poêle Nous pouvons vous assurer un bon fonctionnement du poêle quand le tirage est entre 12 et 20 Pa Si le tirage est trop élevé un régulateur de tirage doit être installé Prendre un diamètre inférieur pour la sortie à celui d origine est interdit Si le tir...

Page 33: ...u conduit est directement raccordé à l arrière du poêle Ce tuyau doit être protégé de la condensation en l isolant aux endroits où ils sont encore soumis à l air chaud Les matériaux d isolation utilisés doivent évidemment hydrofuge ou prévu avec pare vapeur Distances à respecter autour du poêle Pour l avant l arrière et les côtés certaines distances doivent être respectées envers les matériaux inf...

Page 34: ...on anthracite sont autorisées Caractéristiques de combustible optimal pour le SAEY Duo Longueur maximal bûches 50 cm Taille maximal ca 25 cm Humidité maximal 20 Anthracite 20 30 cm La quantité correcte de combustible Veuillez consulter le tableau ci dessous Capacité max de bûches Kg 2 3 Consommation puissance nominale Kg h 2 6 Capacité max de briquettes de bois Kg 2 1 Consommation puissance nomina...

Page 35: ...se de fenêtres sales Sec Bois avec un taux d humidité de max 20 Du bois humide brûle moins bien est très salissant pour les vitres et le conduit de cheminée En général on atteint un bois sec après 2 3 ans de stockage dans un endroit bien ventilé Si vous choisissez pour des briquettes de bois utilisez des briquettes appropriées qui sont constitués de bois pur Tenez compte que si vous chauffez avec ...

Page 36: ...t des cendres Utilisez de préférence des gants résistants à la chaleur 4 Poignée tiroir à cendres 5 Porte de remplissage toujours à droite 6 Fermeture porte de remplissage 7 Couvercle de remplissage La porte du poêle et la porte de remplissage sont toujours fermées à la livraison La poignée de commande est aussi livré avec le poêle pour ainsi ouvrir et fermer plus facilement Faites attention lors ...

Page 37: ...cette poignée de commande vous pouvez vous même régler la quantité d air sont la poêle a besoin pour assurer la combustion Ce réglage fonctionne en différentes positions Important Le SAEY Duo est équipé d une poignée de commande unique pour contrôler l alimentation d air qui règle à la fois l alimentation pour l usage de bois ou d anthracite La poignée de commande peut être tourné de gauche à droi...

Page 38: ... où le tirage de la cheminée est trop élevé il est possible de réduire ce tirage en ajustant le régulateur Réglez le bimétallique de sorte que le poêle à pleine puissance et donc une évacuation de chaleur maximale a encore un courant d air suffisant OUVERT dans la position de droite comme indiqué sur la figure 2 chaleur maximale FERMÉE dans la position de gauche chaleur plus faible 6 4 Brûler avec...

Page 39: ... régulateur d air sera vers la gauche Quand vous rechargez du bois ouvrez complètement le régulateur vers la droite Vous pouvez remplir du bois par la porte de remplissage mais assurez vous qu il n y a plus de grandes flammes Ouvrez la porte prudemment Si nécessaire vous pouvez laisser la porte ouverte pendant un laps de temps pour que les flammes reprennent Après 3 minutes vous refermez bien la p...

Page 40: ...devez installer la soute à charbon 1 comme indiqué sur la photo Ouvrez le couvercle de remplissage pour l installer Sortez la plaque de feu Déflecteur et glissez la soute à charbon par le haut Faire du feu Pour allumer le SAEY Duo au charbon vous utilisez tout d abord des allumes feu donc le régulateur est mis sur bois Ouvrez complètement l air de combustion vers la droite tout comme le thermostat...

Page 41: ...uvercle Mettez le clapet d air complètement à gauche Laissez pendant 5 minutes la porte du tiroir à cendres ouverte et refermez la ensuite Le clapet peut aussi être très chaud Veuillez utiliser des gants résistant à la chaleur pour la manipulation Poursuivre la combustion Une fois que le combustible brûle complètement vous pouvez ouvrir la porte du tiroir à cendres et manipuler la grille de décend...

Page 42: ...s suivez la consigne maximale Pour diminuer la capacité vous devez placer le clapet d air plus vers la droite Toujours rester sur la partie côté gauche du milieu Laissez toujours les portes fermées jusqu à ce que vous remplissiez à nouveau Extinction Quand vous décidez d éteindre le poêle et qu il n y a plus de flammes jaunes blanche vous pouvez complètement fermer le clapet d air vers la gauche S...

Page 43: ...ement refroidi Il est possible que la combustion précédente laisse des restes de charbon de bois ou d anthracite Il n est pas nécessaire de les retirer à chaque fois Ceux ci brûlerons à la prochaine combustion et aiderons le bois à atteindre une température de combustion correcte Vider le tiroir à cendres Le tiroir à cendre ne peut pas être rempli à ras bord avec des cendres Les cendres ne peuvent...

Page 44: ... déviation si avez utilisez le poêle pour le bois Retirez les grilles à bois comme indiqué 1 et retirez ensuite la pierre arrière 2 Ensuite vous retirez les pierres latérales 3 Soulevez légèrement et tirez le dessous vers l intérieur retirez ensuite la pierre Maintenant vous voyez le brasero qui est en deux parties Soulevez d abord celle de gauche 4 hors du poêle et puis celle de droite 5 ...

Page 45: ...cteurs bois humide mauvaise combustion ne peuvent éviter que la vitre se salisse plus vite Nous conseillons vous pour le nettoyage de la vitre Imprégnez un morceau de papier journal humide dans le blanc des cendres froides du poêle et frottez sur la vitre avec des mouvements circulaires Les cendres suppriment la suie noire de la vitre Frottez ensuite la vitre avec un chiffon humide Faites briller ...

Page 46: ... est assez petit utilisez que du bois Trop de bois Ne remplir que 2 3 bûches max Trop peu d air de combustion Contrôlez le diamètre de circulation Prévoir un conduit d air de combustion supplémentaire Eteindre la ventilation de l habitation Fumées au premier usage Séchage de la peinture Disparait après un moment N est pas nocif Condensation Différence de températures trop élevée Mettez la porte en...

Page 47: ...1005 04111 2 Poignée complet pour porte de remplissage 1005 04112 3 Vitre 1005 04170 4 Grille 1005 04172 5 Pierre de dos 2 pièces 1005 04171 6 Pierre latéral 1005 04173 7 Brasero gauche 1005 04168 7 Brasero droite 1005 04160 8 Soute à charbon complet 1005 04177 9 Plaque de déviation 1004 00851 10 Pierre intérieur porte de remplissage 1005 04120 11 Parre bûches 1005 04174 12 Poignée de commande 100...

Page 48: ...modifications à l appareil démontage de l appareil usure ou manque d entretien Nous donnons 5 ans de garantie sur la carcasse Toutes demandes de garantie doivent toujours être faites via votre point de vente La garantie est accordée uniquement par l installateur où le poêle a été acheté Pour un service après vente fluide inscrivez votre poêle sur www saeyheating com En cas de non respect du foncti...

Page 49: ...pliance Please read it carefully and keep it throughout the product s life We re convinced that many cozy days are ahead of you and wish you the best of luck in using your stove 2 PACKAGING AND DELIVERY CONTENT We have the utmost care of delivering your new stove in the best packaging possible in order to reduce any chance of damage Thanks for checking your stove for damage and complete content as...

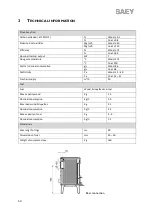
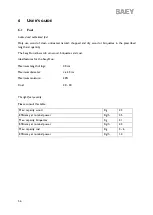
Page 50: ... Draft at nominal consumption g s Wood 8 6 g s Coal 9 4 Draft limits Pa Wood 12 20 Pa Coal 13 21 Fresh air supply m h 30 Fuel Fuel Wood briquettes and coal Max capacity wood Kg 2 3 Nominal consumption Kg h 2 5 Max load wood briquettes Kg 2 1 Nominal consumption Kg h 2 3 Max capacity of coal Kg 5 6 Nominal consumption Kg h 1 2 Dimensions Max length of logs cm 40 Dimensions of coal mm 20 30 Weight o...

Page 51: ...facturing company This stove is not equipped to be connected with other ones on the same conduct De Saey Duo was solely made to burn wood briquettes and cool and only to work in a closed environment 4 1 Risks of fire The main parts of the Saey Duo especially the door front upper side and fume conducts can become really hot A heat resistant glove should be used for controlling the stove Pay attenti...

Page 52: ...onducts for clogging Check this frequently The law prescribes to clean the fume conducts on annual basis 4 7 Things to do in case of chimney fire We advise you to take the following steps in case of chimney fire Seal off the air supply Call the fire brigade When cleaning entrances are foreseen make sure they are well accessible e g basement attic Remove all inflammable objects from the chimney Bef...

Page 53: ...th adjustable legs adjusting screws Adjust these if necessary so that the stove is levelled out as much as possible Adjustments can be made with a wrench The chimney Before connecting the stove to a chimney please check the dimensions and quality so that they correspond to local directives If necessary the dimensions must be calculated The stove can be connected on the chimney in a direct way The ...

Page 54: ... stoves or venting installations in the same room s will have disruptive effect on the functioning of your stove If there are still fumes coming back from the chimney due to bad weather conditions fog storm and within 15 minutes after detonating you should stop trying to light up the fire until better weather conditions have arrived ATTENTION In no way whatsoever fresh air may never be supplied fr...

Page 55: ...be respected These are clearly minimum distances Respect them where possible The stove may never be put on inflammable materials or surfaces Always make sure that under the stove a fire free environment is created such as a heat resistant floorplate Please respect the following safety distances to inflammable objects ...

Page 56: ...ob urn wood briquettes and coal Ideal features for the Saey Duo Maximum length of logs 40 cm Maximum diameter ca 25 cm Maximum moisture 20 Coal 20 30 The right fuel quantity Please consult this table Max capacity wood Kg 2 3 Efficiency at nominal power Kg h 2 5 Max capacity briquettes Kg 2 1 Efficiency at nominal power Kg h 2 3 Max capacity coal Kg 5 6 Efficiency at nominal power Kg h 1 2 ...

Page 57: ...autiful combustion with low emission They can be the cause for those dirty windows of your stove Dry Wood with maximum moisture of 20 Humid wood burns much worse and very impure In general dry wood can be obtained by storing it 2 3 years in a well ventilated area When burning with briquettes use them that consist of clean wood Also bear in mind that burning with pressed wood or briquettes makes th...

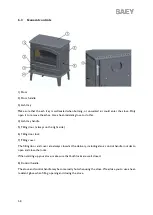
Page 58: ...ling door always on the right side 6 Filling door lock 7 Filling cover The filling door and cover are always closed at the delivery including also a control handle in order to open and close the locks When starting up your stove make sure that both locks are well closed 8 Control handle The stove and control handle may become really hot when using the stove We advise you to use a heat resistant gl...

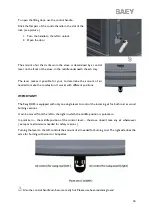
Page 59: ...ion It works with different positions IMPORTANT The Saey DUO is equipped with only one single lever to control the incoming air for both coal as wood burning versions It can be moved from the left to the right in which the middle position is point zero In point zero the middle position of the control lever the stove doesn t take any air whatsoever except a real minimum needed for safety reasons Tu...

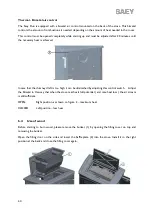
Page 60: ...ney draft is too high it can be diminished by adjusting this control switch Adjust the Bimetal in this way that when the stove reaches it full potential and max heat loss the air stream is still sufficient OPEN Right position as shown on figure 2 maximum heat CLOSED Left position less heat 6 4 Use of wood Before starting to burn wood please remove the bunker 1 by opening the filling cover on top a...

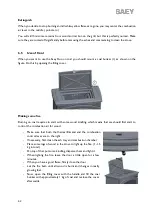
Page 61: ...ight You may refill wood through the filling door on the side as long as there are no more flames visible Always open the door in a gentle manner If necessary you can keep the filling door open for a little while until the flames flare up After 3 minutes seal off the door firmly and adjust the air control a little to the middle The nominal position is now between the maximum right position and poi...

Page 62: ...equires to start with some wood kindling which means that we should first start to control the combustion air for wood Make sure that both the thermal Bimetal and the combustion control lever are to the right If necessary first clean the ash tray and combustion chamber Place some logs of wood in the stove to light up the fire 1 1 5 kg in total On top of that put some kindling disperse them and lig...

Page 63: ...own After some time you can now open the filling cover again and refill some coals untill you reach the shown maximum limit 1 After you have stopped refilling it is for the best to place the air control lever back in the outer left position and to open the ash tray for a few minutes Please remember to close it back again A full load of carbon allows you to heat for 4 5 hours as long as the install...

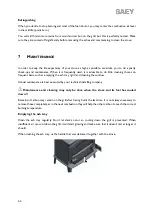
Page 64: ...sis such as emptying the ash tray grill and cleaning the window Annual maintenance is best executed by your technical installing company Maintenance and cleaning may only be done when the stove and its fuel has cooled down Remains of carbon may remain on the grill after having burnt the last time It is not always necessary to remove those completely as in the next combustion they will help the oth...

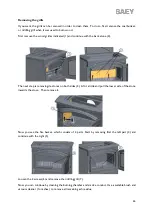
Page 65: ...p is removing de stones on both sides 3 Lift it a little and pull the lower side of the stone inwards the stove Then remove it Now you see the fire basket which consists of 2 parts Start by removing first the left part 4 and continue with the right 5 Loosen the 2 screws 6 and remove the riddling grill 7 Now you can continue by cleaning the burning chamber and smoke conduct Use a suitable brush and...

Page 66: ...ean the window Use some wet newspaper and peel it in the white ashes of the cold stove Rub it on the glass The ashes give a grinding result without really making deep scratches Clean up the window with another humid piece of cloth and shine it up gently with a dry and clean towel You can also find other cleaning products in regular shops It is not forbidden to use them of course but be careful to ...

Page 67: ... Too many wood Don t refill more than 2 3 pcs max Too little combustion air Check the diameter of the air supply Install an extra air supply conduct Shut down the ventilation system of the house Signs of smoke at first use of the stove The base paint is drying out Disappears after a while Is harmless Moisture High temperature difference Open the door of the stove a little when starting to heat up ...

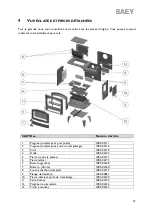
Page 68: ...omplete 1005 04111 2 Clinch filling door complete 1005 04112 3 Glass 1005 04170 4 Grill 1005 04172 5 Back brick 2 pcs 1005 04171 6 Side brick 1005 04173 7 Fire basket left 1005 04168 7 Fire basket right 1005 04160 8 Coal tank complete 1005 04175 9 Baffle plate 1005 04177 10 Inner plate filling door 1005 04120 11 Log retainer 1005 04174 12 Handling tool 1005 04122 13 Ash tray 1005 04167 ...

Page 69: ...flaws at normal use of the stove It is therefore not valid on flaws that are the result of wrong installation wrong use changes on the device or lack of maintenance On the housing of your stove you have been granted a 5 year warranty All request for warranty must be made to your point of sale as it is given to you by the installing company where you have bought your stove When not respecting this ...

Page 70: ... te contacteren Veuillez contacter votre installateur en cas de problèmes d entretien ou de fonctionnement Please contact your installer in case of maintenance or operation problems Industriepark De Bruwaan 17 9700 Oudenaarde Belgium www belgofire be Versie 08 2021 ...

Reviews: