background image

Item

When to clean

How to find in the control panel/
What to do

Coffee grounds

container

Empty the coffee grounds

container when prompted by the

machine. Clean it weekly

Remove the coffee grounds container while the

machine is switched on. Rinse it under the tap

with some washing-up liquid.

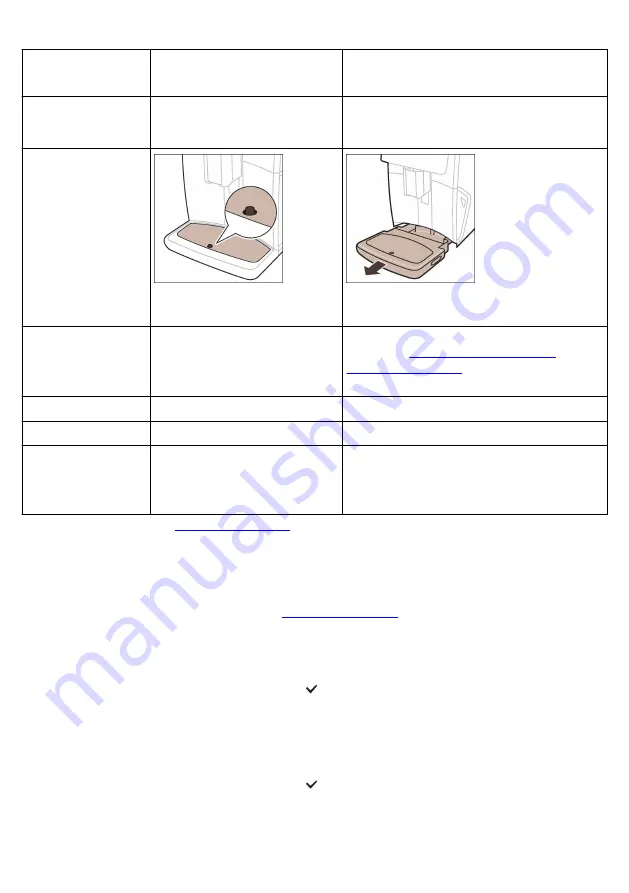
Drip tray

Empty

the drip

tray daily

or as

soon

as the

red 'drip

tray full'

indicator

pops up through the drip tray.

Clean the drip tray weekly

Remove the drip tray

and rinse it under

the tap with some

washing-up liquid.

Lubrication of the

brew group

Every 2 months

Lubricate the brew group with the by-packed

grease (see 

Lubricating the brew group

). Go to

www.saeco.com/care

for detailed video instructions.

Water tank

Weekly

Rinse the water tank under the tap.

Machine front

Weekly

Clean with a non-abrasive cloth.

Descaling of the

machine

When the machine asks you to

descale

STATUS -> DESCALING. Follow the steps

to descale the machine. When descaling is

needed, the machine asks you to descale it,

press the OK icon to start and follow the steps.

www.saeco.com/care

Cleaning the brew group

Regular cleaning of the brew group prevents coffee residues from clogging up

the internal circuits. Go to the 'Status' menu on the screen and select 'Brew

group clean' or visit 

www.saeco.com/care

 for support videos on how to remove,

insert and clean the brew group.

Cleaning the brew group under the tap

1

Tap the 'Status' icon and scroll to select 'Brew group clean'.

1
2

Tap the confirmation   icon to confirm and then follow the instructions on

2

the screen.

Cleaning the brew group with the coffee oil remover tablets

Only use Philips coffee oil remover tablets.

1

Tap the 'Status' icon and scroll to select 'Brew group clean'.

1
2

Tap the confirmation   icon to confirm and then follow the instructions on

2

the screen.

     21

Summary of Contents for SM8780

Page 1: ......

Page 2: ......

Page 3: ......

Page 4: ......

Page 5: ...uring spoon A31 Water hardness test strip Control panel There are two versions of this espresso machine Their control panels look different but all icons work the same way Refer to figures B and C for...

Page 6: ...is SUPREMA SM8885 SM8889 only Switch on the machine by pressing the main switch on the back of the machine Touch the center of the control panel to make the on icon appear on the screen Tap the on ico...

Page 7: ...is switched on and off via voice control and when the machine has been inactive for a while and switches off Please make sure that the environment of the machine is safe Special functions Special fun...

Page 8: ...to enter the Drinks menu Swipe from left to right to 3 select your drink by tapping on it Tap the 2x icon if you want to brew two cups The machine automatically carries out two grinding cycles in sequ...

Page 9: ...p icon at any time to start brewing the selected drink 7 For specific drinks the machine first dispenses milk and then coffee For a number of other drinks this is the other way around the machine will...

Page 10: ...and select your drink 2 3 Tap the pre ground coffee icon 3 4 You can adjust the settings to your preference by swiping the adjustable bars 4 up and down 5 Press the start stop icon to start brewing t...

Page 11: ...beans with the BeanMaestro function With BeanMaestro you are able to select the type and roast of your beans It then optimizes the brewing settings automatically to get the best out of your coffee bea...

Page 12: ...feeEqualizer Touch function you can adjust the following settings 1 Aroma strength 1 2 Coffee quantity 2 3 Milk quantity 3 4 Water quantity 4 5 Drink temperature 5 6 Foam amount 6 7 Coffee flavor 7 8...

Page 13: ...e bar up to set the strength to the top level and select the 3 ExtraShot function 4 Then press the start stop icon SM8780 SM8782 SM8785 only or press 4 the start icon SM8885 SM8889 only to start brewi...

Page 14: ...3 4 Select the water hardness level The number of red squares selected on the 4 display should be the same as the number of red squares on the test strip 5 When you have set the correct water hardnes...

Page 15: ...etailer or from authorized service centers AquaClean filter status indication The status of the AquaClean filter is always visible in the Status menu as a percentage If the status of the AquaClean fil...

Page 16: ...place the filter but you first need to descale the machine When the AquaClean status indicator drops to 0 or when the machine reminds you to replace the AquaClean filter 1 take out the old AquaClean w...

Page 17: ...achine make sure it is in the correct position 1 Check if the arrow on the yellow cylinder on the side of the brew group is 1 aligned with the black arrow and N If they are not aligned push down the l...

Page 18: ...aning and maintenance keeps your machine in top condition and ensures good tasting coffee for a long time with a steady coffee flow Consult the table below for a detailed description of when and how t...

Page 19: ...k into the machine make sure it is in the correct position The arrow on the yellow cylinder on the side of the brew group has to be aligned with the black arrow and N Monthly STATUS PERFORMANCE COFFEE...

Page 20: ...minds you Remove the HygieSteam container from the machine and remove the HygieSteam cover Clean the HygieSteam container and cover under the tap Pre ground coffee compartment Check the pre ground cof...

Page 21: ...ive cloth Descaling of the machine When the machine asks you to descale STATUS DESCALING Follow the steps to descale the machine When descaling is needed the machine asks you to descale it press the O...

Page 22: ...f grease around the shaft grey part in the bottom of the 2 brew group 3 Apply a thin layer of grease to the guiding rails on both sides 3 Cleaning programs for the internal cappuccinatore The machines...

Page 23: ...the instructions on the screen Deep Milk Clean Perform the Deep Milk Clean procedure with the Philips milk circuit cleaner for a thorough cleaning of the internal milk system Cleaning the internal cap...

Page 24: ...imescale properly Not using the Philips descaler will void your warranty Failure to descale the appliance will also void your warranty You can buy Philips descaler from your local or online retailer o...

Page 25: ...s interrupted before it is completely finished some descaling liquid may remain in the water tank or the water circuit In that case do the following 1 Empty and rinse the water tank thoroughly 1 2 Fil...

Page 26: ...cale the machine if you have not done so for a longer period of time The AquaClean filter was not prepared properly before installation or it is clogged Remove the AquaClean filter and try to brew a c...

Page 27: ...ssential to safeguard your privacy and proper functioning of your coffee machine You can set whether you want to update your machine manually or whether you want it to be done automatically When you h...

Page 28: ...back too fast Remove the coffee grounds container wait at least 5 seconds and then insert it again The machine prompts to empty the coffee grounds container even though the container is not full The...

Page 29: ...machine is performing its self adjustment procedure This procedure is started automatically when you use the machine for the first time when you change to another type of coffee beans or after a long...

Page 30: ...emove the brew group and rinse it under the tap see Cleaning the brew group under the tap The coffee dispensing spout is dirty Clean the coffee dispensing spout and its holes with a pipe cleaner or ne...

Page 31: ...inatore under the tap Rinse all parts under the tap For thorough cleaning use Philips milk circuit cleaner and perform the Deep Milk Clean procedure via the Status and Hygiesteam menu Note that if the...

Page 32: ...e Make sure the water tank is in the correct position remove it and reinsert it into the machine as far as possible The brew group is dirty clogged Rinse the brew group The machine is not placed on a...

Page 33: ...hin range of each other or use a Wi Fi repeater The machine is not able to find the home Wi Fi network The Wi Fi router is not working properly Please make sure that the Wi Fi router is working proper...

Page 34: ...tioned above work Switch the machine off and then on again with the main switch on the back to recheck the Wi Fi connection Technical specifications The manufacturer reserves the right to improve the...

Page 35: ...espresso machines SM8780 SM8782 SM8785 SM8885 and SM8889 are equipped with a Wi Fi module 2 4 GHz 802 11 b g n channels 1 13 Maximum transmitting power 100 mW 20 dBm Wi Fi The machine is a networked...

Page 36: ......

Page 37: ...2021 Koninklijke Philips N V All rights reserved 4219 450 3076 2 12 14 2022 75 recycled paper 75 papier recycl...

Reviews: