EC-SSD2
5
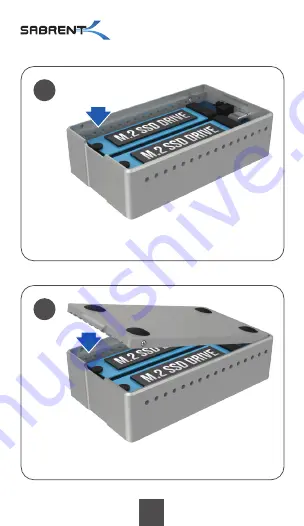
STEP 3
Lower the SSD and carefully push down on the rubberfastener until it goes through the pre-perforated hole in the PCB.
STEP 4
Place the bottom plate back on the enclosure’s slit and pushit down until it clicks into place.
3
4
Page 1: ...EC SSD2 USER MANUAL USB TYPE C USB TYPE A...
Page 2: ......
Page 3: ...your disks from throttling due to high temperature Full aluminum construction for maximum heat dissipation Transfer data up to 10 Gigabits per second Quick release lid for fast access and 100 tool le...
Page 4: ...EC SSD2 2 NOTE NVMe disks NOT included 1 Dual NVMe SSD enclosure 2 USB Type C to USB Type C cable 3 USB Type C to USB Type A cable 4 This user guide 5 AC power adapter 5V 4AMP Required 1 2 3 4 5...
Page 5: ...o use two disks this device will work with only one disk installed WARNING Do not install any disks while the device is powered on or connected to the computer s USB port WARNING Only compatible with...
Page 6: ...g it up from its protruding notch 1 STEP 2 At a 20 degree angle slide the SSD into the M 2 socket until it is properly seated Then place the rubber fastener on the disk s notch The rubber fastener has...
Page 7: ...r the SSD and carefully push down on the rubber fastener until it goes through the pre perforated hole in the PCB STEP 4 Place the bottom plate back on the enclosure s slit and push it down until it c...
Page 8: ...ing function will not work For instance if your source drive the one you want to clone has 256 GB your target drive should at least have 256GB 2 Before cloning disconnect the USB cable from your exter...
Page 9: ...it for 3 seconds The cloning process will begin as soon the progress LEDs start to flash Let go of the button and let the enclosure work 6 Once the LEDs stop flashing and all four of them remain solid...
Page 10: ...at all As you can see in the example below after successfully finishing the cloning process the only drive that is available is the SOURCE DRIVE the target drive is not found under This PC This happen...
Page 11: ...e the target drive goes offline To fix this in Windows 7 or higher please follow the steps below 1 First open up Disk Management To do this click on the Start button type diskmgmt msc and hit the ente...
Page 12: ...10 EC SSD2 3 Once the target drive is back online Windows will assign it a drive letter Notice they will both have the same drive name as you can see below...
Page 13: ...ll be left as unallocated space This means that the operating system will show the newly cloned drive target as having exactly the same amount of partitions and storage capacity as the original source...
Page 14: ...12 EC SSD2 6 This will open up the Extend Volume Wizard welcome screen To continue click on the Next button 5 When the contextual menu appears click on Extend Volume...
Page 15: ...Wizard will automatically default to maximizing the remainder of the unallocated space and assign it to the last available partition Click on the Next button to accept the default behavior or select...
Page 16: ...14 EC SSD2 8 Click on Finish to apply the changes 9 After applying the changes your Disk Management should look similar to the screenshot below...
Page 17: ...ble TO INITIALIZE NEW DISKS 1 Open Disk Management with administrator permissions To do so in the search box on the taskbar type Disk Management select and hold or right click Disk Management then sel...
Page 18: ...ke sure that the correct disk is selected and then click OK to accept the default partition style If you need to change the partition style GPT or MBR you can do it here The disk status briefly change...
Page 19: ...ect Next specify the size of the volume you ll likely want to stick with the default which uses the whole drive and then select Next 6 Specify the drive letter you want to assign to the volume and the...
Page 20: ......