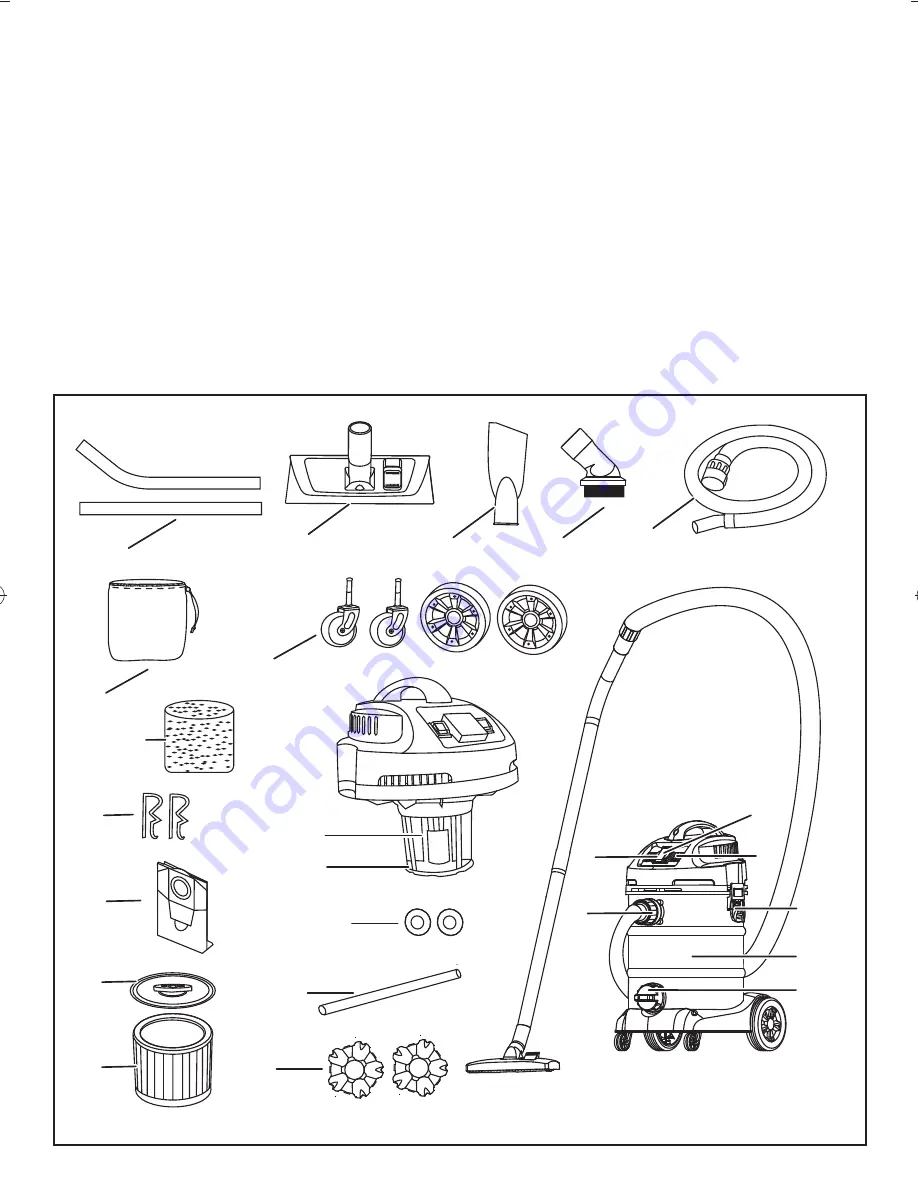
background image

VC30HDA

RG

1.  2 Piece wand
2. Floor tool
3. Crevice tool
4. Round brush
5. Hose set
6. Cloth pre-

fi

 lter

7. Wheels (x4)
8. Foam 

fi

 lter

9.  Lock pins (x2)
10. Dust bag
11. Float switch
12. Filter basket

13. Cartridge 

fi

 lter cap

14. Washable cartridge 

fi

 lter

15. Function switch
16. Connection for the vacuum hose
17. Outlet-socket
18. ON/OFF switch
19. Clamps (x2)
20. Tank
21. Drain outlet
22. Washers (x2)
23. Axle
24. Hub cap

Fig. 1B

8

9

10

6

7

1

2

3

4

5

13

14

15

16

20

21

19

11

12

22

23

24

18

17

Summary of Contents for VC30ARG

Page 1: ...WET DRY VACUUM CLEANER OWNER S OPERATING MANUAL VC30ARG VC30HDARG VC60HDARG VC30HDARG VC60HDARG VC30ARG...

Page 2: ...am filter 9 Screws 10 Blowing port 11 Float switch 12 Filter basket 8 9 13 6 7 1 2 3 4 5 14 15 16 17 19 21 20 22 10 11 12 18 Fig 1A 13 Dust bag 14 Cartridge filter cap 15 Cartridge filter non washable...

Page 3: ...ins x2 10 Dust bag 11 Float switch 12 Filter basket 13 Cartridge filter cap 14 Washable cartridge filter 15 Function switch 16 Connection for the vacuum hose 17 Outlet socket 18 ON OFF switch 19 Clamp...

Page 4: ...et 6 Cloth filter 7 Wheels x4 8 Power tool adaptor 9 Foam filter 10 Lock pins x2 11 Dust bag 12 Accesory bag 13 Float switch 14 Filter basket 15 Cartridge filter cap 16 Washable cartridge filter 17 Fu...

Page 5: ...Fig 2 Fig 4 Fig 5 Fig 3 Fig 6 Fig 7...

Page 6: ...Fig 9 Fig 13 Fig 12 Fig 11 Fig 10 Fig 8...

Page 7: ...Fig 17 Fig 16 Fig 18 Fig 19 Fig 15 Fig 14...

Page 8: ...Fig 21 Fig 22 Fig 24 Fig 25 Fig 23 Fig 20...

Page 9: ...Fig 27 Fig 26...

Page 10: ...Important It is essential that you read the instructions in this manual before operating this machine Subject to technical modifications...

Page 11: ...it is electrically conductive In addition it is possible that it will not be completely filtered out by the filter system of the wet dry vacuum cleaner and can be released into the air via the exhaust...

Page 12: ...e that the dust bag is inserted into the appliance correctly When using the appliance make sure that no hair clothing or members are drawn in Keep the vacuum cleaner away from heat sources such as rad...

Page 13: ...supplied for dry vacuuming See the DRY VACUUM CLEANING section Replace the upper section on the tank See figure 10 Align the upper section with the clamps See figure 11 Hook the clamps into the upper...

Page 14: ...that the ON OFF switch on the appliance is in the OFF position position 0 before you plug the power plug into the receptacle Plug the power plug into the receptacle Switch the motor on ON OFF switch i...

Page 15: ...nd separate the upper section from the tank Remove all the dirt and residue from the tank and the hose Clean the foam filter by washing it with a mild detergent Check the hoses and connections and che...

Page 16: ...Techtronic Industries Australia Pty Ltd Level 1 660 Doncaster Road Doncaster VIC 3108 Australia Techtronic Industries New Zealand Ltd 27 Clemow Drive Mt Wellington Auckland 1060 New Zealand...

Reviews: