Ryobi OCS1830BL Original Instructions Manual Download Page 10

10

RESIDUAL RISKS

Even when the product is used as prescribed, it is still 

impossible to eliminate certain residual risk factors. The 

following hazards may arise during use and the operator 

should pay special attention to avoid the following:


injury caused by vibration


Always use the right tool for the job, use designated 

handles and restrict working time and exposure.


injury caused by exposure to noise


Wear hearing protection and limit exposure.


injury caused by contact with exposed saw teeth of the 

chain (cutting hazards)


injury  caused  by  parts  ejected  from  the  saw  chain 

(cutting/injection hazards)


injury  caused  by  thrown-out  pieces  of  the  workpiece 

(wood chips, splinters)


injury caused by dust and particles


injury to the skin caused by contact with lubricants

RISK REDUCTION

It has been reported that vibrations from hand-held tools 

may contribute to a condition called Raynaud’s Syndrome 

in certain individuals. Symptoms may include tingling, 

numbness, and blanching of the fingers, usually apparent 

upon exposure to cold. Hereditary factors, exposure to 

cold and dampness, diet, smoking, and work practices 

are all thought to contribute to the development of these 

symptoms. There are measures that can be taken by the 

operator to possibly reduce the effects of vibration:


Keep your body warm in cold weather. When operating 

the product, wear gloves to keep the hands and wrists 

warm. It is reported that cold weather is a major factor 

contributing to Raynaud’s Syndrome.


After each period of operation, exercise to increase 

blood circulation.


Take frequent work breaks. Limit the amount of 

exposure per day.


Protective gloves available from professional chainsaw 

retailers are designed specifically for chainsaw use, 

which give protection, good grip, and reduce the effect 

of handle vibration.

If you experience any of the symptoms of this condition, 

immediately discontinue use and see your physician.

 WARNING

Injuries may be caused, or aggravated, by prolonged use 

of the product. When using the product for prolonged 

periods, ensure to take regular breaks.
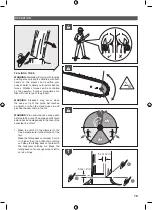
SAFETY DEVICES

Low kickback saw chain

A low-kickback saw chain helpsreduce the possibility of a 

kickback event.
The rakers (depth gauges) ahead of each cutter can 

minimize the force of a kickback reaction by preventing the 

cutters from digging in too deeply. Use only replacement 

guide bar and chain combinations recommended by the 

manufacturer.
As saw chains are sharpened, they lose some of the low 

kickback qualities and extra caution is required. For your 

safety, replace saw chains when cutting performance 

decreases.

Spiked bumper

The integral bumper spike may be used as a pivot when 

making a cut. It helps to keep the body of the chainsaw 

steady while cutting. When cutting, push the machine 

forward until the spikes dig into the edge of the wood, then 

by moving the rear handle up or down in the direction of the 

cutting line it can help ease the physical strain of cutting

Guide bars

Generally, guide bars with small radius tips have somewhat 

lower potential for kickback. Use a guide bar and matching 

chain  that  is  just  long  enough  for  the  job.  Longer  bars 

increase the risk of loss of control during sawing. Regularly 

check the chain tension. When cutting smaller branches 

(less than the full length of the guide bar), the chain is more 

likely to be thrown off if the tension is not correct.

Chain brake

Chain brakes are designed to quickly stop the chain 

rotating. When the chain brake lever is pushed towards the 

bar, the chain should stop immediately. A chain brake does 

not prevent kickback. It only lowers the risk of injury should 

the chain bar contact the operator’s body during a kickback 

event. The chain brake should be tested before each use 

for correct operation in both the run and brake positions.

Chain catcher

A chain catcher prevents the saw chain from being thrown 

back towards the operator if the saw chain comes loose 

or breaks.

WHAT’S IN THE BOX

See pages 12-13.


Chainsaw x 1


Guide bar x 1


Saw chain x 1


Operator’s manual x 1


Guide bar cover x 1


Battery pack x 1(sold separately for OCS1830BL)


Charger x 1 (sold separately for OCS1830BL)

NOTE:

 Chain and bar oil is sold separately.

SYMBOLS ON THE PRODUCT

Safety alert

Read and understand all instructions 

before operating the product. Follow all 

warnings and safety instructions.

Wear eye, ear, and head protection.

Summary of Contents for OCS1830BL

Page 1: ...ORIGINAL INSTRUCTIONS Cordless Chainsaw RCS1830BLX4 OCS1830BL ...

Page 2: ...Important It is essential that you read the instructions in this manual before assembling operating and maintaining the product Subject to technical modification ...

Page 3: ...es Keep children and bystanders away while operating a power tool Distractions can cause you to lose control ELECTRICAL SAFETY Power tool plugs must match the outlet Never modify the plug in any way Do not use any adapter plugs with earthed grounded power tools Unmodified plugs and matching outlets will reduce risk of electric shock Avoid body contact with earthed or grounded surfaces such as pipe...

Page 4: ...ck is not in use keep it away from other metal objects like paper clips coins keys nails screws or other small metal objects that can make a connection from one terminal to another Shorting the battery terminals together may cause burns or a fire Under abusive conditions liquid may be ejected from the battery avoid contact If contact accidentally occurs flush with water If liquid contacts eyes add...

Page 5: ...ppery or unstable surfaces may cause a loss of balance or control of the chainsaw When cutting a limb that is under tension be alert for spring back When the tension in the wood fibres is released the spring loaded limb may strike the operator and or throw the chainsaw out of control Use extreme caution when cutting brush and saplings The slender material may catch the saw chain and be whipped tow...

Page 6: ...rature Check the chain tension frequently Get used to a new chainsaw by making simple cuts on securely supported wood Do this whenever you have not operated the saw for some time To reduce the risk of injury associated with contacting moving parts always stop the product apply the chain brake remove the battery pack and make sure that all moving parts have come to a stop before cleaning or clearin...

Page 7: ...make sure that the chain brake is in RUN position by pulling the chain brake lever toward the front handle 2 Pull the trigger release then press the switch trigger CHECKING AND OPERATING CHAIN BRAKE 1 Engage the chain brake by rotating your left hand around the front handle Allow the back of your hand to push the chain brake lever towards the bar while the chain is rotating rapidly Ensure to maint...

Page 8: ...ional tree surgeons 1 Notching undercut See page 19 20 Make the notch 1 3 the diameter of the tree perpendicular to the direction of falls Make the lower horizontal notching cut first to avoid pinching either the saw chain or the guide bar when the second notch is being made 2 Felling back cut See page 19 20 Make the felling back cut at least 50 mm 2 in higher than the horizontal notching cut Keep...

Page 9: ...o not transport batteries that are cracked or leaking Check with the forwarding company for further advice MAINTENANCE WARNING Use only original manufacturer s replacement parts accessories and attachments Failure to do so can cause possible injury can contribute to poor performance and may void your warranty WARNING Servicing requires extreme care and knowledge and should be performed only by a q...

Page 10: ...ES Low kickback saw chain A low kickback saw chain helpsreduce the possibility of a kickback event The rakers depth gauges ahead of each cutter can minimize the force of a kickback reaction by preventing the cutters from digging in too deeply Use only replacement guide bar and chain combinations recommended by the manufacturer As saw chains are sharpened they lose some of the low kickback qualitie...

Page 11: ...hten the chain Loosen the chain Moving direction of the chain Marked under the sprocket cover Set the chain brake to the RUN position Set the chain brake to the BRAKE position V0 10 m s No load chain speed L max 300mm Maximum guide bar length SYMBOLS IN THIS MANUAL Parts or accessories sold separately Note Warning Wear eye and face protection Wear upper body protection Wear leg protection Stop the...

Page 12: ...12 WHAT S IN THE BOX x 1 x 1 x 1 x 1 x 1 x 1 x 1 RCS1830BLX4 The chain and bar oil is sold separately ...

Page 13: ...13 WHAT S IN THE BOX x 1 x 1 x 1 x 1 x 1 The chain and bar oil battery pack and charger are sold separately OCS1830BL ...

Page 14: ...hain 2 Guide bar 3 Front hand guard Chain brake 4 Front handle 5 Rear handle 6 Chain lubricant cap 7 Guide bar cover 8 Chain catcher 9 Chain tensioner knob 10 Chain tensioner adjustment ring 11 Sprocket cover 12 Switch trigger 13 Trigger release 14 Spiked bumper ...

Page 15: ...clockwise to help align the bolt and hole Turn the chain tensioner clockwise to tighten the chain and keep the guide bar in place Reinstall the sprocket cover Turn the chain tensioner knob clockwise just enough to secure the cover in place 8 Insert the battery pack until the latches click in place WARNING Hold the front handle with the left hand so that the thumb is underneath the handle 6 4 5 5 m...

Page 16: ...16 ...

Page 17: ...17 OVERVIEW Felling a tree Removing buttress roots Bucking a log Limbing a tree Replacing the saw chain p 19 p 20 p 21 p 22 p 23 ...

Page 18: ...18 OVERVIEW Adjusting the chain tension Cleaning the chain brake Transporting the product Storing the product p 26 p 27 p 28 p 29 ...

Page 19: ...en the nose or tip of the guide bar touches an object or when the wood closes in and pinches the saw chain in the cut WARNING Plan and clear an escape path before starting cuts The escape path should extend back and diagonally to the rear of the expected line of fall 1 Make the notch 1 3 the diameter of the tree perpendicular to the direction of the fall Make the felling back cut at least 5 cm 2 i...

Page 20: ...oots WARNING Do not cut through the hinge 2 As the felling gets close to the hinge the tree should begin to fall When the tree begins to fall remove the chainsaw from the cut stop the motor put the chainsaw down then use the retreat path planned Be alert for overhead limbs falling and watch your footing WARNING If there is any chance that the tree may not fall in the intended direction or it may r...

Page 21: ...g on the bottom edge of the bar Always firmly engage the bumper spike to avoid such movement The product can be pushed backwards towards the operator when cutting along the top edge To avoid this make sure that the chain is not jammed when cutting along the top edge NOTE When the log is supported on one end cut 1 3 the diameter from the underside underbuck then make the finished cut by overbucking...

Page 22: ...OTE Leave larger lower limbs to support the log off the ground Remove the small limbs in one cut Branches under tension should be cut from the bottom up to avoid binding the product WARNING Watch out for springpoles they are dangerous Do not attempt to cut bent branches or stumps that are under tension unless you are professionally trained and competent to do so ...

Page 23: ...in tensioner adjustment ring Turn the chain tensioner adjustment ring counterclockwise to loosen the chain tension 3 Turn the chain tensioner knob counterclockwise to loosen the sprocket cover Remove the sprocket cover Remove the bar and saw chain assembly 4 Remove the chain tensioner assembly from the guide bar Dispose of the used bar and chain properly ...

Page 24: ...hole in the attached chain tensioner assembly NOTE Turn the chain tensioner counterclockwise to help align the bolt and hole Turn the chain tensioner clockwise to tighten the chain and keep the guide bar in place 7 Reinstall the inner chain tensioner and sprocket cover Turn the chain tensioner knob clockwise to secure the sprocket cover in place 8 Adjust the chain tension until the gap between the...

Page 25: ...25 OPERATION 9 9 Turn the chain tensioner knob clockwise to lock the chain tensioner adjustment ring and sprocket cover ...

Page 26: ...ment ring 3 Adjust the chain tension until the gap between the drive teeth and the bar is 4 5 5 mm Turn the chain tensioner adjustment ring clockwise to increase the tension Turn the adjustment ring counterclockwise to reduce the tension NOTE Frequently check the chain tension while turning the adjustment ring 4 Turn the chain tensioner knob clockwise to lock the chain tensioner adjustment ring ...

Page 27: ... 1 2 2 1 CLEANING THE CHAIN BRAKE 1 Remove the battery pack 2 Clean the product with a brush Remove as much loose dirt and sawdust from around the chain brake as possible WARNING Do not use water to clean the product ...

Page 28: ...emove the battery pack 2 Engage the chain brake Install the guide bar cover 3 Remove all chain and bar oil from the product 4 Use a trolley to transport the product Secure it against movement or falling to prevent injury to persons or damage to the product 20220309v5d1 ...

Page 29: ... the product 4 Use a trolley to transport the product to the storage location Secure it against movement or falling to prevent injury to persons or damage to the product Store the product in a cool dry and well ventilated place that is inaccessible to children Keep the product away from corrosive agents such as garden chemicals and de icing salts Do not store the product outdoors ...

Page 30: ...e compatible charger is for charging in vehicles with 12 V DC outlets REPLACEMENT PART BAR AND CHAIN Manufacturer OREGON POWERFIT Bar 591057 PCB1245050 Chain 90PX045XTT PWFTCA1201 The chain must be fitted with a bar from the same manufacturer according to the above combinations MAINTENANCE Chainsaw file 5 32 in 4 0 mm VIBRATION LEVEL WARNING The declared vibration total values and the declared noi...

Page 31: ......

Page 32: ...Industries N Z Limited Unit C 70 Business Parade South Highbrook Auckland 2013 New Zealand RYOBI is a trade mark of Ryobi Limited and is used under license OREGON is a registered trade mark of Blount Inc POWERFIT is a trade mark of Techtronic Outdoor Products Technology Limited in ANZ Imported by 961087438 02 ...

Reviews: