background image

15

2009-03

RVR

Energy Technology Experts

Switch off the current to the burner before removing the 
temperature delimiter's casing.

Reset button

1

6

5

3

2

4

Operation and Maintenance 

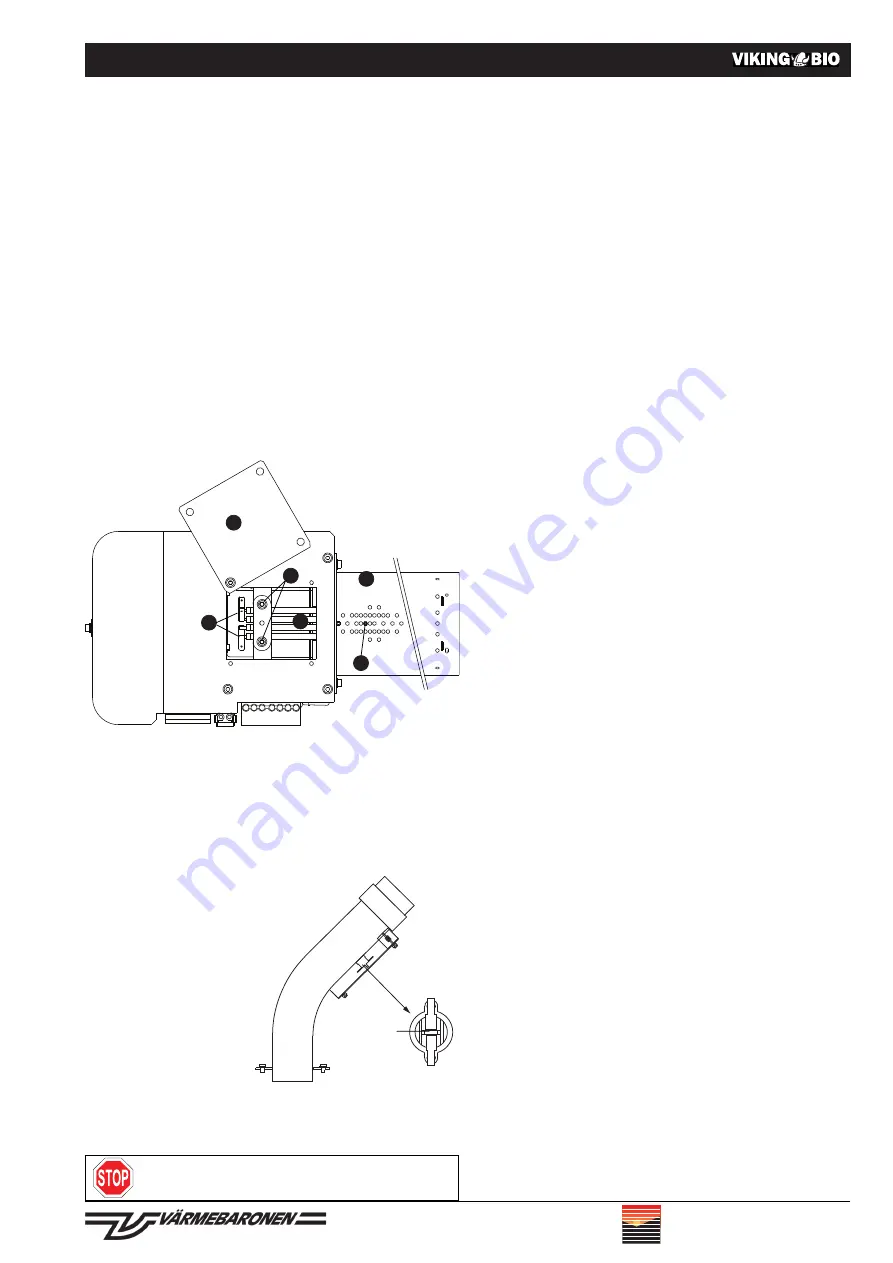
Changing ignition elements

1.  Lid 

4.  Nut for ignition element

2.  Electrical connections 

5.  Ignition element

3.  Hexagon screws 

6.  Inner combustion pipe

A. Remove the burner from the boiler, remove burner cover, 

open quick release fasteners and release combustion pipes 
and fl ange from the burner.

B. Turn the burner, so that there is access to the underside. 

Unscrew the screws holding lid nr. 1.

C. Release the cables on electrical connections nr. 2

D. Release nr. 3 screws and nr 4. nuts. Push the screw upon 

which the nut sat, inwards towards the combustion pipe.

E. Take out the ignition element through the hole; or the elec-

trical connections on the element can be cut away, after 
which the element is drawn out through the combustion 
pipe.

F. Reassemble in reverse order with a new ignition element, 

do not drag nr 4 nut too hard, max 0,5Nm.

Resetting temperature limits

An activated temperature delimiter on the 
downpipe is indicated by the lighting of an 
"ALARM" indicator with a solid bar.
The temperature delimiter has to be 
manually reset before the burner 
can be used again. Investigate 
and correct the reason that 
the temperature delimiter was 
activated.

In order to reset the temper-
ature delimiter, the burner 
must fi rst be deactivated. 
Then the temperature 
delimiter's casing on the 
downpipe has to be removed. Resetting is done by activating 
the button on the temperature delimiter. Remount the casing 
and restart the burner.

Summary of Contents for Varmebaronen Viking BIO

Page 1: ...tion operation and maintenance Issue 018 2 2009 03 346000 RVR Energy Technology Experts RVR Energy Technology Limited t FONBSF P FSSZ SFMBOE èðéð ëéë èèë ROI t èêè ëêðï èéëè UK t ëíë îì îîìéëìì INT XXX SWS JF t XXX SWS DP VL ...

Page 2: ... time Efficiency savings Pellet class Handling and storage of pellets Checking the screw feeder s capacity Soot residue Cleaning the burner Ash and soot Placement of fire grate Safety system Changing ignition elements Resetting temperature limits Troubleshooting 16 Component specifications 17 Accessories Key to symbols means less than means less than or the equivalent to means greater than means grea...

Page 3: ...g type of boiler or poor draught conditions the burn er monitors back pressure con ditions in the boiler and closes down or will not start where back pressure is too great The burner s safety system also features a flame monitor and fan control Different operational modes can be chosen one step modu lating or boiler temperature control via the burner There is also a start delay feature which extend...

Page 4: ...m below If the depth measurement of 150 mm cannot be obtained it is possible to build out the burner from the hatch alternatively more packing can be used between the hatch and burner The distance to the bottom of the boiler should be deep enough that there is enough space for a week s build up of ash in winter conditions The greatest amount of ash collects in the deepest part of the boiler Assemb...

Page 5: ...ellet supply The supply unit is designed so as to restrict the emergence of too much dust and shavings in the burner room during filling It must be covered by a non inflammable material perhaps sheet metal or plasterboard It must be possible to remove the screw feeder without first having to empty the supply unit The amount corresponding to a week s supply depends on the heat requirements in the home...

Page 6: ...double bond epoxy resin It is important that the indicator has good thermal con tact so that temperature regulation is both accurate and stable In the Värmebaronen Star heat exchanging boiler the tempera ture indicator is placed in the pocket tube which can be found on the left hand side behind the foldable automatics cabinet Electrical connections This page shows how to install electrical connect...

Page 7: ...ng electrical configuration 1 Circuit breaker and thermostat must be in the 0 position 2 Set the circuit breaker in the I position all indicators on the burner should come on for a short period after which only RUNNING should be lit 3 Turn up the thermostat so that the heating is activated the LOW indicator should be flashing If this does not happen the configuration should be checked Electrical cabl...

Page 8: ... Connection tool for boiler temperature indicator 5 Boiler temperature indicator accessory 6 Connection tool for feeder screw PLEASE NOTE 230V 7 Ignition element 8 Current transformer 9 Transformer for feed to circuit board and fan motor 10 Semi conductor relay with indicators for control of igni tion element 11 Fan motor 12 Flame monitor photocell 13 Connection tool for temperature delimiter on d...

Page 9: ...lysis instrument The adjustment handle has a screwdriver thread In order to avoid damaging this when adjusting the handle should be turned using the screwdriver provided or by hand 15 Alarm relay with indicators 16 Relay with indicators for feeder screw 17 Running indicator green Light constant current supply to the burner Slow flashing 30 minutes start delay 18 Output indicator green Light constan...

Page 10: ...t 300 ppm Boiler temperature 75 80 C CO2 content substance 12 5 2 1 Dependent on type of flue2 2 5 Check before first start up Before the burner is put into use please check that the installation has been carried out properly the slope on the screw is 40 all control units have been properly adjusted the boiler is in proper functioning order the burner is receiving sufficient air for combustion pellet...

Page 11: ...sted using the boilers flue gas damper In certain circumstances the draught can be difficult to set correctly Flue air flow affects the time it takes for the burner to ignite The prevailing conditions are input with switch SW2 2 see point 23 on page 9 Please see also the section The flue and the contraflow hatch on page 10 Switch SW2 2 OFF Normal position draught 0 to 15 Pa ON High draught draught 15 t...

Page 12: ...tages so as to establish a stable bed of embers on the grate Pellets are fed in The screw runs approx a quarter turn for each feed Pause time depends on output setting If the flame disappears during this phase the controls switch to the start phase but no pellets are fed in Operation Fan speed is determined by output setting The OUTPUT indicator gives a fixed or flashing light depending on the operat...

Page 13: ... the boiler s flue gas damper should be closed when burning with pellets is not undertaken Be careful when closing your pellet unit as spring arrives and do not start it up again until it is absolutely necessary Efficiency savings Proper care of the unit and regular adjustments will ensure re duced fuel consumption for all those who make the effort Where the heating requirements on a cold winter s d...

Page 14: ...en the flue gas temperature has risen by approx 50 C in comparison to when the pan was first cleaned of soot A useful aid for emptying the boiler and burner of ash is an ash box which is attached to a normal vacuum cleaner Cleaning the burner For optimum function the burner should be regularly cleaned at the same time as the boiler is de sooted the ash which is inside the the burner s inner combusti...

Page 15: ...ards towards the combustion pipe E Take out the ignition element through the hole or the elec trical connections on the element can be cut away after which the element is drawn out through the combustion pipe F Reassemble in reverse order with a new ignition element do not drag nr 4 nut too hard max 0 5Nm Resetting temperature limits An activated temperature delimiter on the downpipe is indicated ...

Page 16: ...verpressure in burner can only arise at the start Continual flashing Start element not working All indicators are flashing Probable cause Remounted flue Too much ash and soot in burner and burner chamber Draught too great or area in waste gas flue too large No feeding of pellets to the burner Too much ash in grate Photocell smudged worn Too much ash and soot in burner and burner chamber High ambie...

Page 17: ...gon screws S6SS M8x14 FZB 1 10 05 20 Hook screw 1 24 04 81 Tube clip 2 39 02 58 Polyurethane tube 1 44 00 60 Chain cable 1 44 00 61 Fire snap hook 1 44 00 96 Mounting 1 50 00 01 Motor with gear transmission 1 Accessories Boiler temperature indicator temperature controlled via the burner Art nr 3310 Mounting plate 300 x 300 mm with viewfinder Viking BIO Art nr 3320 Conversion unit large wooden inse...

Page 18: ...re not binding in detail All offers and sales are subject to the Company s current terms and conditions of sale which are available on www rvr ie E OE RVR Energy Technology Experts RVR Energy Technology Limited t FONBSF P FSSZ SFMBOE èðéð ëéë èèë ROI t èêè ëêðï èéëè UK t ëíë îì îîìéëìì INT XXX SWS JF t XXX SWS DP VL ...

Reviews: