

INSTALLATION
OPERATION
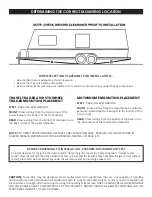
STEP 1:
Park RV on level ground. Prevent wheels from rolling by activating emergency brake and/or by using tire
chocks.
STEP 2
: BEFORE PROCEEDING TO INSTALLATION - PERFORM THIS IMPORTANT TEST
To insure clearance for the jack in the closed position, clamp the jack to the vehicle frame using two “C” clamps or
Vise Grips™. Close the jack with the crank handle and check to insure that the location chosen will allow the jack to
close without coming into contact with or obstruct any under chassis components (ie: plumbing, exhaust, etc.)
- Open the jack until it touches the ground. Recheck location and adjust as needed.
- Once in place, apply enough pressure so jack cannot move during installation procedure. Remove clamps or Vise
Grips™.
BOLT-ON INSTALLATION
WARNING:
BEFORE DRILLING HOLES, BE SURE THE DRILL
WILL NOT DAMAGE UNDER CHASSIS COMPONENTS
WHICH MAY BE ROUTED INSIDE VEHICLE FRAME (ie:
electrical, gas, water, generator fuel lines, holding tank
plumbing, water heater).
Refer to
STEP 1
and
STEP 2
above.
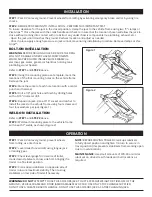
STEP 3:
Using the mounting plate as a template, mark the
locations of the four mounting holes on the vehicle frame.
Remove the jack.
STEP 4:
Mark the center of each hole location with a center
punch and hammer.
STEP 5:
Drill a 1/8” pilot hole and finish by drilling holes
with a 5/16” diameter drill.
STEP 6:
Reposition jack. Use a 9/16” socket and ratchet to
install the jacks to the vehicle frame using four screws and
four lock washers per jack (Figure 1).
WELD-ON INSTALLATION
Refer to
STEP 1
and
STEP 2
above.
STEP 3:
Weld each mounting plate to the vehicle frame
with 4 each 1” welds, as shown (Figure 2).
STEP 1:
Park RV on level ground, prevent wheels
from rolling, use tire chocks.
STEP 2:
Level trailer fore and aft using tongue jack
or landing gear.
STEP 3:
Check level gauge for low side of trailer,
crank down stabilizers on low side first, bringing the
trailer to a fine level position.
STEP 4:
Crank down stabilizers on opposite side of
trailer to insure maximum stability. Then re-snug
stabilizers on low side of trailer if necessary.
NOTE:
BEFORE MOVING TRAILER: Crank up stabilizers
to fully closed position and tighten 1/4 turn to secure in
travel position (this prevents stabilizers from working open
due to road vibration).
MAINTENANCE:
Use small amounts of WD-40 or similar
lubricant on drive screw threads and bolt locations as
required.
Figure 1
Figure 2
WARNING:
DO NOT
ATTEMPT TO USE THIS SCISSORS JACK TO LIFT EXCESSIVE WEIGHT OR TIRES OFF OF THE
GROUND - VEHICLE FRAME AND DOOR JAMB DAMAGE MAY OCCUR. USE ONLY STOCK HANDLE SUPPLIED.
DO NOT USE A CHEATER BAR ON HANDLE. DO NOT USE THIS SCISSORS JACK AS A TIRE CHANGING JACK.


