background image

4

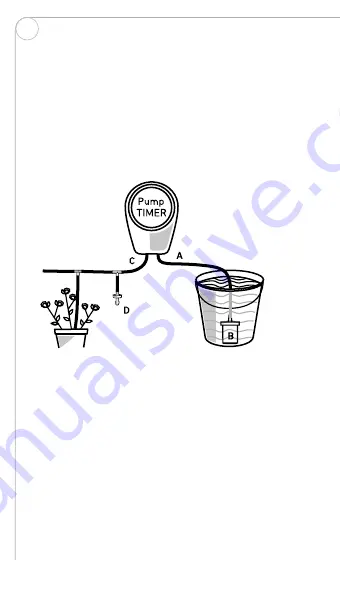
INSTALLERE PUMPEN
1.  Install 3xAA batteries in the opening on the rear of the 

pump.

2.  Cut the supplied hose in two. Adapt the lengths as required.
3.  Connect the hose to the pump inlet (A). Place the filter (B) in 

the opposite end of the hose.

4.  Connect the hose to the pump outlet (A). Ensure that the 

outlet ends are connected to the T-coupling’s anti-siphon 
connector (D). The anti-syphon connector (D) is mounted on 
the T-coupling.

•  To store water and prevent wastage, the pump is equipped 

with an anti-syphon system. This means that the water 
stops flowing once the watering cycle is over. The anti-
syphon (D) must initially be connected facing the plants.

•  The filter (B) protects your installation if there are 

impurities in your water storage. The filter has to be placed 
at the bottom of the water storage.

SETTING THE PROGRAM
•  FREQUENCY is used to set and adjust the frequency 

between watering sessions (every morning at 08:00 means 
24-hour frequency).

•  RUN TIME sets and adjusts the length of each watering 

session.
PLEASE NOTE! FREQUENCY must be longer than RUN 
TIME, otherwise the setting will not work.

ENG

Summary of Contents for 624013440101

Page 1: ...k timer med pump Automatisk tidsur med pumpe Automatische Zeitschaltuhr mit Pumpe Automaattinen ajastin ja pumppu Manual Bruksanvisning Gebrauchsanweisung K ytt ohje Item no 624013440101 Automatic tim...

Page 2: ...oller with a built in pump The watering FREQUENCY can be set from 1h to 7 days RUN TIME or watering time can be set from 1 min to 120 min This is an ideal automatic irrigation system for up to 10 pot...

Page 3: ...ter x 1 Joint coupling x 1 T coupling x 1 TECHNICAL DATA Working voltage 3XAA alkaline battery 4 5V Working current 500mA Standby current 100 A Max distance from water source to point of irrigation 10...

Page 4: ...ent wastage the pump is equipped with an anti syphon system This means that the water stops flowing once the watering cycle is over The anti syphon D must initially be connected facing the plants The...

Page 5: ...per day and start watering at 18 00 1 Set FREQUENCY to 1 hour 2 Set RUN TIME to 5 min 3 Press and hold the DELAY button for at least 2 seconds until the LED button starts flashing 4 Release the DELAY...

Page 6: ...ingsfrekvensen FREQUENCY kan st llas in fr n 1 timme till 7 dagar Vattningstiden RUN TIME kan st llas in fr n 1 minut till 120 minuter Detta r ett idealiskt automatiskt bevattningssystem f r upp till...

Page 7: ...x 1 Filter x 1 Skarvkoppling x 1 T koppling x 1 TEKNISKA DATA Arbetssp nning 3 x AA batterier 4 5V Arbetsstr m 500mA Standby str m 100 A Maxavst nd fr n vattenk lla till bevattningspunkt 10m Fl deshas...

Page 8: ...indra spill r pumpen f rsedd med antisifonsystem D Detta inneb r att vattnet slutar rinna efter att bevattningscykeln r ver Antisifonen D m ste initialt kopplas in v nd mot v xterna Filtret B skyddar...

Page 9: ...me 2 St ll RUN TIME p 5 min 3 H ll in DELAY knappen i minst 2 sekunder tills LED knappen b rjar blinka 4 Sl pp DELAY knappen 5 Varje tryck som nu g rs p DELAY knappen motsvarar 1 timmes f rdr jning I...

Page 10: ...innebygd pumpe Vanningsfrekvensen FREQUENCY kan stilles inn fra 1 time til 7 dager Vanningstiden RUN TIME kan stilles inn fra 1min til 120 min Dette er et ideelt automatisk vanningssystem for opp til...

Page 11: ...1 Filter x 1 Spleisekobling x 1 T kobling x 1 TEKNISKE DATA Driftsspenning 3xAA batterier 4 5V Arbeidsstr m 500mA Standbystr m 100 A Maks avstand fra vannkikden til vanningspunktet 10m Str mningshasti...

Page 12: ...p vann og forhindre s l er pumpen utstyrt med antihevertsystem Dette betyr at vannet slutter renne etter at vanningssyklusen er ferdig Antihevertkontakten D m f rst kobles inn vendt mot plantene Filte...

Page 13: ...e kl 18 00 1 Still inn FREQUENCY til 1 time 2 Still inn RUN TIME til 5 min 3 Hold inne DELAY knappen i minst 2 sekunder til LED knappen begynner blinke 4 Slipp DELAY knappen 5 Hvert trykk du n gj r p...

Page 14: ...RWQUENCY kann von 1 Stunde bis 7 Tage eingestellt werden Die Bew sserungszeit RUN TIME kann von 1 Minute bis 120 Minuten eingestellt werden Dieses System ist ein ideales automatisches Bew sserungssyst...

Page 15: ...1 Schlauchkupplung x 1 T verbindung x 1 TECHNISCHE DATEN Betriebsspannung 3x AA alkali Batterien 4 5V Betriebsstrom 500mA Ruhestrom 100 A Max Abstand von der Wasser quelle zur Bew sserungsstelle 10m...

Page 16: ...gebracht Um Wasser zu speichern und Verschwendung zu vermeiden ist die Pumpe mit einem berlaufsystem D ausgestattet Dies bedeutet dass das Wasser zu flie en aufh rt nachdem der Bew sserungszyklus vorb...

Page 17: ...EQUENCY auf 1 Stunde 2 Stellen Sie RUN TIME auf 5 Min 3 Dr cken und halten Sie die DELAY Taste mindestens 2 Sekunden bis die LED zu blinken beginnt 4 Lassen Sie die DELAY Taste los 5 Wenn Sie jetzt we...

Page 18: ...lla Kastelutiheys FREQUENCY voidaan asettaa 1 tunnista 7 p iv n Kasteluaika RUN TIME voidaan asettaa 1 minuutista 120 minuuttiin Automaattinen kasteluj rjestelm on ihanteellinen enint n 10 kukkaruukul...

Page 19: ...nt x 1 Suodatin x 1 Jatkoliitin x 1 T liitin x 1 TEKNISET TIEDOT K ytt j nnite 3x AA paristo 4 5V K ytt virta 500mA Valmiusvirta 100 A Vedenl hteen ja kastelupaikan maksimiet isyys 10m Kastelun virtau...

Page 20: ...laponestoj rjestelm D jolla voidaan s il vett ja est vuodot Se varmistaa ett veden virtaaminen loppuu kun kastelujakso on p ttynyt Laponesto D on aluksi liitett v kasveja kohti Suodatin B suojaa laite...

Page 21: ...QUENCY s din 1 tuntiin 2 Aseta RUN TIME s din 5 minuuttiin 3 Pid DELAY painike painettuna v hint n 2 sekuntia kunnes LED valo alkaa vilkkua 4 Vapauta DELAY painike 5 Jokainen DELAY painikkeen painallu...

Page 22: ...22...

Page 23: ...23...

Page 24: ...by SVERIGE www rusta com customerservice rusta com Rustas kundetjeneste Forbrukerkontakt Hjemmesida E post Rusta Kundetjeneste Box 5064 194 05 Upplands V sby SVERIGE www rusta com customerservice rust...

Reviews: