Russound CA 4.4i Instruction Manual Download Page 13

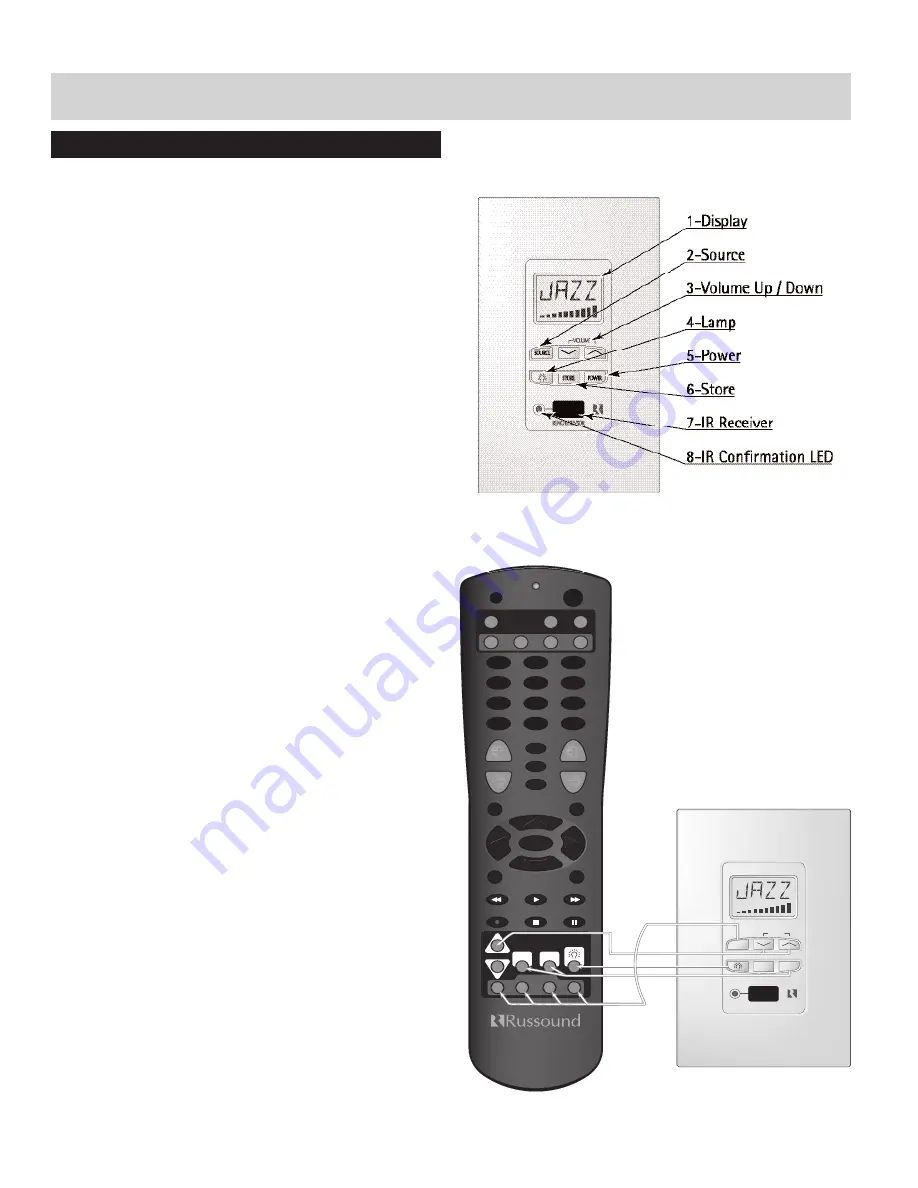
OPERATING THE CA-LCD2 KEYPAD

1)

Display:

The LCD panel displays the name of the source

selected and the volume level. 

2)

Source:

The source button is pressed to select one of the

four sources to listen to. Press the source button until the
desired source is selected. The source will be displayed on
the LCD display panel.

3)

Volume Up / Down:

The UP / DOWN arrows for volume

are used to select the volume level and to select a differ-
ent source name after the store button is pressed. If the
button is pressed and held the volume will ramp up or
down.

4)

Lamp:

The lamp button when pressed and released will

turn on and off the backlight lamp. The backlight color
can be set to amber or green by pressing and holding the
button. The backlight will change from one color to the
other.

5)

Power:

Turn on or off any zone by pressing the power

button on the front of the corresponding keypad.  When
the keypad comes on, it will automatically select the
source that was previously selected and set the volume to
minimum.

6)

Store:

The store function is used to select and store one

of the 23 preset source names for each of the four
sources. Select the source name that you want to change
by selecting source. Press and hold the store button for
approximately 3 seconds, and the display begins to flash.
Immediately press the UP/ DOWN volume buttons to
select the different source names. After you have selected
the name, press the store button again or wait for it to
stop flashing.

7)

IR Receiver:

The IR receiver is used to receive commands

from an IR remote control. Remote controls used for the
source equipment will pass through to the main con-
troller and on to the source equipment. It will receive IR
signals from 38KHz to 56KHz. To control the functions of
the keypad, use the CAi Remote control (see Figure 20).
The CAi remote control will operate the lamp, source
selection, volume up / down and room on / off.  

8)

IR Confirmation LED:

This LED will flash to confirm the

reception of an IR signal from a remote control through
the IR receiver.

Figure 19

- CA-LCD2 Keypad Functions

Figure 20

- CA-LRC1 Remote Control Functions

13

O

PERATION

ON

OFF

VOL

CA-LCD

SOURCE SELECT

SOURCE

CONTROL

MUTE

LAST

SLEEP

INFO

MENU

INPUT

ENTER

1

2

3

4

5

6

7

8

9

0

GUIDE

EXIT

SELECT

PWR

SETUP

VOL

CH

1

2

3

4

CBL

VCR

TV

1

2

3

4

REMOTE SENSOR

VOLUME

SOURCE

STORE

POWER

CAi-Series manual  10/17/02  11:01 AM  Page 13

Summary of Contents for CA 4.4i

Page 1: ...ler Amplifier 1 2 3 4 5 6 ZONE REMOTE SENSOR ON OFF VOLUME SOURCE R B CHILDRENS ROCK JAZZ REMOTE SENSOR VOLUME SOURCE STORE POWER CA4 4i 4 Zone 4 Source Central Controller Amplifier POWER 1 2 3 4 ZONE...

Page 2: ...ces The appliance should be connected to a power supply only of the type described in the operating instructions or as marked on the appliance 11 Grounding or Polarization The precautions that should...

Page 3: ...nnecting the Infrared Components 7 Connecting the IR Link 7 Keypad Connections at Controller 8 Wiring at the Controller 8 Clean Installations 8 Installing Keypads 9 Punchdown Terminals 9 Installing th...

Page 4: ...bility and Quality are the primary objectives Russound products are guar anteed to provide years of enjoyment The CAi conforms to UL and CSA safety specifications POSSIBLE SYSTEM CONFIGURATIONS PRODUC...

Page 5: ...onnectors If you have problems or you are not absolutely comfortable with what you are doing consult a professional carpenter electrician or system installer BASIC PLANNING AND LAYOUT CONSIDERATIONS W...

Page 6: ...______ Zone 3 ________________ Zone 4 ________________ REAR PANEL CONNECTIONS 1 R L 2 1 R L 2 3 4 CA6 4i NEWMARKET NH U S A 110VAC 220 240VAC 50 60Hz 400W VOLTAGE 110V 220 240V FUSE F4A F2A KEYPAD POR...

Page 7: ...gh a 1 8 male mini plug The tip is and the sleeve is 12VDC When more than one CAi is used connect the MUTE OUT of the first CAi to the MUTE IN of the second CAi Figure 7 DIM 1 Doorbell Interface Modul...

Page 8: ...s from the Wall Plate KEYPAD CONNECTIONS AT CONTROLLER KEYPAD PORTS 1 2 3 4 1 2 3 4 5 6 7 8 CAT 5 Cable RJ 45 using T568A Wiring Standard Each keypad connection on the back panel of the CAi Series Mas...

Page 9: ...and saw If you are installing the optional DSC keypad you will need to use a double gang electrical box If you are installing both the optional DSC and DAN keypad you will need to install a triple gan...

Page 10: ...grammer is compatible with DAN and DSC IR Keypads which have a 5 pin programming port located at the top left of the keypad Refer to IKP 1 Instruction Manual for complete instructions 1 Loads IR code...

Page 11: ...using the optional SRM 2 1 speaker relay module wire the terminals of the CA LCD2 to the SRM 2 1 terminals Figure 16 SRM 2 1 connection to CA LCD2 Refer to the SRM 2 1 Instruction Manual for complete...

Page 12: ...on the keypad will also illuminate to verify the zone is now on Note The CAi front panel zone management lights also informs you which zones are On or Off 2 Volume Up Down Once the unit is on the kno...

Page 13: ...ne of the 23 preset source names for each of the four sources Select the source name that you want to change by selecting source Press and hold the store button for approximately 3 seconds and the dis...

Page 14: ...device may have been activated Please take the following steps to troubleshoot the system 1 Turn off the power switch on the front of the CAi Series controller 2 Disconnect all keypad connections fro...

Page 15: ...n transit TROUBLESHOOTING WARRANTY COMBINING ADDITIONAL IR RECEIVERS When combining a CAi Series multi source controller and a secondary IR system together it needs to be done after the CAi System The...

Page 16: ...A V D I S T R I B U T I O N C O N T R O L S Y S T E M S 5 Forbes Rd Newmarket NH 03857 603 659 5170 Fax 603 659 5388 e mail tech russound com Come visit us at 28 0106...

Reviews: