7
Russound ALTx-2 Installation Manual
Rev. 2
INSTALLATION
Wiring Instructions (continued)
If using ALTx-2s with a resistor-based speaker selector, place selector in Bypass mode and match
number of speakers with ALTx-2 settings (see page 4).
If using ALTx-2s with an autoformer-based selector, set selector for number of speakers and set
ALTx-2 at 1X setting.
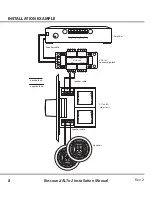
Connect the speaker cable from the amplifier’s outputs to the ALTx-2’s 4-pole screw
1.
down Input connector. Keep polarity (+ or -) and identification (L or R) consistent.
CAUTION: Do not reverse the Input and Output connections!!
Connect the speaker cable from the ALTx-2’s 4-pole screw down Output connector to a pair of
2.
speakers. Keep polarity (+ or -) and identification (L or R) consistent.
Install the completed assembly in the junction box. Insert carefully to avoid excessive strain
3.
on the connector. Taking the time to feed the excess wire out the back of the junction box will
help you with the final assembly.
Operation
Turn the amplifier/receiver OFF and set its volume to minimum.
1.
Set all the ALTx-2 volume controls to maximum (fully clockwise).
2.
Turn on the amp/receiver and select a music source (e.g., tuner or CD player).
3.
Slowly turn up the amplifier/receiver volume to the maximum desired listening level, and
4.
leave the amp/receiver set at that level. If the sound becomes muddy or distorted, the level
has reached the amplifier’s volume capability limit. Quickly reduce the volume to avoid
damaging the speakers. Never turn the receiver up beyond the comfortable listening level,
usually no more than 50%. NOTE: An amplifier driven beyond its limit will produce D/C
voltage (clipping) resulting in improper signal transfer and possible amplifier shutdown or
damage.
Adjust the volume of the speakers to the desired listening level using the ALTx-2.
5.
Turn off the speakers in each room by turning the knob on the ALTx-2 completely counter-
6.
clockwise.

