background image


4.2


Configuring the Fatigue Sensor 

4.2.1


Configuration via the Enable IO Button 

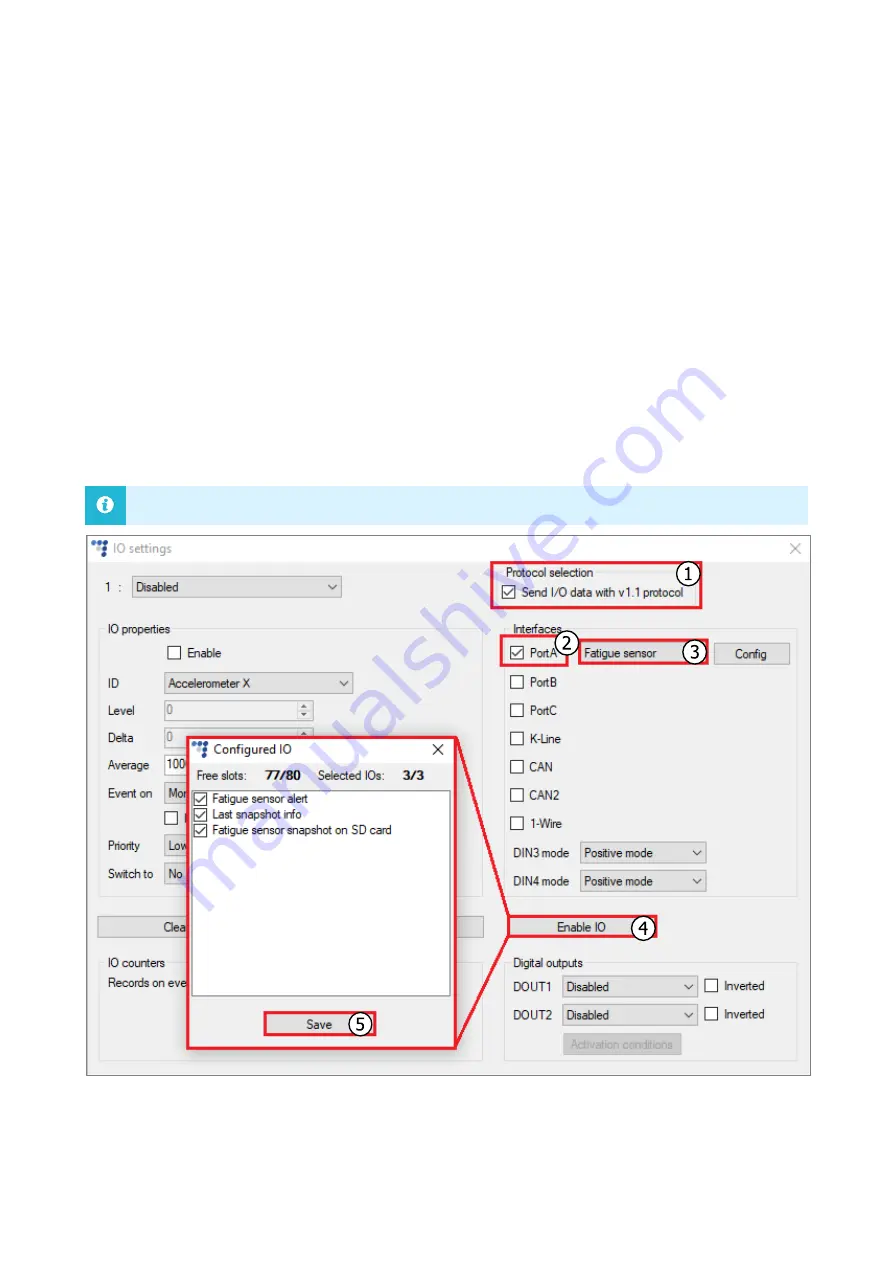
Follow these steps to configure the fatigue sensor: 

1.


Tick  the 

Send  I/O  data  with  v1.1  protocol 

checkbox  (not  applicable  for  the  5

th

  gen 

Advanced family devices). 

2.


In the 

Interfaces 

section select the port, to which the fatigue sensor is connected (

PortA 

or 

PortB)

.  

3.


Select 

Fatigue sensor 

from the drop-down list.  

4.


Click the 

Enable IO 

button to open the 

Configured IO

 window. 

5.


Untick any IO parameter box according to your needs. Click the 

Save 

button. 


It is recommended to keep all of the IO parameters boxes checked.


Summary of Contents for Fatigue Sensor

Page 1: ... with the latest firmware version You can get the newest firmware and configurator from our documentation website doc ruptela lt 1 2 Legal Information Copyright 2020 Ruptela All rights reserved Reproduction transfer distribution or storage of parts or all of the contents in this document in any form without the prior written permission of Ruptela is prohibited Other products and company names ment...

Page 2: ... 2 0 2020 07 Updated Connection schematics Updated Compatible devices list Updated Manual design and construction 1 6 Notations The following notations are used in this document to highlight important information Bold text Used to indicate user interface elements or for emphasis Italic text Used to indicate items that belong to a list and can be selected Note Used to highlight important informatio...

Page 3: ...r or GSM operator pictures cannot be taken or sent to the server 2 2 Picture Storage If the tracking device has an SD card the pictures will be stored in the card and sent to a server upon request If the fatigue sensor folder on the SD card is full the oldest picture will be overwritten If the folder is full and there are no pictures on the card the taken picture will be discarded After receiving ...

Page 4: ...en Advanced Family Devices Connect the fatigue sensor to your tracking device as follows Port A is used in this schematic Alternatively TX and RX wires can be connected to Port B 16 pin connector pin 3 and 11 pink green wire red cyan wires ...

Page 5: ... Advanced Family devices Connect the fatigue sensor to your tracking device as follows Port A is used in this schematic Alternatively TX and RX wires can be connected to Port B 14 pin connector pin 3 and 1 orange and yellow wires ...

Page 6: ...Starting the Configuration To start the configuration follow these steps 1 Open the advanced configurator Select your tracking device 2 Select the COM port to which your device is connected 3 Click Connect 4 Click the Options button in the IO events section to open the IO Settings window ...

Page 7: ...cable for the 5th gen Advanced family devices 2 In the Interfaces section select the port to which the fatigue sensor is connected PortA or PortB 3 Select Fatigue sensor from the drop down list 4 Click the Enable IO button to open the Configured IO window 5 Untick any IO parameter box according to your needs Click the Save button It is recommended to keep all of the IO parameters boxes checked ...

Page 8: ...select the port to which the fatigue sensor is connected PortA or PortB 3 Select Fatigue sensor from the drop down list 4 Select an empty parameter slot 5 Enable the slot by ticking Enable 6 In the ID section select Fatigue sensor alert from the drop down list 7 Set Event on to Monitoring or Change 8 Repeat steps 4 7 with the Fatigue sensor snapshot on SD card or and Last snapshot info selections ...

Page 9: ...larm to activate Default value 5 km h Range 0 255 km h Distraction detection sensitivity Use the slider bar to calibrate the sensitivity of distraction detection Default value 5 No portrait sensitivity Calibration of the sensitivity of portrait detection Default value 15 Range 0 255 Fatigue alarm sensitivity Use the slider bar to calibrate the sensitivity of the fatigue alarm Default value 5 Alarm...

Page 10: ...10 4 3 Finishing the Configuration To finish the configuration close the IO settings window Click Send CFG to send the configuration to the device ...

Page 11: ...cture successfully busy indicates that the fatigue sensor is busy with a previously taken picture at the moment n a indicates that the fatigue sensor is either not configured not connected or not responding fullsd indicates that the memory of the SD card is full and the picture will be discarded as there are no pictures to be overwritten err indicates that there was an error If the SD card is miss...

Reviews: