background image

13

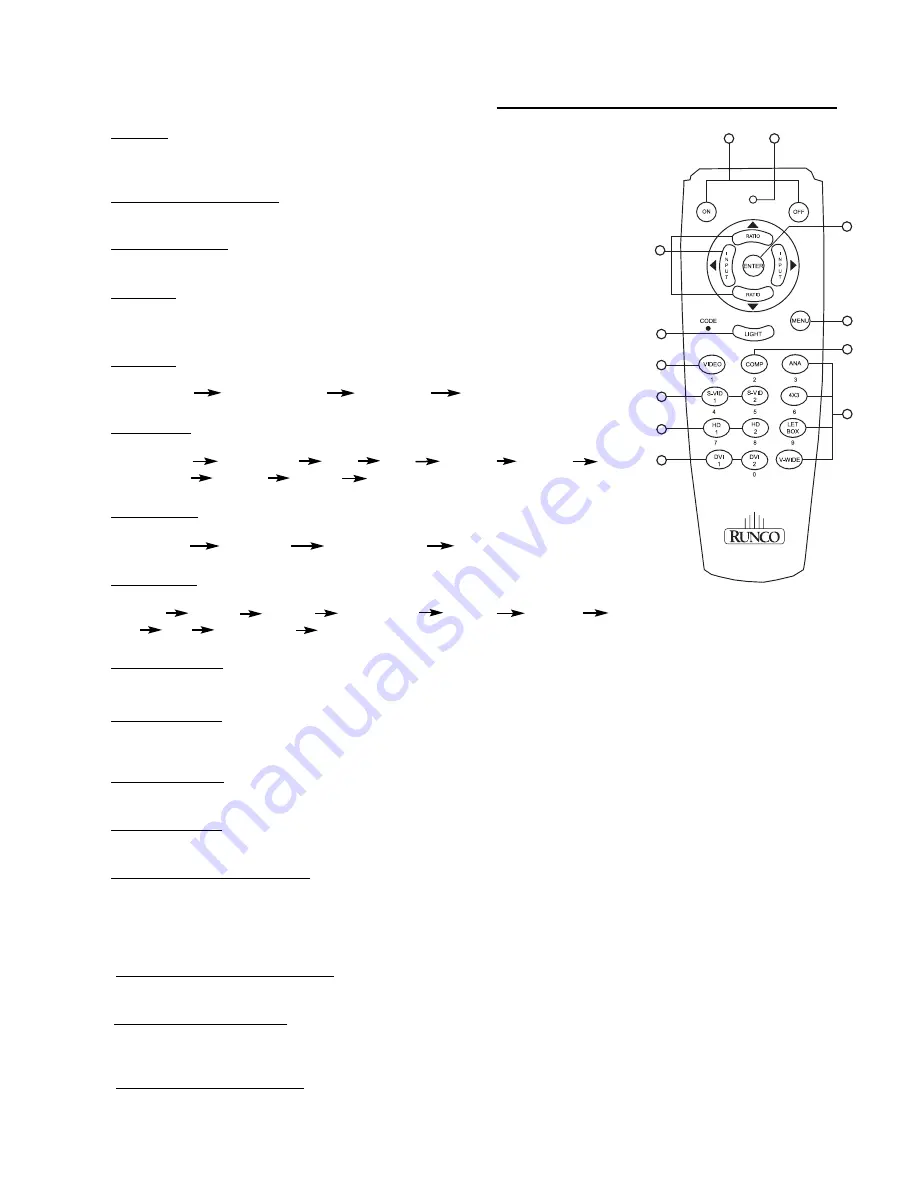
Remote Control Description

(1) ON/OFF

Switches Power ON/OFF.  (This does not operate when POWER/STANDBY indicator of
the main unit is off.)

(2) IR OUTPUT INDICATOR

Illuminates when a button in pressed, indicating that an IR signal is being transmitted.

(3) ENTER BUTTON

When an item is highlighted on a menu, pressing ENTER will select that item. 

(4) CURSOR

(

S

T

W

X

)

Use these buttons to select items or settings and to adjust settings or switch the display
patterns.

UP Button: When no menus are present on-screen, the UP button will toggle through
aspect ratios in the following order:  (RATIO)

Anamorphic          Standard (4:3)          Letterbox           VirtualWide

LEFT Button: When no menus are present on-screen, the LEFT button will toggle
through the different sources in the following order:  (INPUT)

HD Pass Thru 2

HD Pass Thru1

DVI 2

DVI 1

HD/RGB2

HD/RGB 1

Component SD

S-Video 2         S-Video 1         Composite

DOWN Button: When no menus are present on-screen, the RIGHT button will toggle
through the different sources in the following order:  (RATIO)

VirtualWide          Letterbox          Standard (4:3)          Anamorphic

RIGHT Button: When no menus are present on-screen, the RIGHT button will toggle
through the different sources in the following order:  (INPUT)

Composite

S-Video 1         S-Video 2          Component SD          HD/RGB 1           HD/RGB 2

DVI 1         DVI 2         HD Pass Thru 1         HD Pass Thru 2

(5) LIGHT BUTTON

Press this to illuminate the buttons.

(6) MENU BUTTON

Pressing this button will access the OSD controls.  Press this button during the display of the sub-menu to return to the

previous menu.

(7) VIDEO BUTTON

Press this button to select VIDEO (composite video) as the source.

(8) COMP BUTTON

Press this button to select Component SD (480i/576i) input.

(9) DIRECT ACCESS BUTTONS

These red buttons to the right hand-side will allow you direct access to an aspect ratio, or selection of a number in
certain cases.  These buttons are:

ANA - selects Anamorphic aspect ratio  

LETBOX - selects Letterbox aspect ratio

4x3

- selects Standard 4:3 aspect ratio

V-WIDE  - selects VirtualWide aspect ratio

(10) S-VID 1 and S-VID 2 BUTTONS

Press this button to select between S-Video 1 and S-Video 2 inputs.

(11) HD1 and HD2 BUTTONS

Press this button to select between HD1 (High Definition) signal and HD2 signal inputs.  Auto detect component input,     

YPbPr or RGBHV.

(12) DVI 1 and DVI 2 BUTTONS

Press this button to select between DVI1 signal and DVI2 signal input.

11

6

5

10

9

2

3

1

4

7

8

12

Summary of Contents for Reflection VX-1000d

Page 1: ...OWNER S OPERATING MANUAL VX 1000d Projector DHD Video Controller Widescreen Digital Light Processing Projector DHD Video Controller...

Page 2: ...r Mount Configuration 10 DHD Controller Description 11 Front Panel 11 Rear Panel 12 Remote Control Description 13 Quick Set up Guide 14 Connection Example 14 Overall Functional Description 16 Menu Des...

Page 3: ...2...

Page 4: ...eptionally high contrast ratio for high light output and better black level than film The VX 1000d projector system also includes the DHD Digital Controller for convert ing all NTSC or PAL signals to...

Page 5: ...LURE TO OBSERVE THIS WILL RESULT IN PREMATURE LAMP FAILURE PRODUCT DISPOSAL This projector utilizes tin lead solder high intensity discharge lamp HID lamp containing a small amount of mercury Disposal...

Page 6: ...Runco International for service Removing the covers will void the warranty RUNCO PROJECTOR MODEL VX 1000d This device complies with Part 15 of the FCC rules Operation is subject to the following cond...

Page 7: ...failure resulting from accident misuse abuse neglect mishandling misapplication faulty or improper installation or setup adjustments improper maintenance alteration improper use of any input signal d...

Page 8: ...d Service Center If solely in Runco s judgement location of product to be repaired is beyond normal operating distance of the closest Runco Authorized Service Center it is the owner s responsibility t...

Page 9: ...s as well as Projector adjustments such as image configuration Maximum lamp life of approximately 2000 hours An adaptive two dimensional comb filter that greatly reduces artifacts when using Composite...

Page 10: ...D is blue When the lamp is off this LED is off Temp If the Projector has overheated and shut down this will light red Intake Vents This is where cooler air enters the Projector Ensure that it is never...

Page 11: ...alf Screen Length 3 500 Base plate to center of lens 1 645 8 830 10 250 6 546 3 500 NOTE These figures are the same for both ceiling and floor configurations Floor Mount Configuration SCREEN _________...

Page 12: ...o direct select inputs or move the menu cursor Left in the On Screen Display When no menu is present on screen the LEFT button will toggle you through the different sources in the order of HD Pass Thr...

Page 13: ...vice Connect to the projector s DVI inputs INPUTS 3 DVI 1 Digital DVI input 1 HDCP compliant 4 DVI 2 Digital DVI input 2 HDCP compliant 5 HD 1 Analog BNC connectors High Definition input 1 can be RGB...

Page 14: ...us are present on screen the RIGHT button will toggle through the different sources in the following order INPUT Composite S Video 1 S Video 2 Component SD HD RGB 1 HD RGB 2 DVI 1 DVI 2 HD Pass Thru 1...

Page 15: ...shown above are the most common ANALOG INPUTS Composite Video Input Composite video is the most common type of signal used but is also the lowest in picture quality Many sources have outputs that are...

Page 16: ...tor and controller 3 Press MENU and ENTER at the same time this enables service mode 4 Press Up Arrow once display should read SERVICE 5 Press ENTER 6 Press Down Arrow four times display should say DI...

Page 17: ...system s control center the DHD Controller is also a high quality scaler which outputs all signals in the native resolution of the VX 1000d Projector The Composite S Video and Component non progressiv...

Page 18: ...ts menu Press ENTER to receive information about the controller To select a source via the main menu press either the up or down buttons on the remote or front panel and highlight the desired source a...

Page 19: ...adjust them properly To access the picture quality adjustments press MENU and over the cursor down to Picture indicated by the green highlight and press ENTER The picture quality sub menu will then ap...

Page 20: ...r or mute the red and green outputs Adjust COLOR until the outer two tall color bars match the outer short color bars see color bar drawing BRIGHTNESS adjusts the black level of the image To adjust th...

Page 21: ...n Height with the LEFT and RIGHT arrows Press ENTER to allow shifting the Image Position Overscan percentage with the LEFT and RIGHT arrows ISF Presets Indicates selection has been made for the ISF Pr...

Page 22: ...oller is on the wrong source The Controller is on the correct source but the source itself is off A progressive scan DVD is plugged into Component input rather than the RGB Component input Contrast is...

Page 23: ...ontroller or inputs to the Projector are reversed The Pr and Pb inputs on the Component input on the Controller are reversed The Projector will not turn on for two minutes after power down to protect...

Page 24: ...s value Command string format command command value command etc i e COMPOSITE BRIGHTNESS 100 ANAMORPHIC CR NOTE In between commands a comma or space may be used NOTE A carriage return must be used aft...

Page 25: ...lects the standard 4 3 aspect ratio LETTERBOX NA YES Selects the letterbox aspect ratio VIRTUALWIDE NA YES Selects the VirtualWide aspect ratio RGBNN NA YES Outputs color space RGB w negative negative...

Page 26: ...NA NA Returns current aspect ratio INPUT NA NA Returns active input OUTRES NA NA Returns output resolution SERIALNUM NA NA Returns serial number DATE NA NA Returns the date of mfg IVPOS NA NA Returns...

Page 27: ...r Calibration 418 600 ANSI Lumens Foot Lamberts 15 6 22 4 1500 ANSI Lumens Contrast Ratio CSMS Contrast Ratio 211 1 to 229 1 2700 1 to 3300 1 Lamp 250W NSH Lamp Life 2000 hours 6500o Kelvin Inputs 1 R...

Page 28: ...ower Requirements 100 240V AC auto sensing 50 60 Hz 160W Operating Environments 41 95 F 5 35 C 0 90 Humidity non condensing Dimensions Width 17 1 2 in 444 50 mm Depth 11 3 16 in 284 10 mm Height 3 3 4...

Page 29: ...RUMA 010825 rev 9 20 04 ver 2 Runco International 2900 Faber Street Union City CA 94587 ph 510 324 7777 fax 510 324 9300 www runco com...

Reviews: