Ruckus Wireless ZoneDirector 5000 Getting Started Manual Download Page 11

page 11 of 18

Cabling and Powering On the 
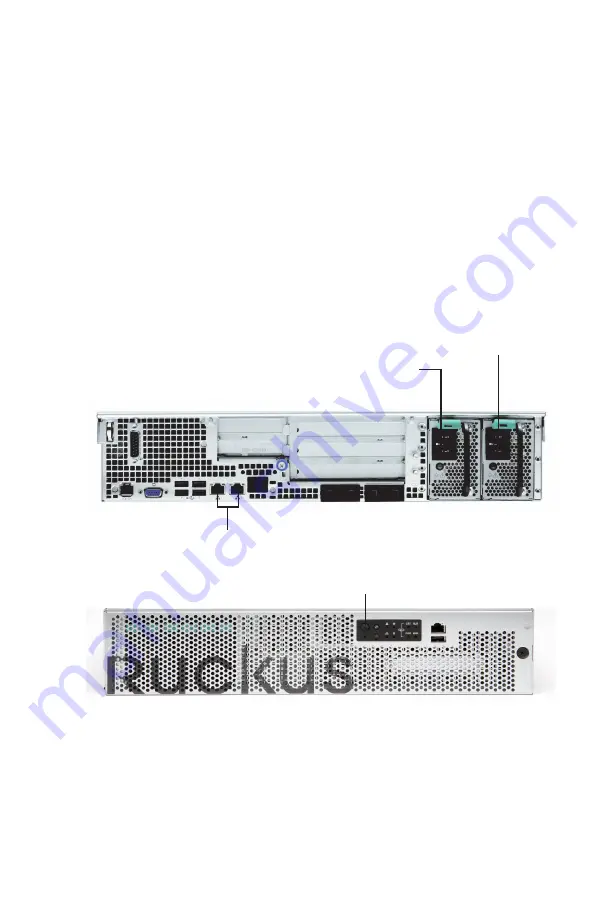
ZoneDirector 5000

Using AC Power

Connect the included AC power cable to the primary power socket (right) on the 

1. 

rear panel. Optionally, connect a second AC power cable to the backup power 
socket (left) on the rear panel.
Connect the other end of the power cable(s) to an electrical outlet.

2. 

Connect one end of an Ethernet cable to one of the RJ45 GbE ports on the rear 

3. 

panel of the ZoneDirector 5000, and connect the other end to an Ethernet port on 
your Admin PC.
Press the Power button on the control panel to power on the ZoneDirector 5000. 

4. 

The MNR LED on the Control Panel lights Amber while booting up, and turns off 
when startup is complete. 

Primary power

Backup power

RJ45 GbE ports

Power button

Summary of Contents for ZoneDirector 5000

Page 1: ...Ruckus WirelessTM ZoneDirectorTM 5000 Getting Started Guide Part Number 800 70310 001 Rev F Published June 2013 www ruckuswireless com...

Page 2: ...e Notes are available at http support ruckuswireless com documents User Guides are available at http support ruckuswireless com documents Software Upgrades are available at http support ruckuswireless...

Page 3: ...cription below 2 RJ45 serial port COM2 serial B 3 USB port not used 4 Front bezel lock Front panel features 1 Number Description 1 ESD ground strap attachment 2 Hard drive bays not used 3 Control pane...

Page 4: ...status LED 4 Fan status LED 5 Critical alarm not used 6 MJR alarm LED not used 7 NMI pin hole button factory reset button 8 Chassis ID button 9 NIC1 NIC2 activity LED 10 HDD activity LED not used 11 P...

Page 5: ...Video connector not used 8 USB 0 and 1 1 on top 9 USB 2 and 3 3 on top 10 GbE NIC 1 connector 11 GbE NIC 2 connector 12 Two ground studs used for DC input system Rear panel features 1 2 3 4 5 6 7 8 9...

Page 6: ...rver rack Unpacking the Rack Mount Kit Unpack your rack mount kit and identify each item Package Contents A complete rack mount installation kit includes all of the items listed below NOTE This kit in...

Page 7: ...de Rails into the Inner and Outer Parts Extend the inner rail see 1 in Figure 2 until it locks 1 Press down the spring safety lock see 2 in Figure 2 to release the inner rail 2 Remove the inner rail f...

Page 8: ...the rack The right rail assembly is identified with a BLUE sticker and the left rail assembly is identified with a GREEN sticker Attach the outer rail slides to the rack posts using two 8 32 x 1 2 scr...

Page 9: ...the inner rails onto the hex head shoulder screws and then slide the inner rails forward Figure 5 Installing the inner rails Step 5 Fasten the Inner Rails to the Server Secure the inner rails with one...

Page 10: ...semblies 1 attached to the rack Engage the matching rails and then slide the server chassis into the rack until the 2 two spring safety locks snap into position Press down the two spring safety locks...

Page 11: ...other end of the power cable s to an electrical outlet 2 Connect one end of an Ethernet cable to one of the RJ45 GbE ports on the rear 3 panel of the ZoneDirector 5000 and connect the other end to an...

Page 12: ...r electrical shock and fire hazard insure the DC L L wiring to the DC input connectors has adequate circuit protection in accordance with local electrical codes When looking at the DC input connector...

Page 13: ...Maximum 75Vdc DC Input Current Maximum 13A 38Vdc Grounding the rack installation To avoid the potential for an electrical shock L L hazard for AC power you must include a third wire safety ground con...

Page 14: ...ernet 3 Protocol Version 4 TCP IPv4 from the scrolling list and click Properties The TCP IP Properties dialog box appears NOTE Write down all of the currently active settings so you can restore your L...

Page 15: ...Mesh capability at this time Once you have completed the Setup Wizard ZoneDirector is ready to begin 4 controlling your ZoneFlex WLAN s For more detailed configuration information see the ZoneDirector...

Page 16: ...e handle sliding the PSU all the way out of the rear of the 3 machine Insert the new PSU into the slot and holding the green safety lock slide the PSU 4 into the slot until it locks in place The PSU s...

Page 17: ...hassis Open the front chassis cover of the ZoneDirector 5000 It may be necessary to 1 extend the ZoneDirector into a maintenance position Identify the faulty fan Each fan has a service required LED th...

Page 18: ...n a particular installation If this equipment does cause harmful interference to radio or television reception which can be determined by turning the equipment off and on the user is encouraged to try...

Reviews: