Copyright © 2016 Ruckus Wireless, Inc.
Published March 2016, Part Number 800-71212-001 Rev A
Page 2 of 4
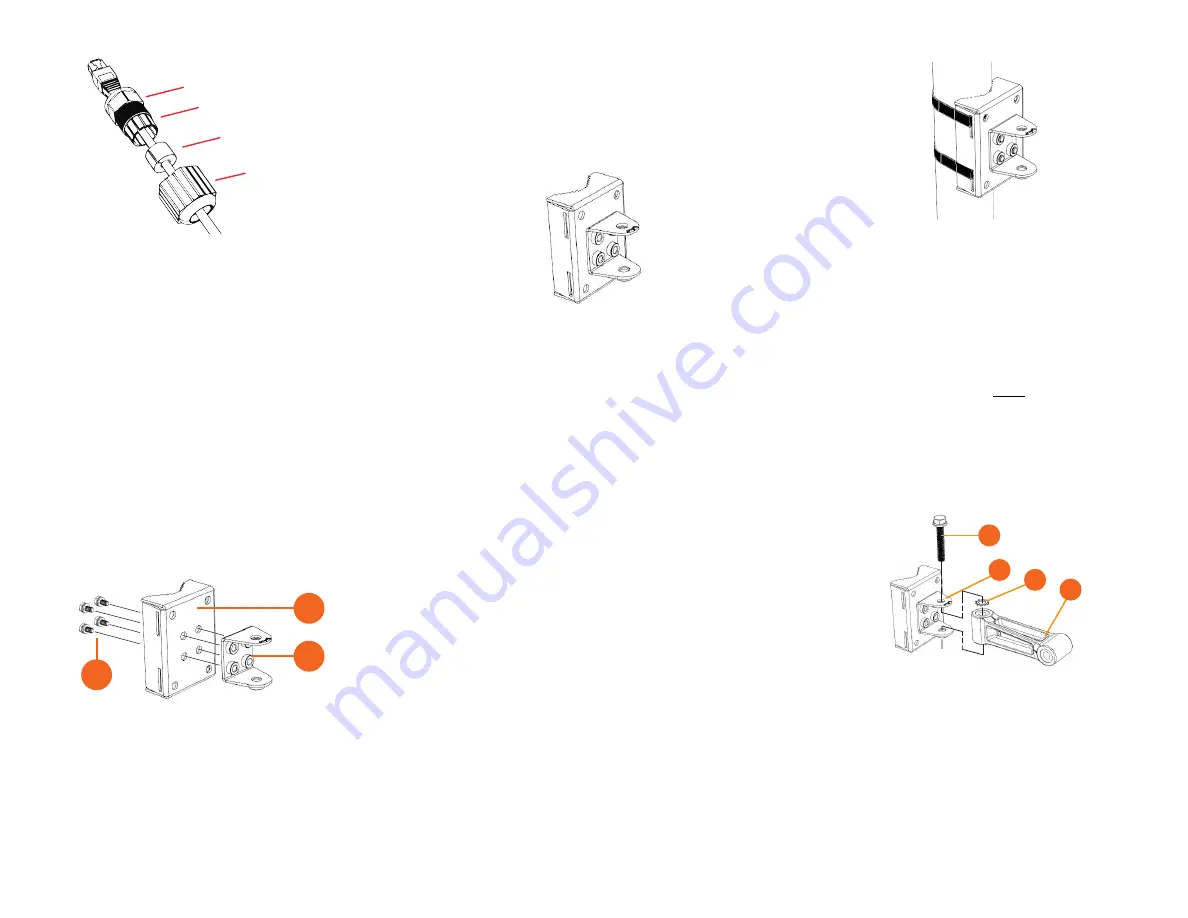
Figure 3:
RJ-45 cable and cable gland assembly
2
Use a wide flat-blade screwdriver to remove the required (RESET/
PoE OUT or PoE IN) blanking cap from the T710s.
3
Connect the cable to the Ethernet port in the T710s.
4
Tighten the cable gland base into the T710s chassis to 7 N.m or
62 in-lbs.
5
Wrap the clamping ring assembly around the rubber O-ring. Make
sure that the clamping ring assembly fully encloses the rubber O-
ring.
6
Seat the clamping ring assembly and rubber O-ring in the cable
gland base.
7
Hand-tighten the sealing nut.
S
TEP
2: A
TTACHING
THE
U-J
OINT
B
RACKET
TO
THE
M
OUNTING
B
RACKET
1
Position the U-joint bracket on the mounting bracket.
NOTE:
Mount the U-joint bracket in any direction on the mounting
bracket, preferably to allow AP azimuth adjustments. Then the AP
bracket allows AP elevation adjustments.
Figure 4:
U-joint bracket attached horizontally to the mounting bracket
2
Use four 1/4-28 bolt and washer sets (A) to mount the U-joint
bracket (B) to the mounting bracket (C). Tighten the bolts to 9.5
N.m (7 ft-lbs).
3
Step 3a: Attaching the Mounting Bracket to a
or
Step 3b: Attaching the Mounting Bracket to a
S
TEP
3
A
: A
TTACHING
THE
M
OUNTING
B
RACKET
TO
A
F
LAT
S
URFACE
1
Place the mounting bracket at the location on the flat surface
where you want to mount the AP. Use the holes on the mounting
bracket as a template to mark the locations of the mounting
holes.
Figure 5:
Mounting bracket flat surface holes
2
Remove the mounting bracket from the flat surface.
3
Drill holes required for the mounting hardware.
NOTE:
The hardware required for mounting to a wall are not included
in the mounting kit.
4
Attach the mounting bracket to the flat surface using the
mounting hardware.
5
Using the mounting hardware instructions, tighten the hardware to
secure the mounting bracket.
6
Continue with
Step 4: Mounting the Linkage Bracket to the U-
.
S
TEP
3
B
: A
TTACHING
THE
M
OUNTING
B
RACKET
TO
A
M
ETAL
P
OLE
1
Insert the open end of one steel clamp into the upper two slots on
the mounting bracket.
2
Take the other steel clamp and insert it into the lower two slots on
the mounting bracket.
NOTE:
The clamps can be daisy-chained together to
accommodate larger poles.
3
Use the clamps to attach the mounting bracket to the pole.
Tighten the clamps to 3 N.m or 27 in-lbs, or per manufacturer’s
specifications.
Figure 6:
Attaching the mounting bracket to a vertical pole
4
Step 4: Mounting the Linkage Bracket to the U-
S
TEP
4: M
OUNTING
THE
L
INKAGE
B
RACKET
TO
THE
U-J
OINT
B
RACKET
The linkage bracket attaches to the U-joint bracket using an M8 bolt
and washer set. The linkage bracket is symmetrical, and either end
can be attached to the U-joint bracket.
NOTE:
Make sure that linkage bracket is installed with its serrated
external-tooth lock washer on the inside of the U-joint bracket
flanges. This ensures that the azimuth adjustment does not
change.
1
Loosely assemble the linkage bracket (A), the U-joint bracket (C),
one
serrated external-tooth lock washer (B),
and one M8 bolt
and washer set (D).
Figure 7:
Attaching the linkage bracket to the U-joint bracket
2
Set the azimuth required by the AP.
3
Tighten the M8 bolt to 13.6 N-m (10 ft-lbs).
4
Step 5: Attach the AP bracket to the linkage
.
S
TEP
5: A
TTACH
THE
AP
BRACKET
TO
THE
LINKAGE
BRACKET
Attach the AP bracket to the linkage bracket using the included bolt,
nut, lock washer, flat washer, serrated external-tooth washer shown in
Figure 8.
Cable gland base
Clamping ring assembly
Rubber O-ring
Sealing nut
C
B
A
A
C
B
D


