


Copyright © 2015 Ruckus Wireless, Inc.
Page 3 of 4
Published April 2015, Part Number 800-70904-001 Rev A
Figure 4.
Connecting the admin PC, SZ-100, and Ruckus
Wireless APs to the network
Step 5: Activate the SZ-100’s Licenses
After you set up the SZ-100 and verify that wireless clients are
able to associate with managed APs successfully, you need to
activate and assign the AP and Tunnel Licenses using the
LiMAN (license management) portal on the Ruckus Wireless
Support site.
Before You Begin
You must have a Ruckus Support portal account (including
user name and password). You can use this account to access
general Support site content including software upgrades,
knowledge base articles and technical documents.
If you do not have a Support portal account, you will be
required to register one before continuing with your product
and license activation.
Every capacity and support license that you have purchased
will have its own unique activation code and each must be
activated for the license to become valid. You will receive the
activation code in a separate Support Purchase
Acknowledgment (SPA) email for each license/support license.
Depending on the product, you may receive up to three (3)
different SPA emails for all of your licenses. The first three
characters of the activation code indicate the license type to
which the code is applicable.
•
LIC
: AP Capacity License
•
LIC
: AP Tunnel License
•
SUP
: Support License
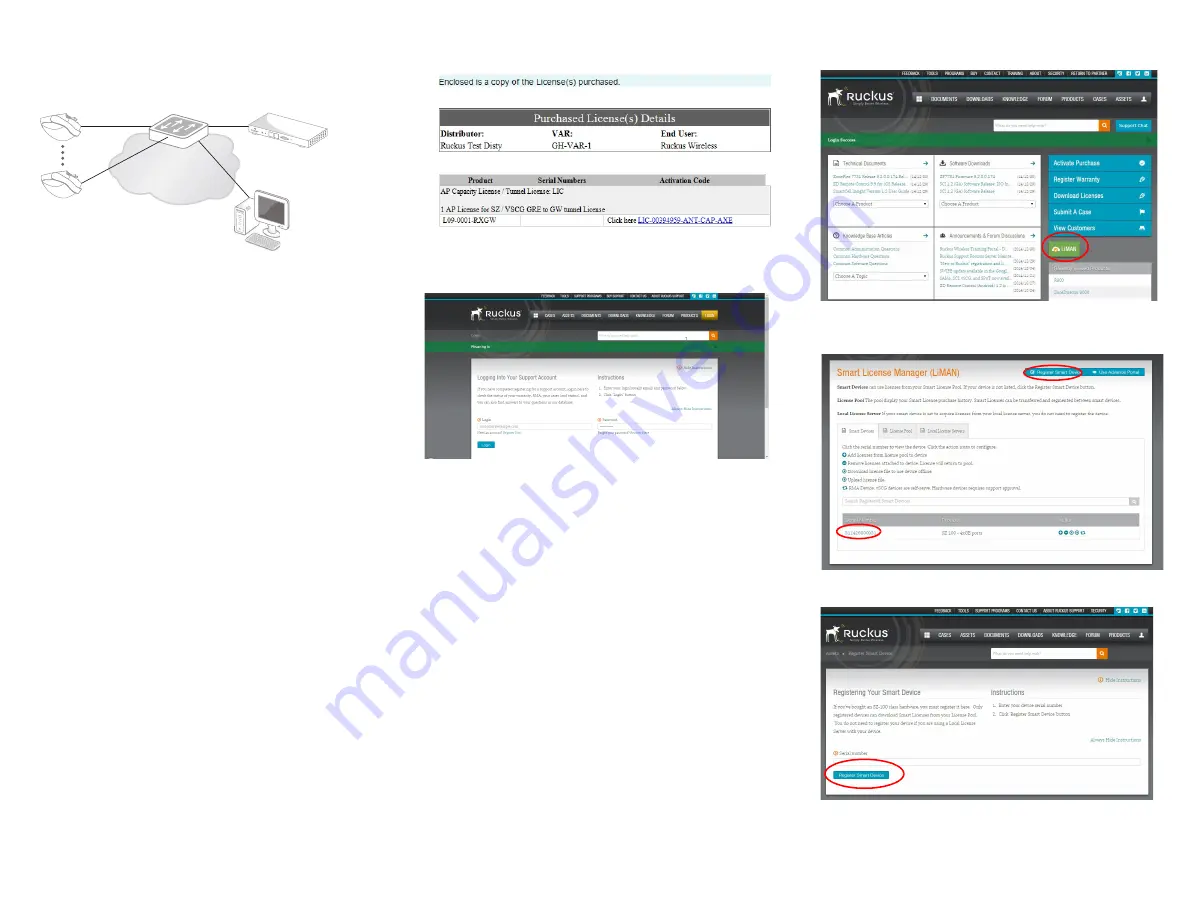
Activating a SZ-100’s License/Support License
#1
Open the SPA email that you received from Ruckus
Wireless.
Figure 5.
The SPA email from Ruckus Wireless
#2
Log on to https://support.ruckuswireless.com.
Figure 6.
Ruckus Wireless Support portal logon page
#3
Have the serial number of your SZ-100 device ready.
#4
Click the link in the SPA email.
#5
Follow the onscreen instructions to activate the licenses
purchased. When required, you will be prompted for your
SZ-100 serial number.
#6
It is important that you repeat steps #1 to #5 above for all
licenses that you have purchased as this will simplify the
“+License” workflow in
below.
#7
After you finish activating all of your licenses, you need to
assign them to your LiMAN account. Click the
LiMAN
button, which appears after a license has been
successfully activated (see
).
•
If your device is listed, click its serial number and
proceed to
.
•
If your device is NOT listed, click the
Register Smart
Device
button (see
), enter your device's serial
number, and then click the
Register Smart Device
button (see
Figure 7.
Click the LiMAN button
Figure 8.
Click the serial number of your device or click Register
Smart Device
Figure 9.
Enter your device’s serial number and click Register
Smart Device
#8
Click the
+ License
), enter the
number of licenses to add in
Qty to Add
, and then click
the
Add License
button (see
). Repeat for all
LAN
Default IP address:
192.168.2.2
if no DHCP server
Admin PC
Ruckus Wireless APs
Router or Switch
SmartZone 100
If your device is listed
If your
device is not
listed


