CHAPTER 3. OPERATION | 10
3.6 GrabBee-HD
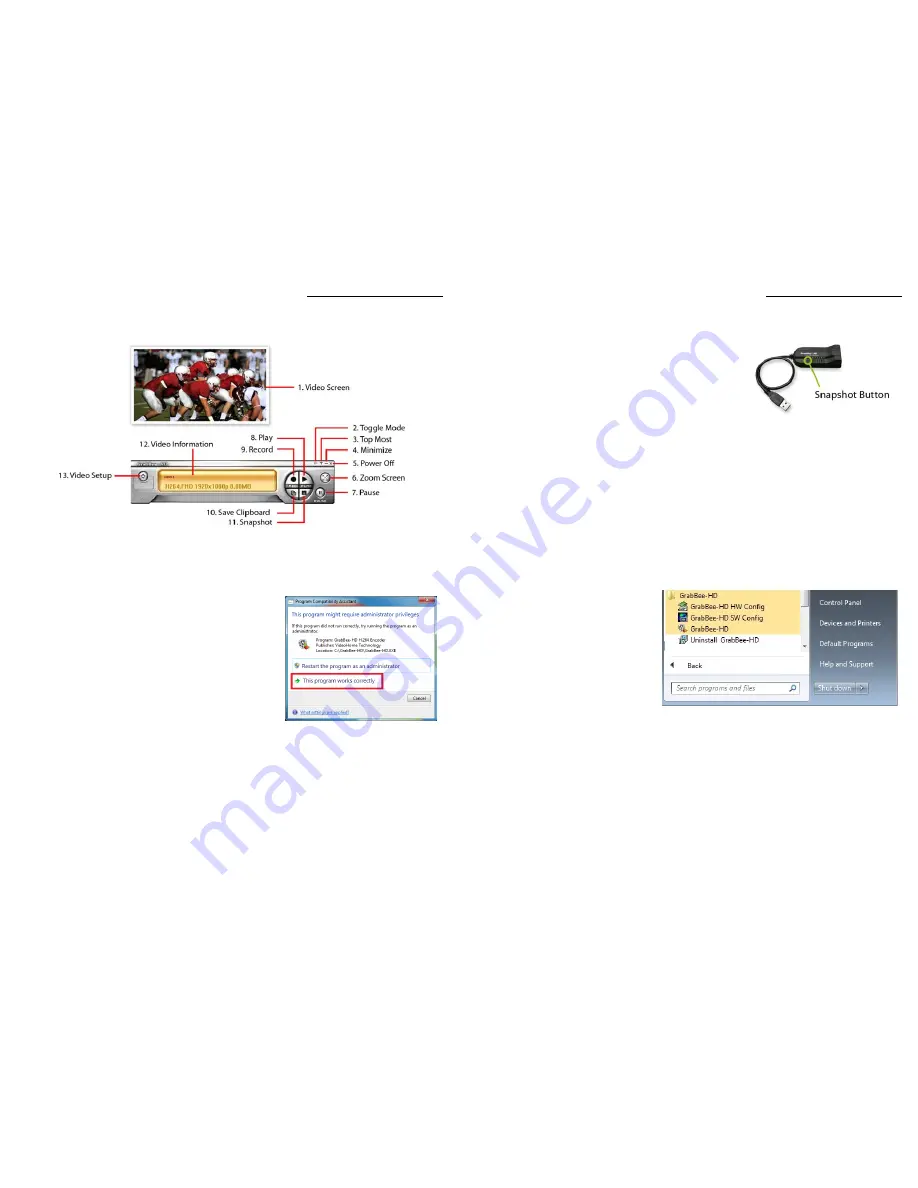
After starting application and setting, you can see video window as below.
1. Video Screen: Video preview window
2. Toggle Mode: Reconnect / Refresh the Video Screen.
3. Top Most: GrabBee-HD control panel and video screen always on top.
4. Minimize: Minimize control panel.
5. Power Off: Exit the application.
When the first time exit application,
system will pop up a PCA
(Program Compatibility Assistant) dialog.
Please click “This program works correctly”
If there are select wrong section,
please see troubleshooting Q5
6. Zoom Screen: Switch full screen and previous screen size.
7. Pause: Freeze the video you are playing.
8. Play: Play the recorded file.
9. Record: Click this button to start recording a video, the video will be saved in the location
where you are specified.
10. Save Clipboard: Click this button to copy a video screen image,
you can paste the image on print / word …etc
CHAPTER 3. OPERATION | 11
11. Snapshot: Click this button to capture and save a video screen image as the BMP or JPEG file.
Or you can click the Snapshot button on
GrabBee-HD device to save the Snapshot
picture in your computer.
The snapshot image will be saved in the
location where you are specified.
12. Video Information: Show the video file information on panel screen.
13. Video Setup: Click this button will pop up the MPEG Encoding Parameters window,
Set the video and audio’s parameter depend on you need. See 3.4
3.7 Reselect Hardware Configuration / Software Configuration
You can also reselect Hardware Configuration / Software Configuration by Start Menu.
Please exit the GrabBee-HD application before reselect HW / SW Config.
- Start Menu -> GrabBee-HD -> GrabBee-HD HW Config -> Go to Hardware Configuration. See 3.2
- Start Menu -> GrabBee-HD -> GrabBee-HD SW Config -> Go to Software Configuration. See 3.3


