background image

Configuration and Operation

8

Connections

The ARP-32 connects to the UIO-256/PAP port, J3 on an ADAM system. The baud rate, as with all UIO-256, PAP, and LCP-
102 devices, can be either 9600 baud or 76.8 K baud.

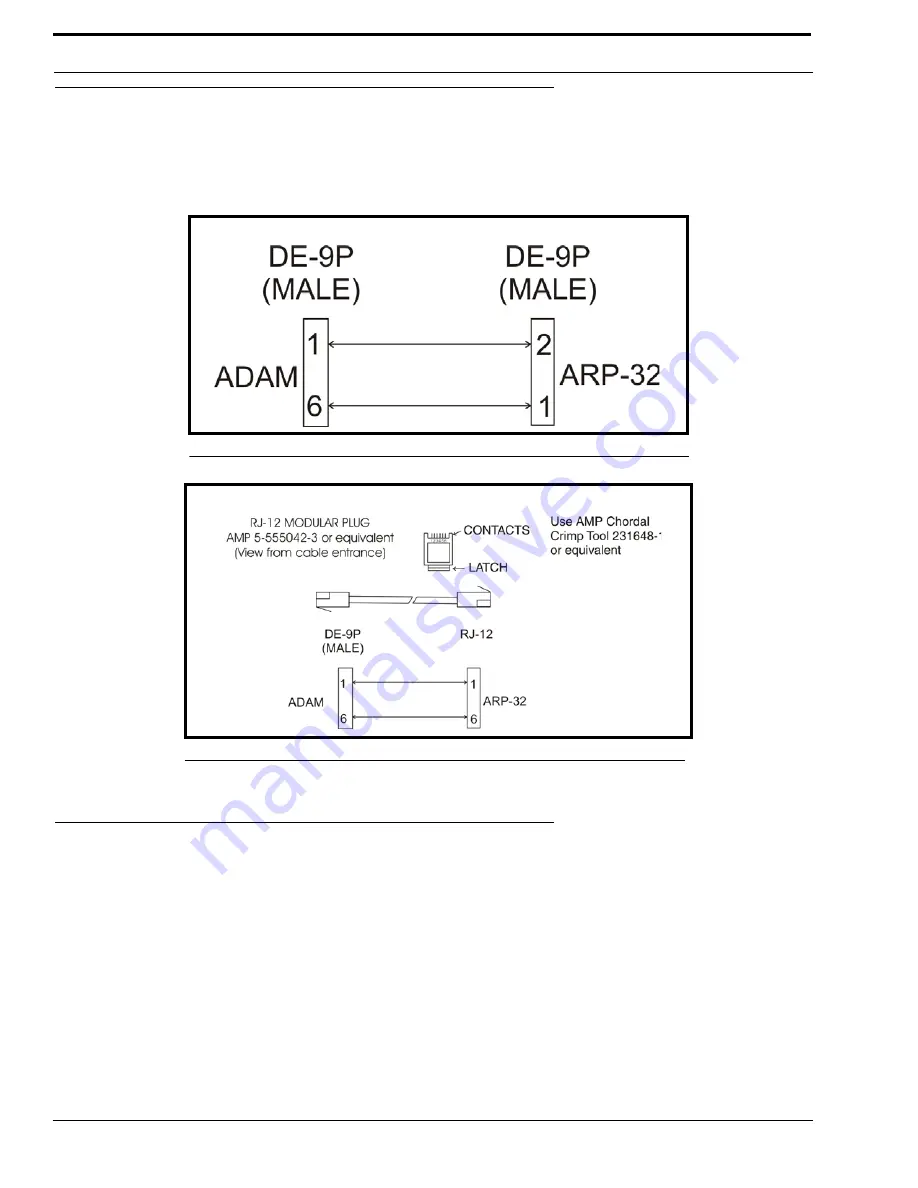
A cable must be made to connect the ARP-32 to the system.

Key Configuration

The ARP-32’s key assignments and setup page assignments are stored by the ADAM MCII-e controller, and downloaded to 
the panel when it powers up. Changes made at the ARP-32 are automatically saved by the MCII-e. Changes can also be made 
using AZedit.

FIGURE 2.

ARP-32 D-Sub Cable Diagram

FIGURE 3.

ARP-32 RJ12 Cable Diagram

Summary of Contents for ARP-32

Page 1: ...MODEL ARP 32 Audio Routing Panel Upto and including Version 0 0 1 9350 7849 000 Rev A 5 2007 ...

Page 2: ...ty of equipment a description of the problem and the serial number s SHIPPING TO THE MANUFACTURER All shipments of product should be made via UPS Ground prepaid you may request from Factory Service a different shipment method Any shipment upgrades will be paid by the customer The equipment should be shipped in the original packing carton If the original carton is not available use any suitable con...

Page 3: ...y Assignments 9 Clear Key Assignments 9 Viewing Audio Paths 9 Changing Audio Paths 10 Scrolling 10 Clear the Scroll Window 10 Keypad Operation 11 AZedit and the ARP 32 11 Assign Key Assignments 11 Downloading Firmware to the ARP 32 12 Menu Mode 15 Display 15 Item 15 Panel ID 15 Setup Pages 15 Version 15 Service 16 Baud Rate 16 Display Dim 16 Mod Assign 16 Reset Cfg 16 Save Cfg 16 Test Panel 16 Not...

Page 4: ......

Page 5: ... downloaded to the panel when it powers up Changes made at the ARP 32 are automatically saved by the MCII e Changes can also be made using AZedit ARP firmware version 0 0 1 and later allows configuration of crosspoint connections Features Firmware Requirements ARP 32 version 0 0 1 or later ADAM MCII e version 1 4 0 or later AZedit version 3 2 or later Single key activation to display audio paths t...

Page 6: ...Introduction 4 FIGURE 1 ARP 32 Reference View ...

Page 7: ...nmental Operating Temperature 0 C to 50 C Storage Temperature 20 C to 75 C Humidity Operating and Storage 0 95 non condensing Dimensions 3 44 88mm high 19 483mm wide 3 5 89mm deep Weight 5 5lbs 2 5kg Finish Thermoplastic front panel aluminum case and rear panel light gray finish Specifications subject to change without notice ...

Page 8: ...Introduction 6 ...

Page 9: ...ote letters A through F on the rotary switch represent IDs 10 through 15 There can be at most one ARP 32 or LCP 102 at any given ID Use a small flat blade screw driver to rotate the switch to the desired setting Panel Options The 8 position DIP switch is used to set options as follows POSITION DEFINITION 8 Normally OPEN when CLOSED forces boot download mode 7 Reserved for diagnostics must be OPEN ...

Page 10: ...K baud A cable must be made to connect the ARP 32 to the system Key Configuration The ARP 32 s key assignments and setup page assignments are stored by the ADAM MCII e controller and downloaded to the panel when it powers up Changes made at the ARP 32 are automatically saved by the MCII e Changes can also be made using AZedit FIGURE 2 ARP 32 D Sub Cable Diagram FIGURE 3 ARP 32 RJ12 Cable Diagram ...

Page 11: ... available ports and assign them to keys You can also change the setup pages assigned to the ARP 32 panel from the keypad Assign Key Assignments To assign key assignments on the ARP 32 do the following 1 Using the scroll up or scroll down keys scroll to the port you want to assign to a key 2 Press Copy keypad number 7 3 Press the key you want to assign the port Clear Key Assignments To clear key a...

Page 12: ...s red briefly and then will turn OFF again Scrolling In normal scroll mode the scroll up keypad number 6 and the scroll down keypad number 9 can be used to display a list of available ports The only ports displayed are those for which the LCP 102 is scroll enabled via AZedit To normal scroll using the ARP 32 do the following 1 Using the scroll up keypad number 6 or scroll down keypad number 9 key ...

Page 13: ...ts Manually enter the port number N001 N002 etc or port alpha Right click and use Change Assignment Use the Assignment Grid SEQUENCE DESCRIPTION NUM PGM key Program the specified key with the specified port number The port number can be 1 2 or 3 digits COPY key Copy the scroll key s assignment to the specified key FUNC COPY key1 key2 Copy the first key s assignment to the second key PAGE PGM key C...

Page 14: ...e 5 Set DIP Switch 8 to CLOSED 6 Power ON the panel The panel enters boot downloader mode and displays This panel needs a firmware download in the lower left window 7 Open AZedit 8 From the Status menu select Software Versions The Software Versions submenu appears 9 From the Software Versions submenu select Keypanels The Keypanel Version Information screen appears In the Version field NEEDS DOWNLO...

Page 15: ...13 Downloading Firmware to the ARP 32 13 Click Open The Download Device Firmware window appears 14 Click Begin Download The download begins Once the download is complete a success message appears ...

Page 16: ... occur 16 Verify the version upgrade in the Keypanel Version Information window is correct 17 Power OFF the panel 18 Set DIP Switch 8 to OPEN 19 Change the polling ID back to the proper ARP 32 ID 20 Disconnect the panel from the spare keypanel port 21 Reconnect the panel to the PAP LCP UIO port 22 Repower the panel ...

Page 17: ... The Item menu item changes the display so item number are shown instead of alphas The display reverts to the standard alphas after 15 seconds or when the CLR key is pressed Panel ID The Panel ID menu item displays the polling ID of the ARP 32 in the range 1 through 15 Setup Pages Use the Setup Pages menu item to display different configuration pages For example to display expansion panel 2 input ...

Page 18: ...im Use the Display Dim menu item to set the brightness of the fluorescent display This menu item also allows you to activate the screen saver Scr Saver Menu options include Dsp Off Dim Normal Bright Maximum and Scr Saver Mod Assign Use the Mod Assign menu item to configure module assignments for expansion panels Reset Cfg Use the Reset Cfg menu item to restore panel to default setup Save Cfg Use t...

Page 19: ...17 Notes Notes ...

Page 20: ......

Reviews: