background image

Einbau- und Betriebsanleitung 
Installation and Operating instructions 
Instructions de montage et de service


3581-8010


07/2009 

 
3.4


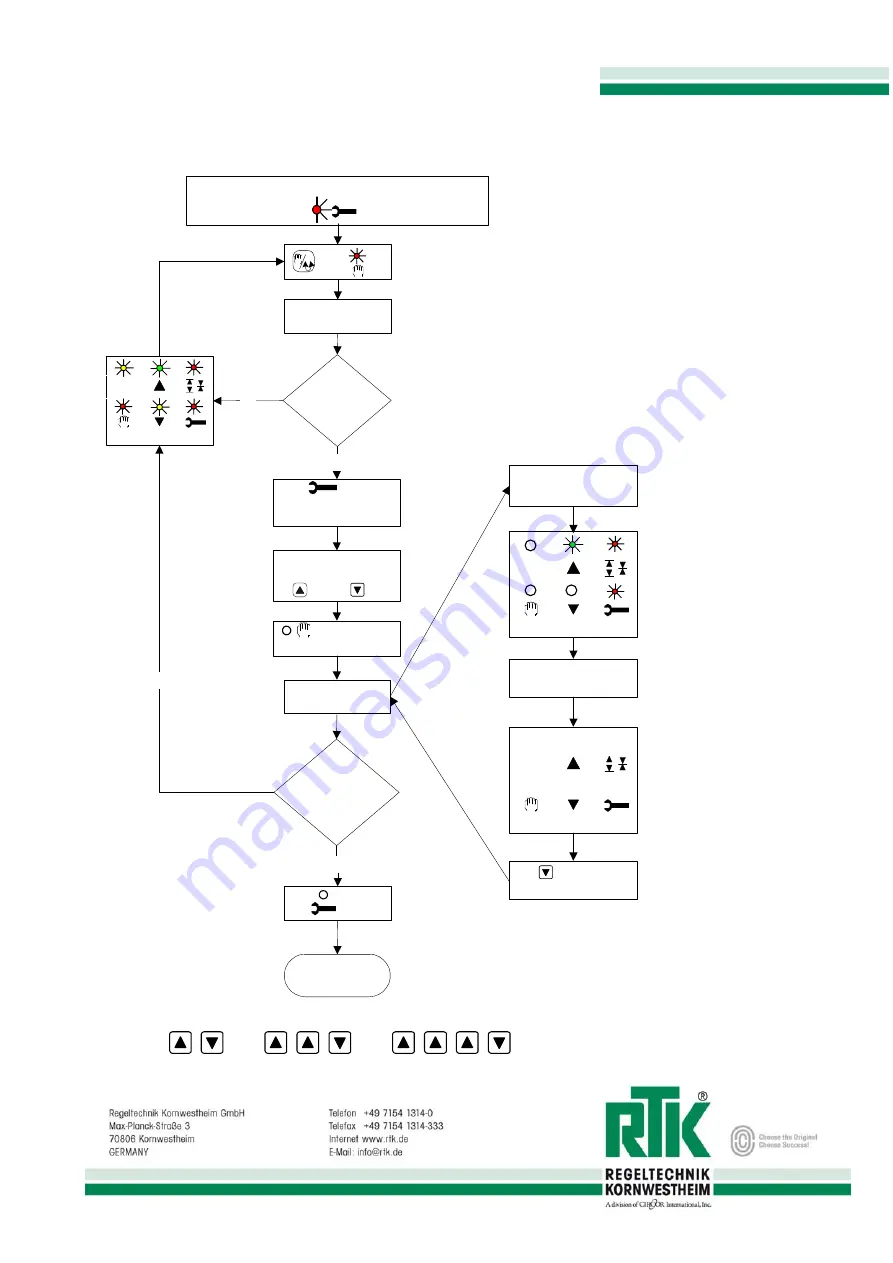
Function diagram of the initialisation 

Press all 3 buttons as long as all lights are on.
After a few seconds                        is flashing

RE 3581

in operation

Initialisation

ok?

yes

Drive valve to middle
po/-20% with

          and          keys

         Handmode off

start initialisation

automatic

initialisation plays

Enter password

(see bottom)

password ok?

yes

          off

no

no

Attention:

At 2-way valves  you

must limit stroke 100%

by

Manual stroke limitation

push

stroke 100% set

All LEDs 3 sec. on

4..20mA

All LEDs 3 Sec. on

4..20mA

push

stroke 0% set

Measurement

Password:

All LEDs 3 sec. on

4..20mA

         push         on

            on

non-monitored

manual mode on

Summary of Contents for DAC RE 3581 Series

Page 1: ...hme 3 4 Funktionsbeschreibung 5 5 Funktionsbeschreibung 5 6 Fehlermeldungen 8 Content 1 General Information 9 2 Installation and connection 9 3 Setting in motion 9 4 Description of Function 12 5 Setting in motion 12 6 Error codes 15 Index 1 Informations générales 16 2 Montage et raccordement 16 3 Mise en service 17 4 Modes de fonctionnement 20 5 Description fonctionnelle 20 6 Messages d erreur 23 ...

Page 2: ...i nachträglichem Einbau des Reglers muß folgendes beachtet werden Schließen Sie bei nachträglichem Einbau Motor Potentiometer Eingangs und Rückmeldesignal wie unter Kapitel 2 1 Elektrischer Anschluß beschrieben an Das Potentiometer muß so justiert werden daß bei geschlossenem Ventil 0 Hub ca 10 des ohmschen Wertes zwischen Klemme 62 und 63 gemessen werden können Bei geöffnetem Ventil sollten ca 90...

Page 3: ...en müssen zuerst die aktuellen Initialisierungsdaten gelöscht werden Löschen der aktuellen Daten Halten sie alle 3 Tasten gleichzeitig länger als 10s gedrückt bis alle LEDs leuchten Nachdem alle LEDs für ca 2 sek an waren blinkt die LED Der Regler erwartet eine Paßworteingabe um mit der Initialisierung starten zu können 3 2 Initialisierung Zur Initialisierung sind folgende Schritte notwendig und g...

Page 4: ...atische Initialisierung läuft Passwort eingeben siehe unten Passwort ok ja aus nein nein Achtung Bei 2 Weg Ventilen muß Hub 100 manuell eingestellt werden Manuelle Hubbegrenzung drücken Hub 100 bestimmen Alle LEDs 3 sek an 4 20mA Alle LEDs 3 Sek an 4 20mA drücken Hub 0 bestimmen Antriebsvermessung Passwort Eingabezeit max 10s Alle LEDs 3 sek an 4 20mA drücken an an unüberwachter Handbetrieb aktiv ...

Page 5: ...r 24V DC anschließen Z1 bis Z3 nicht belegt Antrieb bleibt bei Signalausfall stehen nur bei 4 20mA und 2 10V Ansteuerung Der Regler fährt bei Signalausfall 2mA in die eingestellte Position 5 Funktionsbeschreibung Der DAC ist ein Mikroprozessorsystem Seine Aufgabe ist es die Befehle des Führungsreglers und ihre Auswirkungen auf den Ventilhub zu überwachen Bei festgestelltem Fehlverhalten welches du...

Page 6: ... der Antrieb abgeschaltet Blockrichtung wird wieder freigegeben wenn Fahren in Gegenrichtung möglich ist 5 5 Stellbefehlüberwachung Jeder eingehende Stellbefehl wird auf seine Wirkrichtung und Auswirkung auf die Ventilstellung hin überprüft 5 6 Abgleich RE 3581 Der Regler normiert seinen Hub automatisch beim Initialisierungslauf auf das Ausgangssignal 4 20mA Sollte das Ausgangssignal dennoch nicht...

Page 7: ... Stromeingang an und warten bis der Antrieb stehen bleibt Sollte die 100 Endlage nicht erreicht werden stellen sie den Regler folgendermaßen ein Taste Auf drücken Eingangssignalwert wird vergrößert Antrieb fährt in Richtung Hub 100 Taste Zu drücken Eingangssignalwert wird verkleinert Antrieb fährt in Richtung Hub 0 Stellen sie den Wert so ein daß die 100 Position des Ventils übereinstimmend erreic...

Page 8: ... erlischt 6 Fehlermeldungen 6 1 Blockierung in Schließrichtung 4 20mA 6 2 Blockierung in Aufrichtung 4 20mA 6 3 Schwerwiegender Fehler 4 20mA 6 4 Potentialfreier Störmeldeausgang Der potentialfreie Störmeldeausgang kann mit 5V bis 48 V DC versorgt werden Im Normalbetrieb ist der Ausgang low aktive 0 3V geschaltet Bei Störung ist der Ausgang auf high 5V bis 48 V DC geschaltet und signalisiert so je...

Page 9: ...fter mounting the controller into the actuator do the following Connect the motor potentiometer input signal and output signal as described in Cap 2 1 wiring diagram The potentiometer must be adjusted that if the valve is closed the value of the potentiometer is nearly 10 of the whole Potentiometer value You can measure the potentiometer value between Terminal 62 and 63 If the valve is completely ...

Page 10: ... 1 Control potentiometer and if its possible adjust it as described 2 Switch manual mode on see cap 4 1 manual operation 3 Enter password 4 Drive valve to middle position 20 5 Switch manual mode off initialisation starts automatically 6 After the initialisation is finished 1 3 minutes depends on stroke and motor speed switch power off and on again The controller is switched now in manual mode If t...

Page 11: ...81 in operation Initialisation ok yes Drive valve to middle position 20 with and keys Handmode off start initialisation automatic initialisation plays Enter password see bottom password ok yes off no no Attention At 2 way valves you must limit stroke 100 by Manual stroke limitation push stroke 100 set All LEDs 3 sec on 4 20mA All LEDs 3 Sec on 4 20mA push stroke 0 set Measurement Password All LEDs...

Page 12: ...controller drives in safety position 5 Setting in motion DAC is a microcontroller system Its job is to monitor the result of the commands of the controller If any error occurs which is recognised by measurement of the stroke an error indication is displayed An initialisation for the first time is need to get the RE 3581 in operation The stroke limits 0 and 100 are recognised without limit switches...

Page 13: ...a mA multimeter at terminals 65 and 66 Connect a 4 mA signal to the input If the valve is not closing tight after 5 s or if the feedback signal is not correct 5 6 1 Adjustment input For entering the input signal correction program you must connect these two pins on the top of the controller see picture 1 The Service LED is on picture1 Controller RE3581 without front panel Adjust zero Input signal ...

Page 14: ...tput signal and or connect 4mA signal e g to the input and wait min 5 sec as the controller stopped Control the valve position If the feedback signal is not correct make a digital correction key hand auto keep pressed step with key Open to make the output signal higher step with key Close to make the output signal lower adjust the signal exactly at the right output value Adjust span Output signal ...

Page 15: ...f there is any error on the system the output will be switched to high Voltage signal If any error occurs correct the source of the problem Actuator was blocked during closing LEDs Blockage and Close are flashing alternately Flashing indications disappears with the next step in the other direction Actuator was blocked during opening LEDs Blockage and Open are flashing alternately Flashing indicati...

Page 16: ...érieur du positionneur respectez les instructions suivantes En cas de montage ultérieur raccordez le moteur le potentiomètre et les signaux d entrée et de compte rendu de position conformément aux instructions du appendix raccordement électrque Le potentiomètre doit être ajusté de telle sorte que lorsque la vanne est fermée course 0 on mesure environ 10 de la valeur ohmique entre les bornes 62 et ...

Page 17: ...nneur vous devez d abord effacer les données d initialisation actuelles Effacement des données actuelles enfoncez simultanément les 3 touches pendant plus de 10s jusqu à ce que toutes les LED soient allumées Après que toutes les LED soient restées allumées pendant env 2 s la LED clignote Le positionneur attend l introduction d un mot de passe pour démarrer l initialisation 3 2 Initialisation Les é...

Page 18: ...Einbau und Betriebsanleitung Installation and Operating instructions Instructions de montage et de service 3581 8010 07 2009 ...

Page 19: ...ion Initialisation automatique en cours Entz mot de passe voir ci dessous Passwort ok oui éteint non non Mise en garde Pour des vannes 2 voies la position de course maximale 100 doit être réglée à la main Limitation manuellede Enfoncez Définir course 100 4 20mA 4 20mA Enfoncez Définir course 0 Mesure actionneur Mote de passe max 10s LED allumées 3 s 4 20mA Enfoncez allumé allumé mode manuel non su...

Page 20: ...système à microprocesseur Son rôle est de contrôler les commandes de l organe directeur et leur effet sur la course de la soupape Lorsqu il détecte un dysfonctionnement en mesurant la course le DAC affiche un message d erreur correspondant Le système doit alors être réinitialisé une fois La position de la soupape est donnée sous forme d un signal de 4 20 mA Les fins de course course 0 et course 10...

Page 21: ...es commandes de positionnement L effet sur la course de la soupape et la direction de circulation de chaque commande de positionnement entrante sont contrôlés 5 6 Ajustage du RE 3581 Le positionneur convertit automatiquement sa course au signal de sortie normalisé 4 20mA au cours de la procédure d initialisation Si toutefois le signal de sortie ne devait pas être exactement conforme au signal d en...

Page 22: ...osition de fin de course 100 n est pas atteinte réglez le positionneur de la manière suivante appuyez sur la touche Ouvrir pour augmenter le signal d entrée l actionneur va dans le sens 100 appuyez sur la touche Fermer pour diminuer le signal d entrée l actionneur va dans le sens 0 Ajustez la valeur de telle sorte que la position 100 de la vanne concorde avec le signal d entrée 20 mA Contrôlez enc...

Page 23: ... le sens de l ouverture 4 20mA 6 3 Erreur grave 4 20mA 6 4 Sortie flottante d alarme La sortie flottante d alarme peut être assurée avec un courant compris entre 5 V et 48 V C C En fonctionnement normal la sortie est mise en position basse active 0 3 V En cas de dysfonctionnement elle est mise en position haute 5 V à 48 V C C et signale ainsi les pannes Remédiez à la situation ayant entraîné l aff...

Page 24: ...100 L 0 Input K6 K4 K5 61 62 63 RE 3581 M A3 A1 A2 100 70 71 Error Output Z1 an N Z2 an L1 bedeutet Sicherheitsendlage 100 oder Z3 an L1 Sicherheitsendlage 0 Z1 Z2 Z3 nicht angeschlossen Ventil bleibt bei Signalbruch stehen Z1 connect to N Z2 connect to L1 means safety position 100 or Z3 connect to L1 means safety position 0 Z1 Z2 Z3 not connect Valve doesn t move Z1 à N Z2 à L1 signifie position ...

Page 25: ...nce free keys Potentiometer 200Ω to 5KΩ Feedback signal 4 20mA max 500Ω galvanic isolated 24V DC supply necessary Display LED s Switch step Relay contacts max 250V 50 60 Hz 2A Supply 24V 110V 230V 50 60 Hz 24V DC chosseable 1 5 VA Power loading 1 5 VA Terminal connect Snap terminals for 1 5mm2 solid wire or stranded wire with wire case Ambient temperature 10 C 50 C Caractéristiques techniques Sign...

Reviews: