

It’s Under Control
®
SURFiR
®
Companion Remote Control
Programming the SURFiR
The SURFiR remote control is programmed using RTI’s
Integration
Designer
®
software. Once you have completed the programming,
Integration Designer
®
will generate a unique 10 digit configuration
code that will allow the RTI XP processor to identify the SURFiR.
This code is entered manually into the remote via a series of button
presses on the numeric keypad.
NOTE: This configuration code is based on SURFiR’s programming
functions, RF transmission output type, zone code etc. Therefore
this code may need to be updated in the SURFiR if any of these
options change.
1) Enter Configuration Mode on SURFiR
The SURFiR is in configuration mode when the LED status light
(located at the top of the remote) is blinking red and green. The
SURFiR is automatically in configuration mode the first time it is
powered-up (when it is in its factory default state). To put the
SURFiR in configuration mode:
• Press and hold the “Power” button (located at the top of the
remote) for 10 seconds until the LED status light blinks red and
green.
2) Get Configuration Code
When you have completed programming the SURFiR in
Integration
Designer
®
go to:
• Communications Menu>Get SURFiR Configuration Code.
or
• Communications Menu>Send to Device.
3) Enter Configuration Code into SURFiR
a) Press “Enter” button on SURFiR (LED status light blinking stops)
b) Enter 10 digit code using numeric keypad on SURFiR (remote
beeps with each press).
c) Press “Enter” button on SURFiR to finish.
Authorized RTI dealers can download
Integration Designer
®
software
from:
www.rticorp.com/dealers
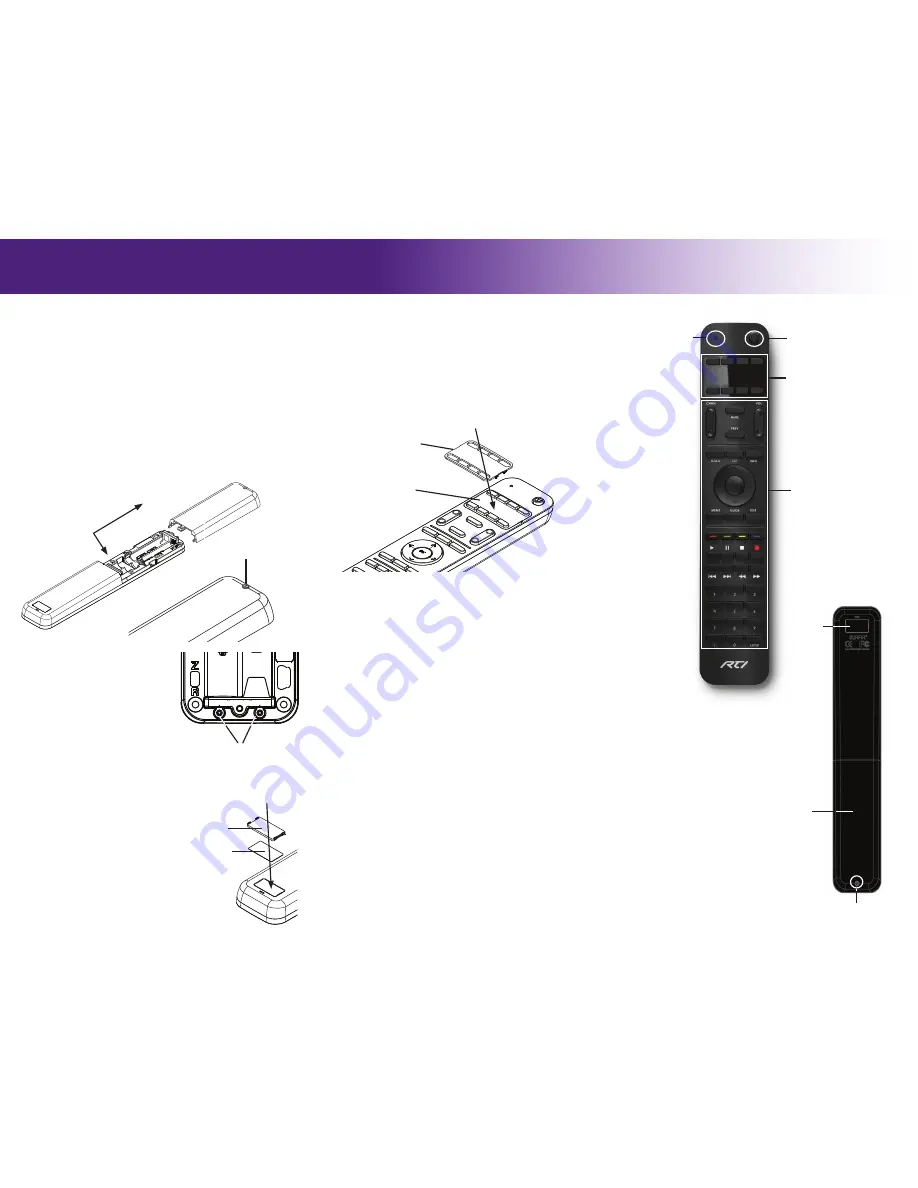
Installing Batteries
The SURFiR uses four (4) AAA batteries and ships without a screw
installed in the battery door. Three optional tri-head security screws
are included for installations such as hotels, to hinder access to the
battery compartment. The included security screw removal tool can
be used to install the security screw.
1 Remove the screw on the battery door (if installed).
2 Remove the battery door from the rear of the remote by applying
pressure near battery door seam and pulling down (pressing
down near seam “unlocks” the door latch).
3 Insert the batteries into the battery compartment sleeves so that
the positive (+) and negative (-) ends of the batteries match the
diagrams.
4 Slide the battery door onto the remote until it snaps into place.
5 Reinstall the battery door security screw using the security screw
tool (optional).
Battery Access Door
Rear of SURFiR
Battery Door Screw
• Optional security screw
Rear of SURFiR
1) Push in to release latch
2) Pull down to slide off
Installing Remote ID Label
Located on the backside of the
SURFiR is an area to label the
zone or room that the remote
will be used in. A sheet of
labels with common locations is
included in the SURFiR box.
1 Remove the remote label
cover by placing a flat head
screwdriver in notch along
edge and prying up.
2 Choose remote ID label from
included sheet and adhere to
remote label area.
3 Reinstall remote label cover
by snapping into position.
Battery Door Security Screws
The SURFiR ships with three
(3) tri-head security screws for
the battery door and a security
screw removal tool. Two of these
extra screws are mounted inside
the battery compartment. Use
the security screw removal tool
(included) to use these screws.
Battery Door Screw
Battery Door
Extra Battery Door
Security Screws (x2)
Top of SURFiR
Remote ID Label
Remote ID
Label Cover
Installing Button Labels
Located on the front of the SURFiR are eight custom buttons which
can be custom labelled with the function or activity that these
buttons will control. A sheet of labels with common functions/
activities is included in the SURFiR box.
1 Remove the button label cover by placing a flat head screwdriver
in notch along edge and prying up.
2 Choose function/activity labels from included sheet and adhere to
label areas next to each button.
3 Install the
clear
button label cover by snapping into position.
NOTE: If you choose not to label these buttons, use the black
button label cover.
Top of SURFiR
Button Label Area
Button Label Cover
Status LED
• Green indicates
a command
code being
transmitted.
• Red slow blink
indicates that
the battery
power is low.
• Red fast blink
indicates that
battery power is
critically low.
• Red/Green
alternating blink
indicates the
SURFiR is in
Configuration
Mode.
Custom Buttons
• Allow custom labeling.
Keypad Buttons
• Custom programmed
for commonly used
functions.
Power Button
• Programmed to control
equipment.
• Used to put SURFiR in
Configuration Mode.
Front of SURFiR
Remote
ID Label


