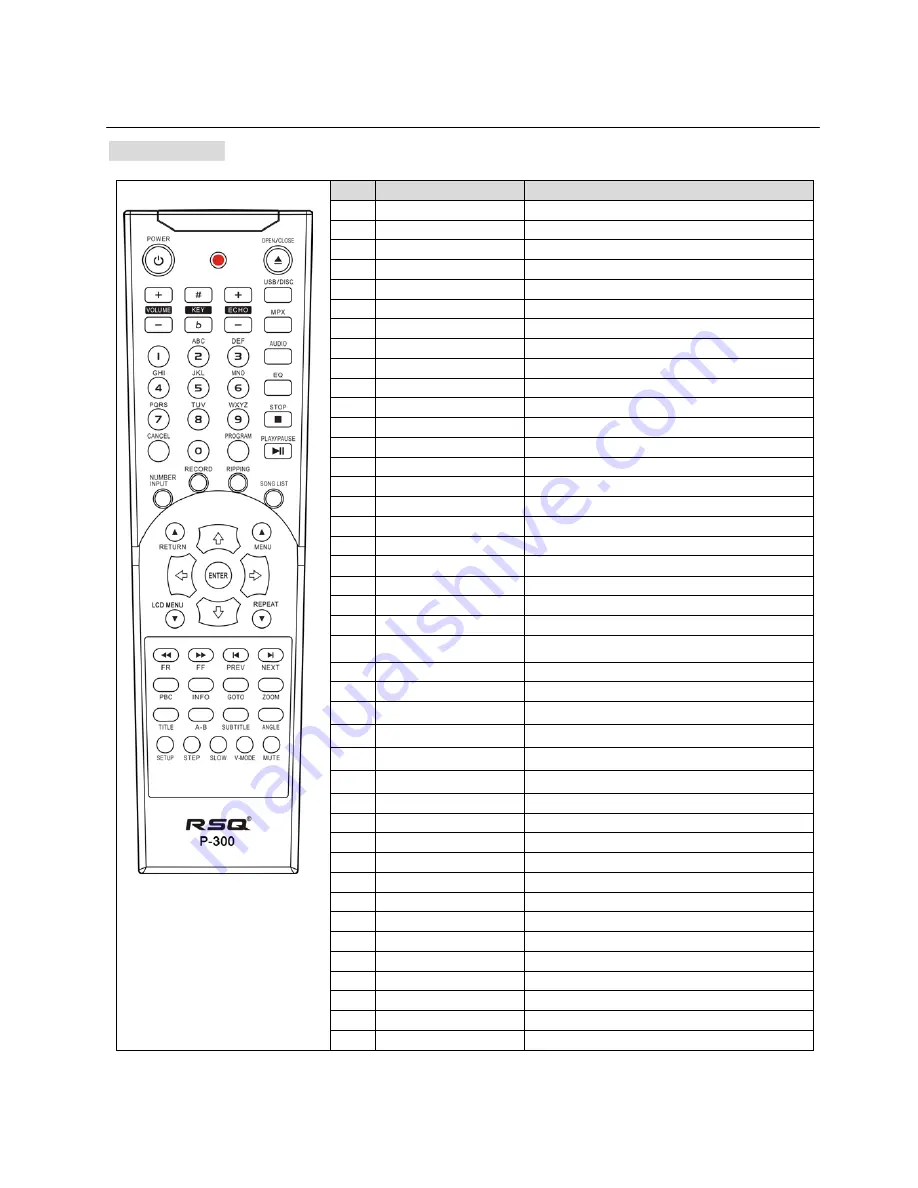
background image


Description 


Remote Control 


NO 

BASIC 

KARAOKE 

POWER 


OPEN/CLOSE 


VOL -/+ 

-Music Volume -/+ Control 

Key b/# Control 

-Key b/# Control 

ECHO -/+ 

-Echo -/+ Control 

USB/DISC 

-Drive Change between Disc, USB and SD 

MPX(Multiplex)=L/R/ST 

-Vocal ON/OFF/Auto for DAT and Vocal Song with 2CH 

AUDIO 

-Vocal ON/OFF/Auto for VOB file with 2 audio 

EQ 

-EQ Control 

10 

PLAY/PAUSE 


11 

STOP 

-Stop Playback 

12 

NUMBERS(0~9) 

-Numbers & Alphabet Character Input 

13 

CANCEL 

-Cancel of the Wrong Digit Input 

14 

PROGRAM 

-Program of Songs


15 

SONG LIST 

-Open/Close of the Neo+G Song List on the Screen 

16 

NUMBER INPUT 

-Input the Neo+G song's number directly 

17 

RECORD 

-Record singing sound with Neo+G &CD+G music 

18 

RIPPING 

-Rip the Neo+G & CD+G disc to USB at MP3+G format 

19 

ARROW(

◀▶

-Song List Page UP/DOWN 

20 

ARROW(

▲▼)


-Song List Line UP/DOWN 

21 

ENTER 

-Play Songs (=PLAY) 

22 

RETURN 

-Return to the previous step on the file list 


23 

MENU 

-Creating of Neo+G/ MP3+G/AVI Song List into   
USB at TXT format(SONGLIST.TXT) 

24 

LCD MENU(for LCD only) 

-Set the built-in LCD display 

25 

REPEAT 

-Repeat One/All/Off 

26 

FAST REVERSE(

)


27 

FAST FORWARD(

 ) 


28 

PREVIOUS(

 ) 

-Skip to the Previous Song   

29 

NEXT(

 ) 

-Skip to the Next Song 

30 

PBC 


31 

INFO 


32 

GOTO 


33 

ZOOM 


34 

TITLE 


35 

A-B 


36 

SUBTITLE 


37 

ANGLE 


38 

SETUP 


39 

STEP 


40 

SLOW 


41 

V-MODE 


42 

MUTE 


Summary of Contents for P-300

Page 1: ...P 300 Multi Format Hi Fi Karaoke System with Ripping Recoding Function USER S MANUAL ...

Page 2: ...E PARTS INSIDE REFER SERVICING TO QUALIFIED SERVICE PERSONNEL Thi symbol indicates that dangerous voltage which can cause electric shock is present inside this unit This symbol alerts you to important operating and maintenance instructions accompanying the unit WARNING To reduce the risk of fire or electric shock do not expose this appliance to rain or moisture CLASS 1 LASER PRODUCT KLASSE 1 LASER...

Page 3: ... stored in cold temperatures If transporting the player during the winter wait approximately 2 hours until the unit has reached room temperature before using The battery used with this product contain chemicals that are harmful to the environment Do not dispose of batteries in the general household trash Handling discs Do not touch the playback side of the disc Hold the disc the edges so that fing...

Page 4: ...ch the battery cover on the rear of the remote control and insert two AAA size batteries with and aligned correctly Do not expose batteries to heat or flame Table of Contents PREPARATION Safety Warnings 1 Precautions 2 Before Use 3 DESCRIPTION Front Side and Rear Side 4 Remote Control 5 CONNECTIONS Connecting to the Power Supply 6 Connecting with Microphone 6 Connecting with Speaker L R 6 Connecti...

Page 5: ...RD READER 11 USB 12 DISC TRAY 13 SPEAKER L 14 SPEAKER R Rear Side 1 MIC INPUT JACK 1 2 2 MIC VOLUME KNOB 1 2 3 DVD 2CH AUDIO OUTPUT L R 4 COMPONENT VIDEO OUT Y Pb Pr 5 AMPLIFIER AUDIO OUTPUT L R 6 OPTICAL AUDIO OUTPUT 7 S VIDEO OUT 8 COMPOSITE VIDEO OUTPUT 9 COAXIAL AUDIO OUTPUT 10 POWER CORD AC100 240V 50 60HZ 11 SPEAKER L 12 SPEAKER R ...

Page 6: ...e Neo G Song List on the Screen 16 NUMBER INPUT Input the Neo G song s number directly 17 RECORD Record singing sound with Neo G CD G music 18 RIPPING Rip the Neo G CD G disc to USB at MP3 G format 19 ARROW Song List Page UP DOWN 20 ARROW Song List Line UP DOWN 21 ENTER Play Songs PLAY 22 RETURN Return to the previous step on the file list 23 MENU Creating of Neo G MP3 G AVI Song List into USB at ...

Page 7: ...eedback noise do not place your hands near the top of the microphone and do not point the microphone directly at the output speaker If feedback occurs lower the volume control Connecting with Speaker L R Connect the SPEAKER L R to the AMPLIFIER OUTPUT AUDIO L R JACK Connecting with External TV Connect the RCA CABLE from AUDIO L R JACK on the rear panel of the player to Audio L R Input of the TV Co...

Page 8: ...hly playback and recording MP3 Player IPOD and flash type MP3 Player USB HDD Devices that support USB2 0 or USB 1 1 For the USB HDD make sure to connect an auxiliary power cord to the USB HDD for proper operation and you must turn on the power of USB HDD before connecting to the player and must pull out the USB HDD from the player before turning the power of the player off NOTE The player may not ...

Page 9: ...etween DISC MODE and CARD or USB mode at stop mode NOTE In case both SD Card and USB was connected to the player The Player won t work at the same time In case no disc is being played the device mode will automatically switch to USB device and play the first track on the device MPX MULTIPLEX L R ST Vocal On Off Auto This is used to select the left and right tracks of VCD MP3 CD discs which have a ...

Page 10: ...title time T countdown and cancel GOTO Time Search DVD MPEG4 VCD The Time Search function allows you to start playback at any chosen time on the disc Press GOTO key and use ARROW keys to select chapter or input the chapter or time by the Numeric Keys 0 9 and press ENTER key to play CD G GOTO function is not supported ZOOM MPEG4 DVD VCD JPEG You can aggrandize the image during the playback or pause...

Page 11: ...1khz 44 1 48khz 44 1khz SUPPORTED SUBTITLE Smi Srt Sub with English NOTE It is normal to experience an occasional pixilation during MPEG4 playback due to clarity of digital contents during internet downloading Some MPEG4 files created on a personal computer may not be played back That is why Codec Type Version and Higher resolution over the above specification is not supported This unit supports C...

Page 12: ...start play To stop playing Music press STOP key To delete wrong number input press CANCEL key WITH SONG LIST ON THE SCREEN At the Select Song mode press SONG LIST key to display all SONG LIST in the disc on the Screen Input ALPHABET of Song s Title with NUMERIC 2 9 keys on the remote After select a desired song and press PLAY or ENTER key to start play To stop playing music press STOP key Eg To se...

Page 13: ...NEO G MP3 G Disc Ripping You can rip the NEO G MP3 G Disc with High speed 8X into USB SD at MP3 G format including Music and Graphics After connect a USB SD Card with the Player in advance and insert a NEO G Disc to the Player Press SONG LIST key to display the all NEO G SONG LIST After select desired song on the NEO G MP3 G SONG LIST press RIPPING key When Do you want to copy it to USB or SD disp...

Page 14: ...USB SD If want to rip more CD G Disc please repeat from step to SONG LIST CREATING NEO G MP3 G AVI You can create the SONG LIST of NEO G MP3 G AVI files in DISC USB SD into USB SD at TEXT SONG LIST txt format and you can make the SONG BOOK with this file In case of NEO G MP3 G files Please open SONG LIST by pressing SONG LIST key at the stop mode of NEO G MP3 G Disc USB SD Then press MENU key to c...

Page 15: ...13 Material is unsuitable for children under age 13 5 6 PG R Parental Guidance Restricted recommended that parents restrict children under 17 from viewing or allow to view only when supervised by a parent or adult guardian 7 NC 17 No children under age 17 not recommended viewing for children under age 17 8 ADULT Mature material should be viewed only by adults due to graphic sexual material violenc...

Page 16: ... DELAY You can adjust the center speaker delay upto 0 5MS according to the position of your center speaker REAR DELAY You can adjust the rear speaker delay upto 0 15MS according to the position of your rear speaker FONT Change the font to LARGE or SMALL Digital Setup OP MODE To set the Dolby digital output you can switch between Line Out encode signal and RF REMOD raw signal DYNAMIC RANGE To set t...

Page 17: ...r is not working normally While NO DISC message appears on the display of main unit enter the SETUP mode and select DEFAULT and all settings will return to the default values Press POWER button D V D Play does not start even when title is selected Confirm the RATING setting Audio soundtrack and or subtitle language is not the one selected at the initial settings If the audio soundtrack and or subt...

Page 18: ... VCD 44 1kHz 4Hz 20kHz Video Output Built in 7 inch LCD Screen Compotiste S Video Component Y Pb Pr Output Progressive Scan up to 720P 1080i 1080P Support PAL NTSC Disc Audio Output Amplifier Audio Output Power L R 25W 25W DVD Analog 2CH Output AUDIO L AUDIO R DVD Digital 5 1CH output Optical Coaxial Input Microphone Input 2EA USB Host 1EA 2 0 Full Speed compatible with external HDD FAT32 Format o...

Reviews: