


PEARL Owner's Manual
22
RSF Woodburning Fireplaces
MANTEL
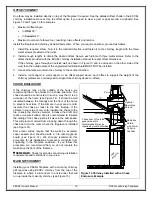
For combustible mantels shelves, please see Table 1 (J-K) for the maximum depth of the mantel shelf and their
clearance requirements. See Figure 1 for an example.
Combustible mantel posts, of any depth, can be installed on either side of the fireplace as long as they respect
the same minimum distance as the side wall (see Table 1 (B)).
Masonry and other non-combustible mantels (shelf and posts) can be placed anywhere around the fireplace
opening. If the non-combustible mantel is located between the top of the fireplace facing and the specified height
for a combustible mantel, then the wall portion between the top of the fireplace facing and the mantel must be
covered in non-combustible material. If the non-combustible mantel is located at the same height allowed for a
combustible mantel, or higher, then no special wall covering is required below the mantel.
REFRACTORY BRICK INSTALLATION
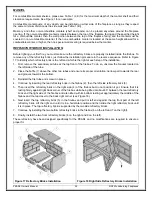
Before lighting your first fire, you must make sure the refractory bricks are properly installed inside the firebox. To
remove any of the refractory bricks, just follow the installation procedure in the reverse sequence. Refer to Figure
17 to identify which refractory brick is the left and which is the right at each step of the installation.
1. First, remove the secondary air tube at the top front of the firebox. To do so, unscrew the bracket located on
the left side of the tube.
2. Place the baffle (1) above the other two tubes and ensure its proper orientation: narrow part towards the rear
and grooves towards the bottom.
3. Reinstall the first tube and screw it in place.
4. Continue by inserting the rear refractory brick in the firebox (2), then the left side refractory brick (3).
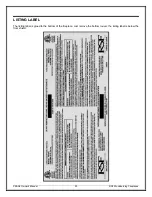
5. Then insert the refractory brick on the right side (4) of the firebox but do not position it yet. Ensure that it is
resting firmly against right back corner of the firebox while being tilted at about 45° between the rear refractory
brick and the right side of the firebox and also tilted with its bottom resting at approximately the middle of the
firebox and the top closer to the back right corner (see Figure 18).
6. Next insert the top refractory brick (5) in the firebox and put its left end against the top front part of the left
refractory brick. Lift the right end until it is in a horizontal position and then slide the right refractory brick until
it is in place. The top refractory brick is supported by the two side refractory bricks.
7. Continue by installing the two bottom refractory bricks in the firebox (6 on the left and 7 on the right).
8. Finally, install the two front refractory bricks (8 on the right and 9 on the left).
These refractory have been designed specifically for the PEARL and no modifications are required to ensure a
proper fit.
Figure 17 Refractory Bricks Installation
Figure 18 Right Side Refractory Bricks Installation


