RSF Woodburning Fireplaces FOCUS 320 Owner'S Manual Download Page 8

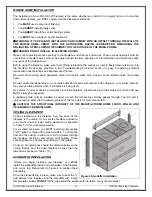
FOCUS 320 Owner's Manual 

RSF Woodburning Fireplaces 

FIRST FIRES 

You will experience a slow start-up during the first few fires. The refractory bricks lining the firebox contain 
moisture from manufacturing and require a few hot fires to evaporate the moisture. While there is still moisture in 
the bricks, they will be black with smoke deposits. When the moisture has dissipated, the bricks will turn white. 
Unlike cast iron stoves, there is no need to cure the fireplace itself by starting with small fires and progressively 
larger ones. Feel free to light a large fire from the very start.  

You will experience a slight odor during the first few fires. This odor comes from curing paint and oil burning off 
the metal. The odor may be strong enough to set off your smoke detector. Open the doors and windows to allow 
the room to properly ventilate.  

LIGHTING 

Ensure that the combustion air control lever is all the way in the open position. You will want as much air as 
possible for the lighting process. 

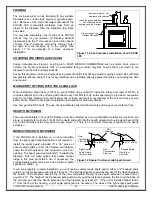
Start by laying your fire starter and kindling. Traditional fire starter is crumpled newspaper; make sure to use 
enough to light the kindling (5-6 pieces should do). Next lay the kindling crisscrossed over the newspaper. Using 
plenty of kindling ensures that the chimney will heat up quickly and establish a strong draft, 

never use any 

flammable liquids

. Light the paper and close the door most of the way, but don’t shut it completely. If the door is 

positioned correctly you will see air rushing into the fireplace, this will help the lighting process. 

Once the kindling is lit and sustaining fire, you can add some small pieces of seasoned cordwood. Use the 
andirons in front to help position the cordwood so as not to flatten and smother the fire you’ve just created. 
Always add at least 3 pieces of cordwood. Position your cordwood in a manner that the fire will hit several pieces 
as it rises and has air gaps to flow through. Continue to leave the door slightly open until the cordwood is lit. Close 
the door completely when the fire is established, if the fire goes out you’ve shut the door too early. 

To get maximum efficiency out of your fireplace you will want to adjust the amount of air entering the firebox at the 
appropriate times. Gauge how much to close the combustion air by how the fire reacts once the combustion air 
control lever has been moved. If the fire goes out and begins to smolder, there’s too little combustion air entering 
the firebox. If there’s no change to the burn pattern, you can continue to close the combustion air further.  
Eventually, you should be able to close the combustion air all or most of the way. There should always be visible 
fire inside the firebox at every step of the process. 

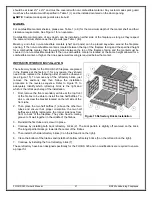
 WARNING: DO NOT USE A GRATE OR ELEVATE THE FIRE.  

 WARNING: MAKE SURE TO KEEP THE FIRE BEHIND THE ANDIRONS. REPLACE THE LOGS IF THEY 

FALL AGAINST THE GLASS. 

REFUELING 

The door should be opened slowly to keep smoke from spilling into your room. If you have a problem with smoke 
spillage, check to see that all kitchen and bathroom fans have been shut off. They can cause negative pressure in 
the house which pulls smoke out of the fireplace. 

 NOTE

: The central heat and internal blowers, if installed, should be shut off during refuelling to prevent smoke 

from spilling out of the fireplace. 

TROUBLESHOOTING PROBLEMS 

If smoke comes into the house when the door is opened: 

  You may have opened the door too quickly and created a suction of air into the room, this can be avoided by 

opening the door more slowly. 

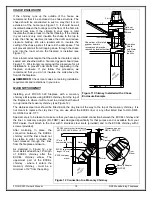
  Ensure your chimney is clean and your chimney cap is not plugged. Chimney caps with screens are more 

likely to become clogged with creosote buildup. 

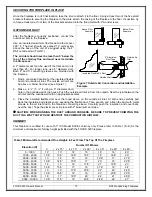
  Make sure you have adequate chimney height for your system. Refer to the Chimney section of this booklet 

and make sure to take altitude, and number of elbows into consideration. 

  If you have purchased the central heat kit option or the circulating internal blower, make sure the blower is off 

before opening the door.  

Summary of Contents for FOCUS 320

Page 1: ... Residential Factory Built Fireplace Operation Maintenance Installation FOCUS 320 Keep these instructions for future use Industrial Chimney Company Inc 400 J F Kennedy St Jerome QC Canada J7Y 4B7 Telephone 450 565 6336 www icc rsf com ...

Page 2: ... AND DONT S 3 CREOSOTE FORMATION AND REMOVAL 3 GENERAL SPECIFICATIONS 4 THE COMBUSTION CONTROL SYSTEM 4 OPTIONS 4 UNIT DIMENSIONS AND CLEARANCES 5 OPERATION 7 AIR CONTROLS 7 BURN TIME VS HEAT OUTPUT 7 FUEL 7 FIRST FIRES 8 LIGHTING 8 REFUELING 8 TROUBLESHOOTING PROBLEMS 8 MAINTENANCE 9 GENERAL CLEANING 9 PAINT 9 GLASS CLEANING 9 CHIMNEY CLEANING 9 DISPOSAL OF ASHES 9 DOOR ADJUSTMENT 10 LOUVERS 10 I...

Page 3: ...st 4 away from the front of the fireplace 8 DO NOT use a fireplace grate or other products not specified for use with this fireplace NOTE We strongly recommend that our products be installed and serviced by professionals who are certified by the National Fireplace Institute in the U S or by Wood Energy Technology Transfer Inc in Canada CREOSOTE FORMATION AND REMOVAL When wood is burned slowly it p...

Page 4: ...gned a rock retainer kit It is not designed or required for full brick or stone With a Louvered FOCUS 320 you can choose to leave all the black metal completely exposed or completely covered with non combustible material Whether you have chosen a Louvered or Clean Face FOCUS 320 the FO KN kit will help you finish the facing of the fireplace as you wish Thin materials can also be installed directly...

Page 5: ... Heat Dump Kit FO HD It includes a 180 cfm blower and is most often used to provide supplemental heating to a basement room when the fireplace is on the main floor but it can also be used to send the warm air to an adjacent room or upstairs NOTE Many options require wiring and or electricity for their installation If there is any chance that any of these options will be installed in the future the...

Page 6: ...tel shelf depth see Table 2 for other mantel sizes 12 305 mm K Minimum height of a combustible mantel shelf above the top of the firebox opening to the bottom of the combustible mantel refer to the Installation Mantel section for particulars See Table 2 Table 2 Various Mantel Shelf Depths and Corresponding Installation Heights Maximum Mantel Shelf Depth Minimum Installation Height 0 to 6 20 12 26 ...

Page 7: ...side air or pull it toward the front to select inside air as the combustion air If the fireplace is installed in a mobile home the outside air MUST be used as combustion air BURN TIME VS HEAT OUTPUT The faster your fireplace burns the more heat it will create however faster fires result in much more hot air flow up the chimney which means you are sacrificing efficiency Fast burning fires lots of a...

Page 8: ...ses and has air gaps to flow through Continue to leave the door slightly open until the cordwood is lit Close the door completely when the fire is established if the fire goes out you ve shut the door too early To get maximum efficiency out of your fireplace you will want to adjust the amount of air entering the firebox at the appropriate times Gauge how much to close the combustion air by how the...

Page 9: ...nough to keep the glass perfectly clean A good hot fire once a day usually cleans off most of the deposits that have accumulated Remember the drier the wood and the hotter the fire the cleaner the glass A word of caution although heat will not break the glass impact can Be careful not to hit the glass WARNING NEVER CLEAN THE GLASS WITH AN ABRASIVE CLEANER USE ONLY A CLEANER RECOMMENDED BY YOUR DEA...

Page 10: ... against the top of the casing move it back to disengage the louver from the two supports one at each end of the louver 4 Turn the louver on its side to bring it back out through the louver opening in the facing of the fireplace To reinstall the top louver follow the above steps in the reverse sequence The top louver support should be inserted between the first and second fins of the top louver Ma...

Page 11: ...RIALS 1 Note the location of roof and floor joists Try to choose a location that does not require cutting them 2 If at all possible run the chimney up through the inside of the house If it must be run outside it should be enclosed in an insulated enclosure see Installation Chase Enclosure Remember a cold chimney causes poor draft The framing dimensions are larger than required for ease of installa...

Page 12: ...ing grayed area refer to text for particulars Cold air trap optional Rain Cap Storm Collar Flashing Radiation Shield with a Storm Collar in the Attic Ceiling Radiation Shield Hearth Extension and Beneath Hearth Extension refer to text for particulars Electrical Knock outs on both sides of the fireplace Outside Air Inlet refer to text for particulars ...

Page 13: ...r the fireplace facing grayed area refer to text for particulars Cold air trap optional Obstruction plates part of Clean Facing Option FO F2 Rain Cap Storm Collar Flashing Radiation Shield with a Storm Collar in the Attic Ceiling Radiation Shield Hearth Extension and Beneath Hearth Extension refer to text for particulars Electrical Knock outs on both sides of the fireplace Outside Air Inlet refer ...

Page 14: ...lace your smoke detector may give you false alarms when the fireplace is being used Be careful if you ever decide to renovate around the fireplace Clearances around the fireplace and the chimney MUST always be respected A radiation shield must be installed as usual at each floor where the chimney passes through The ICC part is long enough to extend to the outermost plane of the roof which it must ...

Page 15: ...e wall with an appropriate sealant 3 Place the insulated flexible duct over the round sleeve on the outside air inlet At both ends carefully pull back the insulation and plastic cover exposing the flexible duct Then at each end attach the duct with metal screws to the air inlet and to the fireplace connecting sleeve Carefully push the insulation and cover back over the duct Tape the plastic cover ...

Page 16: ...e chimney The chimney must extend at least 3 above its point of contact with the roof and at least 2 higher than any wall roof or building within 10 of it If the chimney is higher than 5 above the roof it must be secured using a roof brace 4 Put the roof flashing into place Seal the joint between the roof and the flashing with roofing tar or an exterior sealant For sloping roofs place the flashing...

Page 17: ...obtain the desired offset Secure each joint with three metal screws Refer to the offset charts provided with the EXCEL chimney installation manual for exact offset dimensions 3 Use another elbow to return the chimney to the vertical direction 4 Install a roof support a wall support or an offset support above each offset to support the weight of the chimney elbows are not designed to support the ch...

Page 18: ...ed liner that will run up inside the masonry chimney see Figure 12 The stainless steel liner should be fitted inside the clay liner all the way to the top of the masonry chimney It is not meant to replace the clay liner You can use either the EXCEL liner or any other listed liner to ULC S635 ULC S640 or UL 1777 Special care is to be taken to make sure that you have a good solid connection between ...

Page 19: ...eps 1 Sight in and mark the outline of where the EXCEL chimney will penetrate the masonry chimney 2 Using a large 2 masonry drill bit drill a hole exactly in the center of the oval outline With a masonry hammer and drill slowly enlarge the hole to the size required Remember to work from the center out Be especially careful with the clay liner behind the brick because three sides of it must stay in...

Page 20: ...he area immediately in front of the fireplace must be protected by a non combustible material such as brick tile stone or slate Refer to Table 1 G H for the depth and width that the hearth protection should extend beyond the front and both sides of the door opening see Figure 1 There is no minimum thickness required for the hearth extension BENEATH HEARTH EXTENSION If the FOCUS 320 is installed on...

Page 21: ...factory If for any reason they should need to be replaced the following order should be observed see Figure 15 To remove any of the refractory bricks just remove the andirons and then follow the installation procedure in the reverse sequence Refer to Figure 15 to adequately identify which refractory brick is the right and which is the left at each step of the installation 1 First remove the front ...

Page 22: ...FOCUS 320 Owner s Manual 22 RSF Woodburning Fireplaces LISTING LABEL The listing label is glued to the bottom of the fireplace Just remove the bottom louver the listing label is below the floor shield ...

Page 23: ... Clean Face Kit FO FDHB5 N Blower Internal FO FDHB6 1 Blower Central Heat FO FDHC4 Thermostat Kit FO FDHC6 Central Heat Control FO FDHC6 1 Back Draft Damper FO FDHCZ1 Zone Heat Control FO FDHCZ2 Zone Damper Kit FO FDM7 Masonry Chimney Adapter 7 FO GRK6 Gasket Replacement Kit FO HD Heat Dump Kit FO INT Outside air kit 4 diameter FO KN Rock Retainer Kit FO T Central Heat T Option FO V2 Gravity Vent ...

Page 24: ...k Retainer Kit FO KN Central Heat T Option FO T Gravity Vent Damper FO D Blower internal fan FO FDHB5 N Thermostat kit FO FDHC4 Louvered FOCUS 320 Required Optional Not available Gravity Vent Damper FO D Blower internal fan FO FDHB5 N Blower Central Heat FO FDHB6 1 Thermostat kit FO FDHC4 Heat Dump Kit FO HD Rock Retainer Kit FO KN Central Heat T Option FO T Gravity Vent Kit FO V2 1 or 2 Inline Fa...

Page 25: ...FOCUS 320 Owner s Manual 25 RSF Woodburning Fireplaces REPLACEMENT PARTS Use only genuine RSF parts The use of any substitutes will void the warranty and may put your safety at risk ...

Page 26: ...FOCUS 320 Owner s Manual 26 RSF Woodburning Fireplaces ...

Page 27: ... or cracked refractory components Repairs or replacements necessitated by vandalism neglect abuse over firing improper fuel or fuel loads or failure to adequately service the unit as stated in the owner s manual Repairs or replacements particularly charges for travel and labor not authorized by RSF Woodburning Fireplaces in advance LIMITATIONS All items found to be defective will be replaced or re...

Reviews: