4
Installation
This unit is designed for 10-16.8V negative ground operation system only. Before installing
this unit make sure your vehicle is connected to 10-16.8V negative grounded electrical
system.
The negative battery terminal must be disconnected before making connections, this will
reduce the risk of damage from a short circuit.
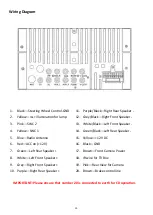
Ensure you connect the colour coded leads as per the diagram. If you connect these
incorrectly if may cause the unit to malfunction or damage the vehicles electrical system.
Ensure you connect the negative speaker leads to the negative speaker terminal and never
connect the left and right channel speaker cable to each other or the vehicle body. Do not
block any vents or radiator panels as this could cause heat to build up and may result in a
fire.
After you have completed the installation of this unit including reconnecting the battery,
press the reset button once on the front panel with a pointed object (ballpoint pen) to set
the unit to initial status.
Frame Button Description
PWR: Long press power on/off
MUTE: Turn off sound
VOL+: Volume up
VOL-: Volume down
Menu button
BAND: Short press is Radio transition, press for selection of FM1, FM2, FM3, AM1,
AM2. Long press for 3 seconds to come into the screen touch calibration interface
MIC: Microphone
AUX: AUX In
USB: USB port
SD: SD port
IR: Remote control sensor
RES: Reset button, factory default
Eject disc


