4
INSTALLING MOUNTING BRACKET
Shut the power off at the circuit breaker box before beginning.
Warning: Failure to disconnect power supply prior to installation may result in serious injury.
For safety and best operating results, installation must be undertaken by qualified electrician.
Before installing the fan make sure the outlet box is properly installed to house structure.
Ensure the metal outlet box is securely fastened by at least two points to a structural ceiling
member, a loose box will cause the fan wobble.
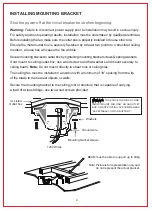
Secure mounting bracket to outlet box by tightening mounting bracket screws & spring washers.
If not mount to ceiling outlet box, use wood screws and flat washers and mount securely to
ceiling beam. Note: Do not mount directly to sheet rock or ceiling tiles.
The ceiling fan must be installed in a location with a minimum of 18” spacing from the tip
of the blade to the nearest objects or walls.
Secure the mounting bracket to the ceiling joist or structure that is capable of carrying
a load of at least 40kgs, use two wood screws provided.
BEAM must be able to support up to 40kg.
120V Wires
Mounting bracket screws
UL Listed
Outlet box
Ground wire
Washers
Note: Picture is for representation only and
do not represent the actual bracket.
WARNING: TO REDUCE THE RISK OF FIRE,
INJURY. MOUNT FAN ONLY ON AN OUTLET
BOX OR SUPPORTING SYSTEM MARKED
“ACCEPTABLE FOR FAN SUPPORT”.
Summary of Contents for 1073-PC
Page 1: ...1073 PC For Models Installation Guide 1073LED PC...
Page 16: ...RP 082119...


