background image

     CAUTION

Take care not to pinch your fingers in the 
frame during set up and take down.

     CAUTION

Never set up or continue to use in any rain, wind, 
or storm conditions, especially lightning storms. 
Damage can occur to the tent and put you and 
others in potential danger.

     CAUTION

Avoid setting up the tent on steep inclines.

     CAUTION

Do not use this tent for permanent shelter. It is 
designed for temporary use only.

     CAUTION

Never leave tent unattended.
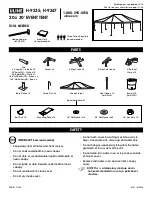
Safety Instructions

WARNING: 

To reduce risk of injury: Before any use, be sure everyone using this unit reads and 

understands all safety instructions and information contained in this manual. Save these instructions 
and review frequently.

WARNING: 

Read all safety warnings and 

all instructions.

 Failure to follow the warnings 

and instructions may result in electric shock, 
fire, and/or serious injury.

WARNING: 

Never modify the product or 

any part of it. Damage or personal injury could 
result.

WARNING: 

To reduce the risk of injury, 

read the instruction manual.

If you have any questions or comments about 
this or any product, call free at: 
1-866-988-3300

WARNING: 

Dress Properly 

KEEP ALL FLAME AND HEAT SOURCES AWAY FROM THIS TENT 

FABRIC. This tent meets the flammability requirements of CPAI-84. The fabric may burn if left in 
continuous contact with any flame source. The application of any foreign substance to the tent fabric 
may render the flame resistant properties ineffective.

Avoid Dangerous Environment 

Don’t use canopy in damp or wet locations.

Don’t Use In Rain
Children Keep Away 

Keep children a safe distance from assembly area.

Must Be Staked 

The frame must be staked or properly weighted down at all times.

Use Caution 

Use extreme caution, even in light wind conditions!

Never Leave Unattended 

Never leave your shelter unattended! Wind and rain can cause damage to frame 

and or possibly result in serious injury to you or others.

Do Not Leave Open 

Your Craftsman Canopy is a temporary pop-up shleter, we do not recommend leaving 

the canopy open for an extended period of time. 

Store Indoors 

When not in use, canopies should be stored indoors in dry, and high or locked-up place out of 

reach of children.

Keep Away From Fire 

Keep all flame and heat sources well away from the fabric top. DO NOT build fires 

within the shelter.

SVPUPGZB106

Summary of Contents for SVPUPGZB106

Page 1: ...structions Pop Up Canopy Questions problems or missing parts Before returning to the store call Customer Service 1 866 988 3300 8 a m 5 p m PST Monday Friday Model No SVPUPGZB106 Retain this manual for future use ...

Page 2: ...ZB106 Contents Safety Instructions Cleaning Maintenance Taking Down the Canopy 3 4 8 Assembly 5 Parts List 4 Spare Parts 10 Drain Holes 11 Warranty 12 IMPORTANT RETAIN FOR FUTURE REFERENCE AND READ CAREFULLY ...

Page 3: ...out this or any product call free at 1 866 988 3300 WARNING Dress Properly KEEP ALL FLAME AND HEAT SOURCES AWAY FROM THIS TENT FABRIC This tent meets the flammability requirements of CPAI 84 The fabric may burn if left in continuous contact with any flame source The application of any foreign substance to the tent fabric may render the flame resistant properties ineffective Avoid Dangerous Environmen...

Page 4: ...d soap and water Never use harsh detergents abrasives or bleach Do not machine wash Never fold or store the canopy when it is wet or damp Allow it to dry completely to avoid mildew Parts List A Frame 1 B Canopy 1 C Carry Bag 1 D Guy Line 4 E Stakes 8 SVPUPGZB106 ...

Page 5: ... Attaching the Canopy With a person on each end lift and partially pull the canopy apart Position the canopy on the center of the frame and hook the four corners of the canopy to the four hooks on the center structure of the frame Fig A Fig B SVPUPGZB106 ...

Page 6: ... place one hand on the upper frame and use the other hand to push the central hub straight up until it clicks into the central pole Finish attaching the canopy inside the canopy frame using the Velcro loops Press the red button on each leg and raise or lower to adjust the canopy height Fig C Fig D Fig E SVPUPGZB106 ...

Page 7: ...ure out from each leg to a proper distance and secure four stakes to the ground Tie the pre attached ropes to the stakes in the ground Ensure the rope has the proper tension by adjusting the plastic adjusters on the ropes Do not attach the ropes to the drain holes Fig F Fig G Drain holes SVPUPGZB106 ...

Page 8: ...ush the central hub straight up until it clicks into the central pole Finish attaching the canopy inside the canopy frame using the Velcro loops From under the canopy place one hand on the upper frame and use the other hand to push the central hub straight up until it clicks into the central pole Finish attaching the canopy inside the canopy frame using the Velcro loops Fig H Fig I Fig J SVPUPGZB1...

Page 9: ...ll legs are raised off the ground except for the 1 leg on the opposite corner Push inward until the frame is fully closed With the canopy feet facing the rollers slide th ewheeled storage bag over the closed canopy frame Close the zipper on the wheeled storage bag Taking Down the Canopy cont Fig K Fig L Fig M SVPUPGZB106 ...

Page 10: ... Parts To inquire about replacement parts please call 1 866 988 3300 A B Top Cap C Slider D Ceiling Assembly E Eave Assembly F Leg Assembly G Leg Extend H Bolt Kit I Canopy J Wheeled Storage Bag SVPUPGZB106 ...

Page 11: ...esign change was made to help alleviate water ponding on the top fabric of the instant canopy during inclement weather due to heavy rain wind This change will allow water to drain efficiently from the top fabric of the instant canopy Please keep in mind these drain holes are not intended for the guide ropes to be attached in this location please use your guide ropes in the intended areas per the in...

Page 12: ... Toll Free Customer Service Hotline at 1 866 988 3300 To expedite any future warranty claims please retain the instruction sheet warranty card and receipt for future use Cleaning and Maintenance Hand wash the canopy using only mild soap and water Never use harsh detergents abrasives or bleach Do not machine wash Never fold or store the canopy when it is wet or damp Allow it to dry completely to av...

Page 13: ... to the following 1 Components subjected to abuse including abuse intended to simulate failure 2 Damages caused by retailer shipper or installation crew such as scratches dents tears chips etc 3 Any part which merely exhibits normal wear yet functions essentially as new including chips scratches or stretching of materials and stitching 4 Tears punctures scratches or any damage caused by improper i...

Reviews: