background image

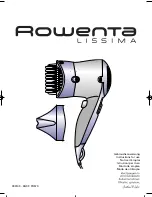
1. ALLGEMEINE BESCHREIBUNG 

A. Zubehör zum Glätten
B. Kämme
C. Scheiben zum Glätten “ Ultra-liss system “
D.  Taste zum Entfernen des Zubehörs
E. Steuertaste
F.

Fixierknopf

G. Haltering
H. Konzentrator
I.

Tasche (zum Aufbewahren von Gerät 
und Zubehör)

J.

Reinigungszubehör

K. Abnehmbarer Filterschutz 
L.

Filter  

D

GB

A

C

F

H

K

E

B

D

J

I

L

1. GENERAL DESCRIPTION

A. Straightener attachment
B. Combs 
C. "Ultra-liss system" smoothing prongs
D. Attachment removal button
E.

Control button

F.

Cold air shot button

G. Ring hanger
H. Concentrator
I.

Carry case (dryer and attachments)

J.

Cleaning brush

K. Removable grid
L.

Filter

NOT lissima Row 030140  31/07/03  12:39  Page 2

Summary of Contents for LISSIMA PH570

Page 1: ...Gebrauchsanweisung Instructions for use Notice d emploi Istruzioni per l uso Modo de empleo Modo de utiliza o 030140 26 03 PH570...

Page 2: ...che zum Aufbewahren von Ger t und Zubeh r J Reinigungszubeh r K Abnehmbarer Filterschutz L Filter D GB A C F H K E B D J I L 1 GENERAL DESCRIPTION A Straightener attachment B Combs C Ultra liss system...

Page 3: ...have finished using it if you have to leave it unattended even for a few moments To ensure additional protection we recommend that you have a differential residual circuit breaker installed with an op...

Page 4: ...ng the hair dryer function with or without the concentrator attachment leaving it damp Fix the Ultra liss system straightener attachment in place and select speed 1 Place the dryer at the roots of you...

Page 5: ...under the fringe and smooth the hair vertically above your head Fig 14 then slide the dryer slowly to the end of the fringe To curve your fringe inwards take the fringe in your other hand and place th...

Page 6: ...low one ear to the other ear Fig 20 Attach the rest of your hair with a hair clip Separate the hair at the nape into 3 vertical sections Fig 21 Start by straightening the side sections followed by the...

Page 7: ...nape Fig 28 Start by straightening the first part of the hair at the nape placing the dryer on the outside of the lock in a root end movement Repeat the process until both sides of the nape are perfec...

Page 8: ...ced a 13 A ASTA approved BS 1362 fuse must be used If your socket outlet is not suitable for the plug then the plug must be removed cut off if it is a moulded on plug and an appropriate one fitted War...

Reviews: