Page 1: ...xist please call us 1 800 222 7023 We will be happy to answer any questions concerning this product Check all fasteners for proper torque Check to ensure for adequate clearance between all components...
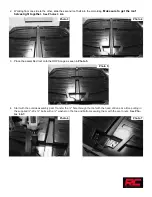
Page 2: ...s 3 4 3 Place the assembled roof onto the ROPS cage as seen in Photo 5 4 Start with the outside assembly part Transfer the hole through the roof with the hand drill one at a time putting in the suppli...
Page 3: ...3 4 bolts with a 1 4 washer on the top and bottom securing them with the acorn nuts See Photo 8 6 Using a knife or scissors cut the H molding off flush with the roof edge See Photo 9 7 Place the assem...
Page 4: ......