Section 6 Maintenance
S7M / S8M Manual
www.rottlermfg.com
6-8
Drive Belt Replacement
Turn off all power to the machine before continuing.
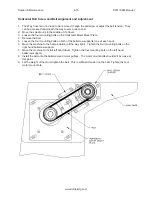
• Remove the access panel at the rear of the machine enclosure. Remove the six screws mounting the
enclosure to the machine. Four screws are located inside the enclosure and are accessed through
the rear opening. The other two screws are in the front and the front right side, from the outside. Lift
cover off the machine carefully. (As cover is lifted slide forward and up to clear motor and belt case.)
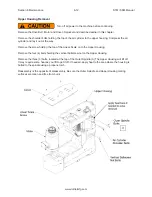
• Remove the four screws holding the upper cover. Lift cover off.
• Loosen the four motor mount screws.
• Loosen the belt tension screw.
• Lift the belt off. Replace with new belt (7247E).
•
Tighten belt tension screw, until belt has 1/8 to 3/16 inch deflection, with 1-1/2 to 3 pounds pressure,
measured in the middle of the belt.
• Tighten the four motor mount screws.
• Replace the upper housing cover and tighten the four screws.
• Replace the machine enclosure and tighten the mounting screws.
Summary of Contents for S7M
Page 2: ......
Page 4: ......
Page 8: ...Section 1 Introduction S7M S8M Manual www rottlermfg com 1 4 ...
Page 17: ...Section 2 Installation S7M S8M Manual www rottlermfg com 2 8 ...
Page 18: ...Section 2 Installation S7M S8M Manual www rottlermfg com 2 9 ...
Page 38: ...Section 5 Operating Instructions S7M S8M Manual www rottlermfg com 5 9 ...
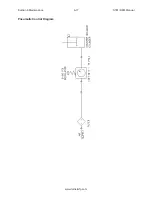
Page 57: ...Section 6 Maintenance S7M S8M Manual www rottlermfg com 6 17 Pneumatic Control Diagram ...
Page 66: ...Section 6 Maintenance S7M S8M Manual www rottlermfg com 6 26 ...
Page 68: ...Section 7 Troubleshooting S7M S8M Manual www rottlermfg com 7 2 ...
Page 71: ...Section 8 Machine Parts S7M S8M Manual www rottlermfg com 8 2 Pneumatic Assembly ...
Page 72: ...Section 8 Machine Parts S7M S8M Manual www rottlermfg com 8 3 Electrical Enclosure ...
Page 74: ...Section 8 Machine Parts S7M S8M Manual www rottlermfg com 8 5 Upper Housing ...
Page 76: ...Section 8 Machine Parts S7M S8M Manual www rottlermfg com 8 7 Spindle Base Front Section ...
Page 77: ...Section 8 Machine Parts S7M S8M Manual www rottlermfg com 8 8 Inner Outer Spindle Assembly ...
Page 78: ...Section 8 Machine Parts S7M S8M Manual www rottlermfg com 8 9 Spindle Base Bushings ...
Page 79: ...Section 8 Machine Parts S7M S8M Manual www rottlermfg com 8 10 Spindle Base Assembly ...
Page 80: ...Section 8 Machine Parts S7M S8M Manual www rottlermfg com 8 11 Left Ballscrew Support ...
Page 81: ...Section 8 Machine Parts S7M S8M Manual www rottlermfg com 8 12 Right Ballscrew Support ...
Page 82: ...Section 8 Machine Parts S7M S8M Manual www rottlermfg com 8 13 Home and Limit Switches ...
Page 83: ...Section 8 Machine Parts S7M S8M Manual www rottlermfg com 8 14 Pendant Assembly ...
Page 84: ...Section 8 Machine Parts S7M S8M Manual www rottlermfg com 8 15 Spindle Base ...
Page 85: ...Section 8 Machine Parts S7M S8M Manual www rottlermfg com 8 16 Chip Shield 14 16 ...
Page 86: ...Section 8 Machine Parts S7M S8M Manual www rottlermfg com 8 17 14 Fly Cutter ...
Page 87: ...Section 8 Machine Parts S7M S8M Manual www rottlermfg com 8 18 Chip Chute ...
Page 89: ...Section 8 Machine Parts S7M S8M Manual www rottlermfg com 8 20 Riser Set ...
Page 90: ...Section 8 Machine Parts S7M S8M Manual www rottlermfg com 8 21 Air Diagram ...
Page 92: ...Section 9 Options S7M S8M Manual www rottlermfg com 9 2 ...
Page 94: ...Section 10 Material Data Safety Sheets S7M S8M Manual www rottlermfg com 10 2 ...
Page 95: ...Section 10 Material Data Safety Sheets S7M S8M Manual www rottlermfg com 10 3 ...
Page 96: ...Section 10 Material Data Safety Sheets S7M S8M Manual www rottlermfg com 10 4 ...

