background image

Rotor Memory Blender 2

43

© Rotor Lips AG

Manual de instrucciones

Español

Desmontaje del accesorio batidor: 


Retire primero el accesorio batidor del bloque motor  

y vacíelo completamente.

Atención:

 Para aflojar la anilla roscada, gire a la 


derecha, en el sentido de las agujas del 


reloj, como si estuviera cerrando un grifo. 


¡Rosca a izquierdas!


¡No tirar del mango! (riesgo de rotura)

¡No accionar nunca el batidor sin blindaje acústico!

Monte o retire el accesorio batidor solo con el motor parado.

La licuadora funciona solo con blindaje acústico cerrado.

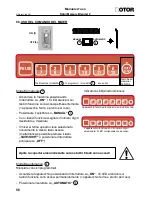
Si el blindaje acústico esta abierto, la tecla “SAVE”  tiene que 

parpadear rojo.

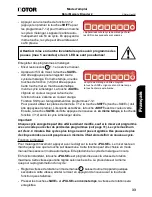
OPEN

TURN

RING

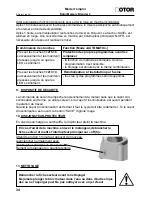
Montaje del blindaje acústico
- Apagar el aparato en el interruptor principal (“OFF” (0)).
- Apretar las cápsulas de fijación y meter por encima la
  pared posterior. Soltar las cápsulas de fijación, mover la
  pared posterior hasta que las cápsulas de fijación se
  enganchan.
- Fijar el blindaje acustico sobre la barra, apretar
  ligeramente las cápsulas de fijación, el blindaje acústico
  baja, ahora soltar otra vez las cápsulas de fijación.
  Leventar ligeramente el blindaje acústico haste que se
  enganchan hacia fuera las cápsulas de fijación.
Batir
- Añada los ingredientes a mezclar.
- Coloque la tapa de tal manera que quede bien cerrada.
- Inserte el accesorio batidor en el anillo de retención sobre

  la base del motor, respetando la posición vertical.

- Cerrar el blindaje acústico.

- Encienda el motor en el interruptor principal
  (“ON”) para ajustar la velocidad en función

  de los ingredientes a mezclar (interruptor de

  control de velocidad).
- Apague el motor en el interruptor principal (“OFF” (0)).
- Abrir el blindaje acústico.
- Retirar el accesorio batidor del bloque motor.
La función “Pulse” del interruptor principal permite el agitado simple y corto del batido; 

accionar el interruptor principal hacia bajo.

Summary of Contents for MEMORY BLENDER 2 RMB

Page 1: ...attentivement ce mode d emploi avant d effectuer la mise en service et conservez le avec pr caution afin de pouvoir vous y r f rer ult rieurement Lesen Sie diese Anleitung vor der Inbetriebnahme sorg...

Page 2: ......

Page 3: ...2 Verwendungszweck 3 3 Maschinen bersicht 3 4 Technische Daten 4 5 Einbau Version RMB IC 5 6 Elektrischer Anschluss 6 7 Inbetriebnahme 6 8a Bedienung und Betrieb 6 8b Bedienung der Mixersteuerung 8 9...

Page 4: ...ss montiert ist Das Ger t darf nur mit den von Rotor Lips AG angegebenen Originalteilen verwendet werden Personen die aufgrund ihrer physischen sensorischen oder geistigen F higkeiten oder ihrer Unerf...

Page 5: ...oder unsach gem ss verwendet kann von der Rotor Lips AG keine Haftung f r eventuelle Sch den bernommen werden 1 Motorsockel 2 Gummifuss 3 Bodenblech 4 Typenschild 5 Mixaufsatz 2 Liter 6 Deckel 7 Decke...

Page 6: ...ische Ausr stung Schutzklasse I gem ss EN 60335 1 funkentst rt nach EMV Richtlinie 2004 108 EC Thermischer Ger teschutz Schalter Becherinhalt 2 Liter Verarbeitungsmenge bis zu 1 7 Liter je nach Konsis...

Page 7: ...el ftet sein zur Motorenk hlung Darauf achten dass die L ftungsschlitze frei bleiben und die Luft gut zirkulieren kann Leichte Materialen wie Plastiks cke etc nicht in der N he der L ftungsschlitze au...

Page 8: ...das Ger t gr ndlich reinigen Befolgen Sie die Richtli nien in Kapitel Reinigung Vor jedem Einstecken des Netzsteckers muss das Ger t unbedingt am Hauptschalter ausgeschaltet Stellung OFF 0 und stabil...

Page 9: ...el stecken auf senkrechte Lage achten Schallschutzhaube schliessen Motor am Hauptschalter ON 1 einschalten und die Geschwindigkeit je nach Mixgut einstellen Ausschalten am Hauptschalter OFF 0 Schallsc...

Page 10: ...halter auf OFF gestellt werden Automatic Betrieb Mixen mit programmierten Zyklen Das Ger t einschalten indem der Schalter auf ON gestellt wird Die 6 orangen LEDs auf den Funktionstasten leuchten dauer...

Page 11: ...d rfnissen angepasst werden Programmiert wird nach dem selben Schema wie wenn ein Zyklus programmiert wird Gew nschte Drehzahl einstellen im manuellen Betrieb Wenige Sekunden das Ger t auf dieser Dreh...

Page 12: ...e gedr ckt halten bis die LEDs leuchten Zur cksetzen auf Lieferzustand Alle selbst programmierte Zyklen werden gel scht 11 REINIGUNG Netzstecker vor der Reinigung aus der Dose ziehen Der Motorblock da...

Page 13: ...durch Einklemmen Stapeln Gewicht von anderen Teilen Speziellen Klarsp ler f r Kunststoffe Polycarbonat verwenden Die vom Geschirrsp lmaschinenhersteller angegebenen Konzentrationen und Einstellungen s...

Page 14: ...as Netzkabel des Ger tes einmal besch digt sein darf dieses nur von einer Fachkraft gegen ein Originalkabel ersetzt werden Nicht vergessen die Schutzerde anzuschliessen SYMPTOM URSACHE UND ODER ABHILF...

Page 15: ...ips 14 2 Uses 15 3 Machine description 15 4 Technical data 16 5 In Counter RMB IC 17 6 Electrical connection 18 7 Putting into operation 18 8a Controls and operation 18 8b Operation of the blender con...

Page 16: ...ng down children The mixer should only be used by instructed personnel The mixer should only be used when all the parts have been properly installed Use only appropriate original spare parts from Roto...

Page 17: ...transparent light and manageable 2 l Stainless steel solid for longest life perfect look 4 l Can not be used If the Rotor Memory Blender 2 is used for any other purposes or altered Rotor Lips Ltd cann...

Page 18: ...Electrical equipment according to standard EN 60335 1 grounded protection class I electromagnetically shielded accordance with EMC directives 2004 108 EC the motor has a thermal protection switch Jar...

Page 19: ...st be ventilated for cooling Ensure that the ventilation slots are unobstructed and permit a sufficient amount of air circulation Plastic bags etc should not be stored too close to the ventilation slo...

Page 20: ...thoroughly cleaned Follow the instructions in the chapter Cleaning Place the Rotor Memory Blender on a firm flat base and plug it into a nearby appropri ate electrical outlet Note The windings of the...

Page 21: ...together both hinge bushings and hook the back board in Release the hinge bushings and align the back board until click into place of both hinge bushings Hook in the sound enclousure onto the steel ba...

Page 22: ...tic operation Blending with programmed cycles To start the appliance move switch to the ON position The 6 orange function button LEDs remain on Appliance stationary and ready for operation Move the se...

Page 23: ...lected speed setting will be saved 1 Important Every saved cycle can be later overwritten except when the mixer is protected from unintentional re programming by a special code See page 20 The max cyc...

Page 24: ...the standby state After 1 hour without a button being pressed the controller disables the buttons This status is indicated by the red LED on the SAVE button To continue operation the blender must be r...

Page 25: ...rations and settings advised by the dishwasher manufacturer must be strictly adhered to Before polish drying the parts all contaminates and remains of the cleaning solutions must be removed Otherwise...

Page 26: ...professional technicians Use only genuine spare parts Serious dan gers to the user could result from improper carried out repairs Attention If the appliance s mains cable should become damaged it shou...

Page 27: ...2 Utilisation 27 3 Aper u de la machine 27 4 Caract ristiques techniques 28 5 La version encastr e RMB IC 29 6 Branchement lectrique 30 7 Mise en service 30 8a Manipulation de la commande du mixer 30...

Page 28: ...is utiliser l appareil N utilisez le mixer que si toutes les pi ces sont mont es correctement L appareil ne peut tre utilis qu avec les pi ces originales cit es par Rotor Lips SA Les personnes enfants...

Page 29: ...l R sistant adapt pour une marche continue tr s l gant 4 l Ne peut pas tre utilis Si le Rotor Memory Blender est modifi e par des tierces personnes ou utilis e de mani re non conforme Rotor Lips SA n...

Page 30: ...mm s dur e du cycle max 4 min Equipement lectrique Classe de protection I conform ment EN 60335 1 D parasit selon la directive de compatibilit lectromagn tique 2004 108 C E E Disjoncteur thermique de...

Page 31: ...ge doit tre a r Veiller ce que les fissures d a rement restent libre et que l air puissent bien circuler Ne laisser pas des mat riaux l gers comme des sac plastics etc proximit des fissures d a rement...

Page 32: ...Blender sur une surface bien plane et stable et brancher la fiche une prise de courant proche et correspondante la fiche Remarque importante Les bobines des moteurs collecteur Rotor sont enduites d un...

Page 33: ...r pour assembler les douilles de fixation et poser la paroi arri re Rel cher les douilles de fixation et bouger la paroi arri rre pour l accouplement Poser le capot d insonorisation sur la barre assem...

Page 34: ...automatique Mixer avec des cycles programm s Mettre en marche l appareil en pressant l interrupteur sur ON Les 6 LED s oranges sur les touches de fonction restent allum s l appareil l arr t et pr t l...

Page 35: ...e m langer d sir Important Chaque cycle enregistr peut tre ult rieurement modifi sauf si le mixer est programm avec un code pour viter de perdre des programmes voir page 31 Le cycle maximum est d env...

Page 36: ...hes du mixer se bloquent La touche SAVE est allum e en rouge Une nouvelle mise en marche par l interrupteur principal ON OFF est n cessaire afin de pouvoir r utiliser le mixer Combinaison des touches...

Page 37: ...tre lav s dans le lave vaisselle Le nettoyage avec m nagement s effectue la main avec un produit de vaisselle cou rant Le d p t de calcaire ne doit jamais tre enlev m caniquement rayures Lors du netto...

Page 38: ...que ment les pi ces d origin Des r parations incorrectes peuvent exposer l utilisateur de graves dangers Attention Si le c ble de l appareil devait tre endommag seul le person nel qualifi en la mati r...

Page 39: ...eguridad 38 2 Aplicaciones 39 3 Descripci n de la m quina 39 4 Caracter sticas t cnicas 40 5 Version incorporada RMB IC 41 6 Conexi n el ctrica 42 7 Puesta en marcha 42 8a Instrucciones de manejo y fu...

Page 40: ...or deber ser utilizado solamente por personal instruido El batidor deber ser utilizado cuando todas las partes hayan sido bien montadas Se deber n utilizar solamente las piezas originales recomendadas...

Page 41: ...rbonato transparente cantidades ligero y manejable 2 l Acero inoxidable robusto muy duradero my elegante 4 l No se puede usar En caso de que el aparato Rotor Memory Blender sea utilizado para otros fi...

Page 42: ...les max duraci n del ciclo aprox 4 minutos Equipamiento el ctrico Doble aislamiento protecci n de Clase 1 de acuerdo con la norma EN 60335 1 Desparasitado seg n la Directiva de Compatibilidad Electrom...

Page 43: ...ser aireado Hacer caso que las ranuras de ventilaci n queden libres y que el aire puede circular bien No depositar materiales ligeros como bolsas de plastico en las proximidades de las ranuras de vent...

Page 44: ...Limpieza Coloque el aparato Rotor Memory Blender en una superficie lisa y firme y ench felo a la toma m s cercana y apropiada Nota importante Las bobinas de los motores con colector Rotor est n prote...

Page 45: ...psulas de fijaci n mover la pared posterior hasta que las c psulas de fijaci n se enganchan Fijar el blindaje acustico sobre la barra apretar ligeramente las c psulas de fijaci n el blindaje ac stico...

Page 46: ...principal en la posici n OFF Funcionamiento autom tico Batir con ciclos programados Encienda el aparato accionando el interruptor en la posici n ON Los 6 LED naranjas de las teclas de funci n se ilum...

Page 47: ...o especial para que no pueda ser programado accidental mente v ase p gina 41 La duraci n m xima del ciclo es de 4 minutos ciclos de mayor duraci n no ser n memorizados Funci n pulse Para un agitado r...

Page 48: ...stas se bloquean autom ticamente y la tecla SAVE se ilumina en rojo Para reutilizar el batidor es necesario un reseteado mediante el interruptor principal ON OFF Combinaciones de las teclas Funci n en...

Page 49: ...s hay que tener en cuenta que todas las piezas de pl stico est n desmontadas y que durante esta no haya carga mec nica p ej por aprisionamiento apilado peso de otras piezas Use abrillantador especial...

Page 50: ...er a ser realizada sola mente por t cnicos profesionales Solo deben utilizarse piezas de recambio originales El usuario podr a resultar gravemente da ado en caso de realizar una reparaci n inadecuada...

Page 51: ...50 2 Ambito d uso 51 3 Panoramica della macchina 51 4 Dati Tecnici 52 5 Modello da incasso RMB IC 53 6 Allacciamento Elettrico 54 7 Messa in servizio 54 8a Uso e funzionamento 54 8b Uso del comando de...

Page 52: ...tutti i relativi componenti L apparecchio deve essere utilizzato esclusivamente con i pezzi originali indicati da Rotor Lips S p A Persone bambini compresi che a causa delle capacit fisiche sensoriali...

Page 53: ...ilizzato in modo improprio Rotor Lips S p A pu respingere ogni responsabilit per eventuali danni 1 Base motrice 2 Piede in gomma 3 Lamiera di fondo 4 Targhetta segnaletica 5 Bicchiere 2 litri 6 Coperc...

Page 54: ...asse di protezione I conforme alla norma EN 60335 1 protezione da disturbi radio conforme alla direttiva EMV 2004 108 EC Interruttore termico Contenuto bicchiere 2 litri quantit di prodotto da miscela...

Page 55: ...il raffreddamento del motore Assicurarsi che le fessure di ventilazione rimangano libere e l aria possa circolare bene Non conservare materiali leggeri come buste di plastica ecc in prossimit delle f...

Page 56: ...istruzioni indicate al capitolo Pulizia Collocare il Rotor Memory Blender 2 su una base solida piana altezza lavorativa ergonomica e collegarlo ad una presa nelle vicinanze Prima di inserire la spina...

Page 57: ...anello di supporto in plastica sulla base motrice in posizione verticale Chiudere la copertura insonorizzante Accendere il motore con l interruttore principale ON 1 e regolare la velocit a seconda deg...

Page 58: ...cipale su OFF Modalit automatica Miscelare con cicli programmati Accendere l apparecchio posizionando l interruttore su ON I 6 LED arancioni sui tasti di funzione sono accesi permanentemente apparecch...

Page 59: ...i svolge secondo lo stesso schema di quella di un ciclo Impostare il numero di giri desiderato nella modalit manuale Fare funzionare l apparecchio brevemente a questo numero di giri dopodich fermare i...

Page 60: ...tti fino a quando si accendono i LED Ripristino dello stato di consegna Tutti i cicli programmati dall utente vengono cancellati 11 PULIZIA Togliere la spina dalla presa prima della pulizia Il base mo...

Page 61: ...tati meccanicamente durante il lavaggio ad es a causa di incastramento impilatura peso di altri elementi Usare un brillantante speciale per materiali sintetici policarbonato Rispettare rigorosamente l...

Page 62: ...usiva mente con un cavo originale Non dimenticare il collegamento a terra SINTOMO CAUSA E O RIMEDIO L apparecchio non funziona Vedere il capitolo protezione del motore Inter ruttore di protezione Coll...

Page 63: ...aso negra 8 1123 490 Mixbecher 2 l polycarbonat bowl 2 l polycarbonate bocal 2l polycarbonate vaso 2l policarbonato 9 1123 470 Mixbecher 2 l Edelstahl bowl 2 l stainless steel bocal 2l inox vaso 2l in...

Page 64: ...e cette d claration est conforme aux normes num r es ci apr s a la que se refiere esta declaraci n esta en conformidad con las siguientes normas o documentos normativos siguientes alla quale questa di...

Reviews: