


rothaudio.co.uk
|
11
User Manual
English
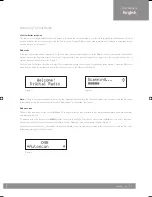
Stereo music connection to other Bluetooth devices
This connection requires a device supporting the Bluetooth A2DP profile for stereo music connection. Please ensure your device has the latest
versions of software drivers and/or firmware supporting Bluetooth functionality. Compatibility with all devices is not guaranteed. In addition
to the procedures described above for mobile phones, this radio can receive stereo music from many other Bluetooth source devices including
personal computers, PDAs, Bluetooth enabled music players. The exact connection procedures may vary from device to device, please refer to
the device user manual for specific operations.
Note:
An increasing number of computing devices include support for Bluetooth, and many include support for stereo music over Bluetooth
(A2DP). For best performance from your particular device, please ensure that you are using the latest update of software drivers and/or
firmware available. In certain circumstances, updating the software drivers or firmware of your device to the latest release may add support
for A2DP that was not available in a previous release. Please contact the vendor of your device for such updates and refer to the device user
manual for update procedures. Please remember that system updates should only be performed by qualified individuals after performing a
full system backup.
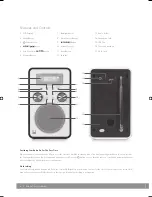
Aux Input
There is a 3.5mm stereo aux input socket located at the back of the unit; analogue audio sound signals from other sources can be input to
the radio through this socket. To select AUX function, repeatedly press the
MODE
button until you see “Switch to AUX” is displayed, the audio
will be switched to the aux input signal and you can adjust the volume control for your desired sound output level.
Note:
To further enhance energy saving, if the unit is left in AUX mode and without any user operation for three hours, the unit will switch
itself to standby automatically; To toggle select this function between on & off During unit on, press and hold the MODE button for longer
than two seconds, the display will show “ECO ON” or “ECO OFF”.
USB Port
There is an USB port located at the back of the unit, a standard 5V/500mA output is provided for normal USB charging capability. USB data
communication is not available through this port.
Headphone Jack
A 3.5mm type stereo headphone jack is located at the back of the unit. Connect a set of stereo headphones (not included) to this jack for
private listening without disturbing others. The speakers are automatically disconnected when the headphones are in use.
IMPORTANT:
When using headphones always set the volume to a low level before you put the headphones on. Then insert the headphones
and gradually increase the volume to a comfortable listening level.
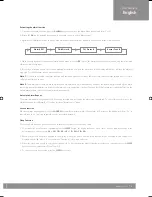
Display Backlight
There are four backlight levels for you to set in unit operation. To set the backlight, repeatedly press the
BACkLIGhT
button and the
brightness of the display will change in the below sequence on every press:
Backlight off > Backlight 01 > Backlight 02 > Backlight 03 > Backlight off >...
During standby, the backlight level is defaulted to be “Backlight 01”, press the
BACkLIGhT
button will toggle the backlight level between
“Backlight off” and “Backlight 01”, and it will be turned on to full brightness for 5 seconds on every key press.
Note:
The display backlight level is defaulted to “Backlight 01” in standby and “Backlight 03” during operation. This is resumed only when
the factory reset has taken place.
DBT-001 Manual VJ.indd 11
7/8/12 13:23:15