background image

22 • Functional Check Procedures

ACO-2200 User Guide (v5.0)

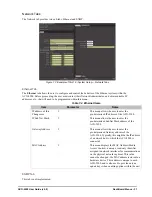
Normal Operation (No Faults)

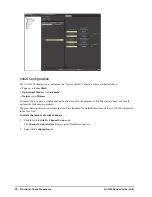
1. Double-click the 

Slot 1: Channel Setup

 node.

The 

Channel Setup interface

 displays in the DashBoard window.

2. Select the 

Configuration

 tab.

3. Use the 

Changeover Mode

 menu to select 

Automatic

.

4. Use the 

On Air

 menu to select 

Primary is On Air

.

You should see that the channel output is the Primary input signal (Composite Video).

You cannot set the Output menu to Backup when the Operational Mode is set to Auto.

5. Use the 

Changeover Mode

 menu to select 

Manual

.

6. Use the 

On Air

 menu to select 

Backup is On Air

.

You should see that the channel output switches to the Backup input signal (Analog Color Black).

7. Use the 

On Air

 menu to select 

Primary is On Air

.

The channel output switches to the Primary input signal (Composite Video)

Loss of the Primary Signal

1. Disconnect the Primary input signal (Composite Video).

The channel output automatically switches to the Backup input signal (Analog Color Black), and a fault 
indication appears on the display.

2. Re-connect the Primary input signal (Composite Video). Note that the fault indication changes to show that the 

Primary input signal is now correct, and the channel output automatically switches back to the Primary input 
signal (Composite Video).

3. Press [Push Button Control under FAULT LED] to clear the fault indication.

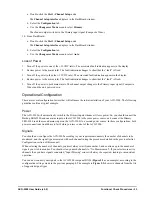
4. From DashBoard:

a. Double-click the 

Slot 1: Channel Setup

 node.

The 

Channel Setup interface

 displays in the DashBoard window.

b. Select the 

Configuration

 tab.

c. Use the 

Changeover Mode

 menu to select 

Manual

.

5. Disconnect the Primary input signal (Composite Video). Note that no switching occurs, but that the Primary 

fault indication appears.

6. Press [Push Button Control under FAULT LED] to clear the fault indication.

7. From DashBoard:

a. Double-click the 

Slot 1: Channel Setup

 node.

The 

Channel Setup interface

 displays in the DashBoard window.

b. Select the 

Configuration

 tab.

c. Use the 

Changeover Mode

 menu to select 

Backup

.

The channel output switches to the Backup signal (Analog Color Black).

8. Re-connect the Primary input signal (Composite Video).

9. From DashBoard:

Summary of Contents for ACO-2200

Page 1: ...ACO 2200 User Guide...

Page 2: ...eople that make things happen At Ross our employees are a special group Our employees truly care about doing a great job and delivering a high quality customer experience every day This code of ethics...

Page 3: ...Refer to the Important Regulatory and Safety Notices document that accompanied your product EMC Notices United States of America FCC Part 15 This equipment has been tested and found to comply with th...

Page 4: ...al resources Ross Video encourages you to use the appropriate take back systems These systems will reuse or recycle most of the materials from your end of life equipment in an environmentally friendly...

Page 5: ...13 Operating Environment Requirements 13 Rack Mount Installation 14 Installing the ACO 2200 into a Rack Unit 14 Installing the Rear Support Brackets 14 Connecting Power 15 Setting the Initial IP Addre...

Page 6: ...30 Network Tabs 31 Calibration 01 06 Tab 32 Technical Specifications 33 General Characteristics 33 Performance Conditions 33 BNC Channels 33 Ethernet Interface 34 DC Power Source 34 Physical Specifica...

Page 7: ...ides a list of terms used throughout this guide Related Publications It is recommended to consult the following Ross documentation before installing and configuring your ACO 2200 ACO 2200 Quick Start...

Page 8: ...close as the nearest telephone Our 24 hour Hot Line service ensures you have access to technical expertise around the clock After sales service and technical support is provided directly by Ross Video...

Page 9: ...type of input There is a selection of predefined checking levels relating to the various signals that are supported No Measurement Color Black no ancillary signals present i e only Sync and Burst Colo...

Page 10: ...the ACO 2200 Figure 2 1 ACO 2200 Functional Diagram BACKUP PEAK DETECT PRIMARY PEAK DETECT PRIMARY LEVEL CHECK BACKUP LEVEL CHECK Output Primary Input Secondary Input RELAY OTHER CHANNELS OTHER CHANN...

Page 11: ...y Backup Mode Button and LEDs This button enables the user to select either the Primary or Backup inputs 5 Panel Lock Unlock Button and LEDs This button allows the user to select if the front panel bu...

Page 12: ...take into account and be aware of the limitations of the switching relay regarding voltage current and signal bandwidth 2 Ethernet 100 Base T Connection This rear panel connector is a standard RJ45 E...

Page 13: ...rior to shipment the ACO 2200 is thoroughly inspected for mechanical defects 4 Verify that the shipping carton contains the instrument the standard accessories and any optional accessories that you or...

Page 14: ...n be attached to the ACO 2200 in six possible positions Figure 4 1 Figure 4 1 Installing the Support Brackets To install the support brackets 1 Choose the position that suits the cabinet depth and wil...

Page 15: ...ddress The ACO 2200 is remotely controlled over an Ethernet link by a DashBoard client When using DashBoard to communicate with the ACO 2200 the ACO 2200 is always configured as a fixed IPv4 device us...

Page 16: ...with suitable connectors are supplied with the ACO 2200 Power Cords All ACO 2200 are shipped with one of the following power cord options Power cords for use in the United Kingdom are BS1363 approved...

Page 17: ...e included which suggest cycling through menu options in order to check operation this is not mandatory a simple check for presence or absence of a signal will suffice Full details regarding the optio...

Page 18: ...User settings are made using DashBoard Recommendation The ACO 2200 menu system contains an appreciable number of pre programmed and user selectable settings All of these settings are programmed using...

Page 19: ...olbar select File New TCP IP DashBoard Connect or openGear Device The New TCP openGear Frame Connection dialog opens 2 Type the IP address of the ACO 2200 in the IPAddress field 3 Type a unique name f...

Page 20: ...To ensure that you have a suitable channel configuration for the purposes of this Functional Check you should perform the following procedures The procedures in this section assume that you have laun...

Page 21: ...node The Channel Setup interface displays in the DashBoard window 2 Select the Channels 1 6 tab 3 Select the channel to update For initial configuration select Channel 1 4 Select the channel type fro...

Page 22: ...put signal Analog Color Black and a fault indication appears on the display 2 Re connect the Primary input signal Composite Video Note that the fault indication changes to show that the Primary input...

Page 23: ...luence the initial installation of your ACO 2200 The following guidelines outline a typical example Power The ACO 2200 will automatically switch to the Primary inputs whenever it loses power So you sh...

Page 24: ...will be helpful to refer to in the future in order to quickly find out whether for example a previously unused channel requires a menu change relating to the new signal to be monitored Table 5 1 ACO...

Page 25: ...ult is only an intermittent one the fault indicator will stay illuminated If more than one fault exists only the first one is reported i e counting from the lowest numbered configured channel As fault...

Page 26: ...ons have been made then try repeating the above procedure after powering down the ACO 2200 and then resuming from the update program start up line 5 If the ACO 2200 still cannot be found contact Ross...

Page 27: ...ents Tab The Events tab provides access to the last 99 events recorded by the ACO 2200 These events may relate to normal expected functionality or to systemic errors This information might be useful i...

Page 28: ...r of times each power supply has been cycled and the running hours count EventGPSTimeLost 7 EventNewMinTemp0 34 EventSetUTCTimeFromNTP 8 EventNewMinTemp1 35 EventNTPTimeLost 9 EventNewMinTemp2 36 Even...

Page 29: ...only fields Recover Mode indicates how the ACO 2200 is configured for recovery from faults Recovery Delay in Seconds indicates how many seconds the optional recovery delay is set for Recovery Delay in...

Page 30: ...ver after the primary fault is fixed immediately This mode returns to the primary as soon as the ACO 2200 sees the primary signals have returned Automatic recover after Primary fault is fixed after de...

Page 31: ...This menu allows the user to enter the pre determined IP address of the ACO 2200 IP Sub Net Mask This menu allows the user to enter the pre determined SubNet Mask address of the ACO 2200 Gateway Addr...

Page 32: ...DashBoard Menus ACO 2200 User Guide v5 0 Calibration 01 06 Tab The Calibration 01 06 tab enables the user to see the factory calibration data for the ACO 2200 Figure 7 4 Example of Calibration 01 06 T...

Page 33: ...ditions are within the operating limits described in the section Environment Characteristics on page 34 The ACO 2200 must have a warm up period of at least 20 minutes The ACO 2200 must have been calib...

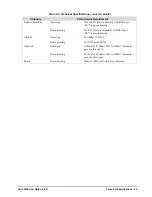
Page 34: ...cifications DC Power Source Category Performance Requirement Notes Operational Voltage Range 10 13 VDC Absolute Limits Voltage Range 9 14VDC Operational AC Current 0 74A Power Consumption 9VA Table 8...

Page 35: ...to 60 C non condensing Altitude Operating To 2 000m 6 561ft Non operating To 12 192m 40 000ft Vibration Operating 2 65m s2 0 27Grms 5Hz to 500Hz 10 minutes per axis three axes Non operating 22 3m s2 2...

Page 36: ...36 Technical Specifications ACO 2200 User Guide v5 0...

Page 37: ...ult in an electrically conductive path A vacuum cleaner may be used to remove accumulated dust on the outside of the instrument Ensure that the nozzle is fitted with a soft brush head or similar to av...

Page 38: ...orm internal service or adjustments of this product unless another person capable of rendering first aid and resuscitation is present Disconnect Power To avoid electric shock switch off the power to t...

Page 39: ...ils name company telephone email the frame serial number of the unit original delivery date Warranty and Repair Policy The ACO 2200 is warranted to be free of any defect with respect to performance qu...

Page 40: ...the responsibility of you the customer All products shipped to you from Ross Video Limited will be shipped collect The Ross Video Technical Support Department will continue to provide advice on any p...

Page 41: ...eplerian like parameters with corrections that account for the perturbations to the orbit caused by the earth s gravitational field and other forces Epoch is an instant of time or a date from which va...

Page 42: ...42 Glossary ACO 2200 User Guide v5 0...

Reviews: