background image

33 

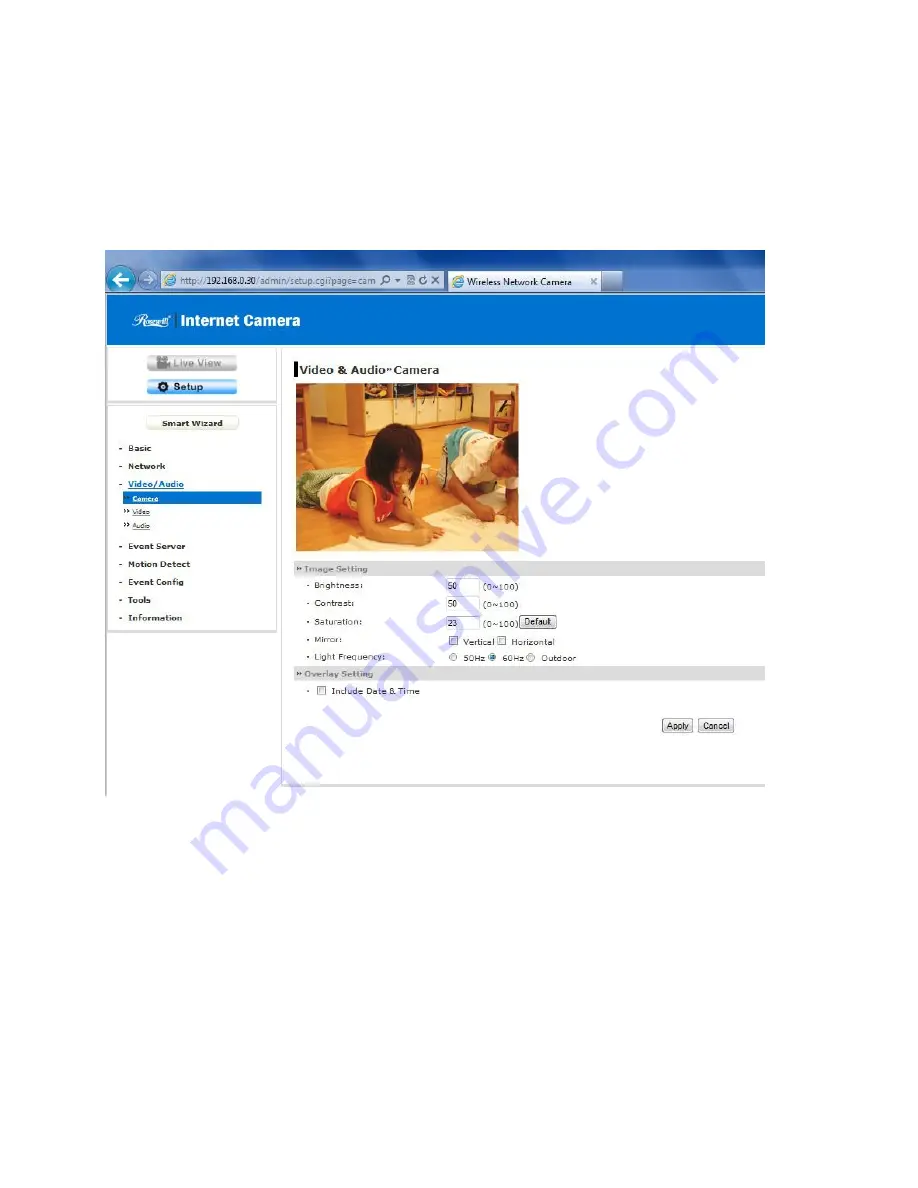
4.5  Setting up Video & Audio 


The Video & Audio menu contains four sub-menus that provide the video and audio 

settings for the camera.


Video & Audio >> Camera 


Image Setting 

Brightness:

 Adjust the brightness level from 0 ~ 100. 

Contrast: 

Adjust the contrast level from 0 ~ 100. 

Saturation: 

Adjust the colors level from 0 ~ 100. 

TIP


Click 

Default

 then 

Apply

 to restore the default settings of the three options 

above. 

Summary of Contents for RS-12001

Page 1: ...1 Internet Camera Advanced Installation Guide...

Page 2: ...he Cam era 4 1 WEB CONFIGURATION 18 4 2 SMART WIZARD 19 4 3 BASIC SETUP 22 4 4 NETWORK SETTINGS 25 4 5 SETTING UP VIDEO AUDIO 33 4 6 EVENT SERVER CONFIGURATION 35 4 7 MOTION DETECT 36 4 8 EVENT CONFI...

Page 3: ...Accounts 89 6 2 5 Deleting Devices 90 APP EAGLESENSE 6 3 OPERATING EAGLESENSE 92 Andriod Google Play 92 iTune App Store 93 6 3 2 Viewing Videos 95 6 3 3 Viewing Images Generated from Multiple Videos...

Page 4: ...in the package carefully You should have the following Wireless Internet Camera AC Power Adapter Camera Stand Ethernet Cable RJ 45 type Installation CD ROM Quick Installation Guide NOTE Once any item...

Page 5: ...ns Assembly Power LED Indicates the camera is powered on with the steady amber light Link LED indicates the camera s network connectivity with the flashing green light Internal Microphone allows the c...

Page 6: ...is long pressed for five seconds the camera will resume the factory default settings DC Power Connector is used to connect the AC power adapter in order to supply power to the camera Ethernet Cable Co...

Page 7: ...on the camera can be upgraded remotely when a new firmware is available The users are also allowed to monitor the image and take snapshots via the network Multiple Platforms Supported The camera suppo...

Page 8: ...VGA 320 X 240 30 FPS QQVGA 160 X 120 30 FPS Networking Network Protocols IPV4 ARP TCP IP UDP ICMP DHCP NTP DNS DDNS SMTP FTP HTTP PPPoE UPnP and SSL Bonjour Ethernet IEEE 802 3u 10 100Mbps Auto MDIX F...

Page 9: ...ove User Interface Microsoft Internet Explorer 6 0 or above Apple Safari 2 or above Mozilla Firefox 2 00 or above Google Chrome Accessing the Camera using UltraView Pro Platform Microsoft Windows XP V...

Page 10: ...a comes with a camera stand which uses a swivel ball screw head to lock to the camera s screw hole When the camera stand is attached you can place the camera anywhere by mounting the camera through th...

Page 11: ...tus from the Power LED on the front panel of the camera Once connected the Link LED starts flashing green light and the camera is on standby and ready for use now Connecting the Ethernet Cable When th...

Page 12: ...ternet or Intranet Capture still images and video clips remotely Upload images or send email messages with the still images attached The following diagram explains one of the typical applications for...

Page 13: ...lick the IPFinder item to launch the utility The control panel will appear as below 3 Once you get the IP address of the camera launch the Web browser or UltraView Pro to access your camera Display th...

Page 14: ...browser 2 If Network Camera can t get IP Address under DHCP mode the default IP Address will be 192 168 0 30 3 When the login window appears enter the default User name admin and password admin and p...

Page 15: ...age of the connected camera Live View Setup Switch Click Setup to configure the camera For details see Chapter 4 and Click the Live View button to return to the Main screen to view the live view image...

Page 16: ...sta platform you may be unable to find these recorded files what stored by Snapshot or Manual Record You need to disable the protected mode of Security in the IE Browser Please follow as below Steps 1...

Page 17: ...on to open the Network Connection window 3 Right click Local Area Connection and then click Properties from the shortcut menu 4 When the Local Area Connection Properties window appears select the Gene...

Page 18: ...and guides you through the configuration of the camera by using the web browser To configure the camera click Setup on the main page of Web Configuration The Web Configuration will start from the Basi...

Page 19: ...u through the necessary settings with detailed instructions on each step To start the wizard click Smart Wizard in the left menu bar Step 1 Camera Settings Step 2 IP Settings Enter the name for the ca...

Page 20: ...20 Step 3 Email Settings Step 4 Wireless Networking for wireless model Enter the required information to be able to send email with image Complete the required settings for wireless networking...

Page 21: ...nfiguration of your camera When you confirm the settings click Apply to finish the wizard and reboot the camera Otherwise click Prev to go back to the previous step s and change the settings or click...

Page 22: ...D illumination as desired There are two options Normal and OFF Basic Date Time Date Time Time Zone Select the proper time zone for the region from the pull down menu Synchronize with PC Select this op...

Page 23: ...ant to add to use the camera Password Enter the password for the new user When you are finished click Add Modify to add the new user to the camera To modify the user s information select the one you w...

Page 24: ...ete NOTE The General User can access the camera and control the Function buttons of the camera s Web Configuration the Guest can only view the live view image from the main page of the Web Configurati...

Page 25: ...Network IP Setting This item allows you to select the IP address mode and set up the related configuration DHCP Select this option when your network uses the DHCP server When the camera starts up it w...

Page 26: ...re when you select PPPoE as your connecting type you have to set up the email or DDNS configuration in advance DDNS Setting With the Dynamic DNS feature you can assign a fixed host and domain name to...

Page 27: ...mera by entering the Start IP address and End IP address options When you are finished click Add to save the range setting You can repeat the action to assign multiple ranges for the camera IPv6 Enter...

Page 28: ...r the infrastructure network mode To connect the camera to a specified access point set a SSID for the camera to correspond with the access point s ESS ID To connect the camera to an Ad Hoc wireless w...

Page 29: ...SK is specially designed for the users who do not have access to network authentication servers The user has to manually enter the starting password in their access point or gateway as well as in each...

Page 30: ...ct TKIP or AES TKIP Temporal Key Integrity Protocol changes the temporal key every 10 000 packets to insure much greater security than the standard WEP security AES Advanced Encryption Standard is use...

Page 31: ...PROTECTED SETUP Press the Reset to Unconfigured button to reset the WPS configuration of the camera WPS PIN Mode The PIN Personal Information Number mode builds the connection by entering the PIN Code...

Page 32: ...tion Utility you can press the WPS button if the camera is designed with a hardware button of WPS function c You need to press the WPS button on the router or access point within 120 seconds to comple...

Page 33: ...and audio settings for the camera Video Audio Camera Image Setting Brightness Adjust the brightness level from 0 100 Contrast Adjust the contrast level from 0 100 Saturation Adjust the colors level f...

Page 34: ...ts VGA QVGA and QQVGA The higher setting VGA obtains better video quality while it uses more resource within your network Video Quality Select the desired image quality from five levels Lowest Low Nor...

Page 35: ...not Once the camera connects to the server successfully click Apply Event Server Setting FTP FTP Host Address Enter the IP address of the target FTP server Port Number Enter the port number used for t...

Page 36: ...rs a way to upgrade a plain text connection to an encrypted TLS or SSL connection instead of using a separate port for encrypted communication Authentication Mode Select None or SMTP according to the...

Page 37: ...provides two detecting areas To enable the detecting area select Window 1 or 2 from the pull down list and then select Enable When the detecting area is enabled you can use the mouse to move the detec...

Page 38: ...ured file Otherwise leave this option blank to use the default setting Event Configuration Arrange Schedule Profile This sub menu displays the scheduled profile s To customize the profile click Add an...

Page 39: ...e period from every weekday Click Delete to remove the selected time period Start End Time Enter the start and end time and then click Add to assign a time period within in the selected weekday Event...

Page 40: ...ule Trigger You can separately configure the schedule for trigger function of the camera by Email or FTP Select the Enable option on each item and then select a Schedule Profile from the pull down lis...

Page 41: ...Click Reset to restore all factory default settings for the camera System Reboot Click Reboot to restart the camera just like turning the device off and on The camera configuration will be retained af...

Page 42: ...s the current firmware version You can upgrade the firmware for your camera once you obtained a latest version of firmware Select the firmware Click Browse to locate the backup file and then click Upd...

Page 43: ...nu displays the current configuration and events log of the camera Device Info Display the Basic Video Network and Wireless settings for wireless model of the camera System Log The Logs table displays...

Page 44: ...ntrol panels of UltraView Pro To use UltraView Pro you have to install it in your computer It is recommended to use a high performance computer if you want to connect multiple cameras simultaneously P...

Page 45: ...omplete the installation step by step NOTE To use UltraView Pro you must have Microsoft NET Framework 2 0 installed in the computer The setup wizard will detect it and if the program is not installed...

Page 46: ...IP The IPFinder program will be installed in your computer simultaneously when you install UltraView Pro For more information of using IPFinder refer to Chapter 5 or the User Guide provided by your ca...

Page 47: ...desktop of your computer 2 On the login window enter the User name Password and click OK to login If this is the first time you start the program and login use the default User name Password admin adm...

Page 48: ...ormation on operating the system as well as the control panel such as the Quick Launch buttons and so on NOTE UltraView Pro requires the resolution setting up to 1024 x 768 For best view of the applic...

Page 49: ...dow Click to configure the event settings Event Server Address Book and Event Trigger Click to configure Device Setting and Recording Setting Click to set the Account Language and System Setting or vi...

Page 50: ...tion including the date and time and the available storage space of the system Live View Status provides the status of live view mode including Camera List and eMap Camera List displays the status of...

Page 51: ...on buttons and then select the position number 1 8 from the Set button To move to the preset position simply select the position number 1 8 from the Go button Navigation Buttons Left Right Up Down Hom...

Page 52: ...u can access the camera you have to add the camera to the system Adding a Camera 1 Click the button and select Device Setting to display the Device Setting window 2 Click New 3 Click Device Search to...

Page 53: ...53 4 Click Search to find the IP address of the connected camera s When search is finished select the camera and click Add...

Page 54: ...g the camera will not be displayed Stream Select the stream type as MPEG4 MJPEG or H 264 Record Select Yes or No to set up recording function of the camera Preview Window This window allows you to pre...

Page 55: ...55 7 Click the X button on the Device Setting window to return to the Main window The image of the camera will be displayed...

Page 56: ...List 2 To delete the camera select the desired one and then click Remove When prompted click Yes and then select OK to confirm deletion To change the configuration of the camera select the desired on...

Page 57: ...For example if you use only one camera select single camera view mode and the Live View Window will display the view as below You can select the other modes according to your need The Information icon...

Page 58: ...Settings 1 Click the button and then select Record Setting 2 To assign the target folder for saving the recorded files click the Browse button next to the Recording Path option and then select the de...

Page 59: ...ameras Click the button and select All Continuous Recording to set all cameras to start recording or select Stop All Recording to set all cameras to stop recording Since you have enabled the recording...

Page 60: ...e Schedule Title to set the time to record video One checkbox stands for 30 minutes of recording time You can choose to assign the single checkbox repeatedly by using Click or assign a period of time...

Page 61: ...Click the button to display the Playback window 2 On the Playback window set the conditions for search such as selecting the camera and setting the begin end date and begin end time When the search co...

Page 62: ...e Record File list 3 To playback the video clip select the desired file and click Play NOTE Codec is required for the system to play the video files If the video clips cannot be displayed in the Playb...

Page 63: ...ting to configure the camera view setting of eMap mode eMap refers to the geography and device scope of the UltraView Pro which visually presents the devices in your security system It uses a backgrou...

Page 64: ...64 2 Enter the eMap Name 3 Click Browse to select a Picture File from your computer The selected picture will be displayed in the Preview window When completed click Save...

Page 65: ...mera position in the eMap Click the Camera Location button to display the Edit window Select the camera from the Camera List and then click the mouse on the desired position of the map The camera icon...

Page 66: ...66 5 When completed click Save 6 To view from eMap a Click the button and select eMap View b Select the map from the eMap Name list...

Page 67: ...nd select View Setting 2 To edit the eMap In the eMap List select the desired map and click Modify The map s information will be displayed where you can change the map s information and then click Sav...

Page 68: ...nagement Click the button and select Account to change the administrator password for the system Enter the Current password and then enter the new password twice in the Type new password and Retype pa...

Page 69: ...Trigger window select the desired camera from the Camera List 2 Do one of the following SMTP Select this option and enter the Subject and Message the system will send an email message to the selected...

Page 70: ...d while triggering out Setting up Event Server Click the button and select Event Server to configure the SMTP server so that you can send emails that include still images as notification Select the En...

Page 71: ...mymail com Authentication Mode Select None or SMTP according to the mail server configuration Sender User Name Enter the user name to login the mail server Sender Password Enter the password to login...

Page 72: ...Information field enter the Name and Email of the user 3 When completed click Save The user will be displayed in the Address Book List 4 To edit the user In the Address Book List select the desired us...

Page 73: ...ing System Language Click the button and select language to change the displayed system language On the Language screen select the preferred language English Traditional Chinese or Simplified Chinese...

Page 74: ...74 5 4 5 Terminating Operation When you have finished operating click the button and select Logout to logout the system or Close to exit the program...

Page 75: ...the desktop of your computer 2 Once you get the IP address of the device launch the Web browser or UltraView Pro to access your device Display the connected video server s Double click to link the de...

Page 76: ...rough this website The following user guide will walk you through the steps you need in order to take full advantage of the functionalities that the website has to offer 6 2 Instructions WEB C4mi 6 2...

Page 77: ...invalid email address 3 2 Enter a display name Your display name can contain a combination of alphabetical and numerical characters and can be no more than 20 character long 3 3 Enter and re enter pa...

Page 78: ...78 D Successful Registration Click on the Register button when you have entered all the required information The following webpage will appear to confirm your registration...

Page 79: ...ch you have provided to C4mi upon registration You will receive a system generated email message which contains an account activation link Click on the activation link and you will be directed to the...

Page 80: ...ice by entering the correct device activation code Once your device is successfully activated you can start viewing the video image generated by your device A Activating Device 1 Click on the Activate...

Page 81: ...81 2 Click on the Start button As the following webpage has indicated enter the device activation code and click the Next button...

Page 82: ...ill display the following webpage once the inputted activation code was correctly entered The system will display an error message if the activation code field is left in blank or an invalid activatio...

Page 83: ...it is successfully activated Click on any of the device on the device list appeared on the left to view the real time image from the selected device You can control the direction of the camera lens b...

Page 84: ...84 Click on save to save the modification or click on cancel to cancel the edit process...

Page 85: ...85 B Viewing 8Video Images Click on the button to view up to 8 camera images at a time...

Page 86: ...on any of the camera buttons to view a single video image Click on the page number to view the desired real time video image s You can view up to 8 video images per page and up to 16 from a total of...

Page 87: ...87 Click on the button on the 8 video webpage to return to My Device webpage...

Page 88: ...system will display the following dialog box to confirm your upgrade request Click on the Yes button to start the upgrading process Your IPD status will be offline while undergoing the upgrading proc...

Page 89: ...word by clicking on the Account tab 2 Enter a new display name Display name can include a combination of alphabetical and numerical characters Maximum length of your display name is 20 characters The...

Page 90: ...r long The maximum length of your password is 20 characters 4 Click on the Update button to complete your account updating process 6 2 5 Deleting Devices Click on Delete Device the webpage will displa...

Page 91: ...next to the device s you wish to delete click on the Delete button The system will pop up a confirmation dialog box Click on the Delete button to delete the selected device s or click on Cancel to exi...

Page 92: ...d Google Play or iTune App Store and download before using 2 For the first time user if you haven t registered on C4mi please go to www c4mi com to register 3 If you already registered on C4mi please...

Page 93: ...93 iTune App Store...

Page 94: ...ation login page Enter account User ID password then tap the Sign in button to log in to the system User ID and password are the same as your registered C4mi account Tap on HELP on the bottom right ha...

Page 95: ...95 6 3 2 Viewing Videos A Start Viewing Videos On the camera list tap the camera from which you wish to view the desired image...

Page 96: ...ouch your iPhone screen with two fingers Close two fingers to zoom in and open two fingers to zoom out the image you wish to enlarge or shrink The frame at the bottom left corner exhibits the displaye...

Page 97: ...97 C Moving Images Around When the image is in zoom mode drag the displayed image to your preferred location The frame at the bottom left corner exhibits the current image movement...

Page 98: ...98 D Stop Viewing Videos Tap the button at the bottom right corner to exit the video viewing page and return to the device list page...

Page 99: ...ion Tap the icon of the camera to which you wish to update information and you will be directed to the device info page Enter the desired information to update the device info Tap the Save button to s...

Page 100: ...hone The following steps walk you through the set up process needed in order to view multiple video images from your iPhone A Viewing 4Video Images Tap the Video button at the bottom of your iPhone sc...

Page 101: ...n at the bottom of your iPad screen A maximum of 8 video images will appear the system displays the images from the 8 cameras which you have previously selected Tap any of the 8 images and the screen...

Page 102: ...102 C Viewing More Videos Swipe the screen to view more videos...

Page 103: ...103 D Changing the Displayed Location of the Selected Video If you wish to change the displayed location of a particular video image simply press down the image and drag it to your preferred location...

Page 104: ...n image from an offline camera a message will appear to indicate that the image is currently unavailable due to camera s offline status When you press down the camera to show the single image the scre...

Page 105: ...105 6 3 4 Exiting EagleSense Return to the device list page Tap the icon to exit EagleSense Application...

Page 106: ...IE 8 or above or Chrome 12 0 or above 6 4 2 I forgot my password how can I reset one 1 Log on to www c4mi com and click on the Forget Password button 2 In the Forgot your password pop up dialog box e...

Page 107: ...address you used to register and you should receive an email message which contains the password reset link Click on the link and you will be taken to the following password reset dialog box Start re...

Page 108: ...at you have successfully reset your password 6 You may now log in with your newly setup password 6 4 3 How do I download user client Log on to www c4mi com to access the website You may download Eagle...

Page 109: ...L page The rule at the moment is that an applet can only make an Internet connection to the computer form that the applet was sent ASCII American Standard Code For Information Interchange it is the st...

Page 110: ...tors because the software keeps track of IP addresses rather than requiring an administrator to manage the task A new computer can be added to a network without the hassle of manually assigning it a u...

Page 111: ...authorized Internet users from accessing private networks connected to the Internet especially Intranets all messages entering or leaving the intranet pass through the firewall which examines each mes...

Page 112: ...nform to IP addressing rules In smaller LANs most people will allow the DHCP function of a router or gateway to assign the IP addresses on internal networks IP address IP address is a 32 binary digit...

Page 113: ...within your network each device requires a unique IP address But the addresses may not be valid outside your network NAT solves the problem When devices within your network request information from t...

Page 114: ...that will be transferred from file server memory to the file server s net work adapter Others are responsible for filtering information between networks and forwarding data to its destination Still o...

Page 115: ...ommon foundation for managing network devices Station In LANs a station consists of a device that can communicate data on the network In FDDI a station includes both physical nodes and addressable log...

Page 116: ...ommon carrier telecommunication techniques WEP WEP is widely used as the basic security protocol in Wi Fi networks which secures data transmissions using 64 bit or 128 bit encryption Windows Windows i...

Reviews: