background image

5

© All rights reserved by Rosewill

Installation Guide

User Manual

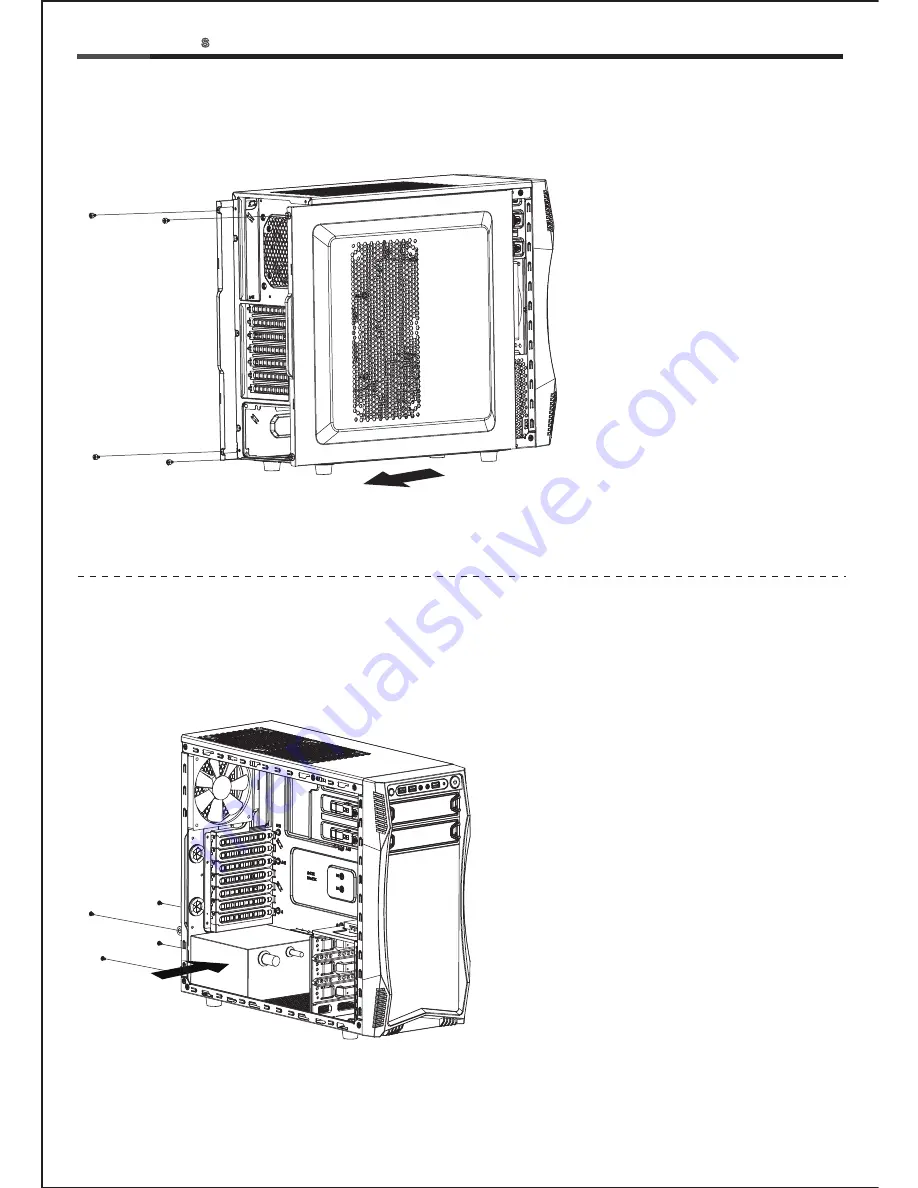
1-1 Remove the thumbscrews and 
      slide both side panels out.

2-1   Seat the power supply unit on the bottom 
        of the case and secure with screw-C. 
        If the PSU is equipped with single fan, 
        you may have two options of installation: 
        
        - Fan Facing 

Upwards

          No special requirements. 

        - Fan Facing 

Downwards

          Make sure that there is enough room for
          air-intake between the bottom of case
          and the surface where the case is located.
        
        - Clean the dust filter regularly to ensure 
          adequate airflow. 

1. Open Chassis 

2. Install Power Supply

CHALLENGER-

CASE

Summary of Contents for CHALLENGER-S

Page 1: ......

Page 2: ......

Page 3: ......

Page 4: ......

Page 5: ...ox Motherboard 12x Screw A 9x M B Standoff Motherboard 5 25 3 5 Device 2 5 SSD HDD 4x Screw C Power Supply Add in Card 9x Screw B 3 5 HDD Motherboard Motherboard Cable Management 1x Buzzer 1x Nut Setter 3x Cable Tie CHALLENGER CASE Part s Name Function Figure ...

Page 6: ...e with screw C If the PSU is equipped with single fan you may have two options of installation Fan Facing Upwards No special requirements Fan Facing Downwards Make sure that there is enough room for air intake between the bottom of case and the surface where the case is located Clean the dust filter regularly to ensure adequate airflow 1 Open Chassis 2 Install Power Supply CHALLENGER CASE ...

Page 7: ... All rights reserved by Rosewill 3 1 Place the motherboard standoffs based on manufacturer specs 3 2 Secure the motherboard with screw A 3 3 Unscrew to remove the slot cover 3 4 Install the add in card and secure with screws screw A CHALLENGER CASE ...

Page 8: ......

Page 9: ...ck and secure with thumbscrews 5 1 Insert the 3 5 HDD into the cage until the latch clicks 5 2 Remove the thumbscrew to retrieve the 2 5 bay 5 3 Secure the 2 5 SSD HDD with screw A 5 4 Install back with the thumbscrews 5 Install 3 5 2 5 HDD SSD 6 System Ready CHALLENGER CASE ...

Page 10: ...l rights reserved by Rosewill User Manual 7 1 Clean the dust filter regularly to ensure adequate airflow for power supply unit Unscrew to remove the top dust filter 7 Clean the dust filters CHALLENGER CASE ...

Page 11: ... cover b 2x 140mm fans on the side panel Insturction of installing 120mm water cooling radiator in the front a Remove the front panel b Unscrew to remove the 2 5 SSD HDD tray on the bottom of the 5 25 cage c Secure the radiator with screws and put the front panel back 9 Optional Additional Fan Liquid Cooling Radiator CHALLENGER CASE ...

Page 12: ......

Reviews: