background image

8

ClearVue  II  Owner’s  Manual

INTRODUCTION

Welcome  to  the 

ClearVue  II  Vehicle  Entertainment  System

Owner’s Manual

. The Rosen ClearVue II has been designed

to give your vehicle’s occupants a more enjoyable journey.
Ensure that you and your passengers take time to read these
instructions.

Your  system  includes  a  combination  of  the  following  compo-
nents:

·

An Overhead Monitor—either a 10.4", 7.0" (widescreen), or
6.8" flat panel display

·

A Video Cassette Recorder (VCR) with TV Tuner

or

·

A DVD/CD/MP3 Player with or without a TV Tuner

·

Wireless  Infrared  (IR)  Headphones  (2  pair)

·

A Remote Control

·

A Stereo FM Modulator (enables the video sound to be
heard  over  your  vehicle’s  speakers)

·

Other parts and cables which are installed out of sight in
your vehicle

Precautions

·

To avoid a dead battery, do not use the system for long
periods  of  time  without  starting  the  engine.

·

Use  this  system  only  after  proper  installation  by  a  qualified
installer.

If the units show signs of overheating or malfunction,
power off the unit and consult your dealer immediately.

·

Do not open any of the units; there are no serviceable
parts  inside.

·

Do not press on the monitor unit; this can distort the
picture or damage the LCD panel.

·

Clean the LCD panel with a slightly damp, soft cloth using
household  glass  cleaner.  Do  not  use  solvents  such  as
benzene,  thinner,  commercially  available  cleaners  or
antistatic  spray.

·

If your car was parked in a very cold or very hot place, the
picture may not be clear. 

The monitor is not damaged.

 The

picture will become clear after the temperature of the
ClearVue  components  returns  to  normal.

·

When  using  portable  radios  and  telephones  near  the
system, picture or sound interference may occur.

Note:

 The DVD system voltage range is 11-16VDC operating voltage.

The system operating temperature is 

0

o

 to 50

o

 Celsius. 

Use of the

DVD  Player  beyond  the  safe  operating  ranges  listed  can  cause
temporary or permanent damage to the unit, and such damage may
not  covered  by  the  manufacturer’s  warranty.

All manuals and user guides at all-guides.com

Summary of Contents for ClearVue II

Page 1: ...e II Entertainment System Owner s Manual a new generation of leadership in mobile vi ROSEN a new generation of leadership in mobile video All manuals and user guides at all guides com a l l g u i d e...

Page 2: ...d viewing uses only unless otherwise authorized by Macrovision Corporation Reverse engineering or disassembly is prohibited Manufactured under license from Dolby Laboratories Dolby and the double D sy...

Page 3: ...LS 9 USING THE REMOTE CONTROL 11 BASIC REMOTE CONTROL BUTTONS 12 USING MENU AND NAVIGATION BUTTONS 14 USING AUDIO BUTTONS 15 USING DVD ONLY BUTTONS 16 OPERATING YOUR DVD PLAYER 18 OPERATING YOUR VCR 1...

Page 4: ...All manuals and user guides at all guides com...

Page 5: ...PBUTTON 5 SPEAKERON OFFBUTTON 6 SOURCEBUTTON 7 MUTEBUTTON 8 DOME LIGHT ON BUTTON 10 4 DISPLAYONLY 9 DOME LIGHT DISABLE BUTTON 10 4 DISPLAYONLY 10 DOMELIGHT 11 DOMELIGHT 12 ADJUSTER KNOB 6 8 AND 7 0 DI...

Page 6: ...ion insert two fingers into the adjustment knob and rotate as needed For 10 4 screens Press the release button as shown The screen releases slightly and powers on automatically Manually position it fo...

Page 7: ...deo game or camcorder 1 Connect the RCA audio and video outputs of the device to the front of the DVD player 2 Press SOURCE until a video image appears on the screen VCR Systems To Watch a Video Casse...

Page 8: ...ied installer If the units show signs of overheating or malfunction power off the unit and consult your dealer immediately Do not open any of the units there are no serviceable parts inside Do not pre...

Page 9: ...er the vehicle s speakers When the FM Modulator is off you can hear ClearVue audio by using the supplied wireless headphones To listen to the vehicle sound system normally turn off the FM Modulator 6...

Page 10: ...ome Lights The ClearVue II overhead consoles have built in dome lights This is due to installation requirements in many vehicles where the factory dome light is removed during installation of the over...

Page 11: ...a safe place for later use if needed Adjust volume using the volume control on the headphones or the vehicle radio There is no volume control on the ClearVue II remote or overhead console 1 Pause Fra...

Page 12: ...12 ClearVue II Owner s Manual All manuals and user guides at all guides com...

Page 13: ...To resume normal playback press PLAY 17 Next Track DVD only Press to jump to the next title or chapter if available on a DVD or to the next track on an audio CD 18 Forward Search DVD Press during pla...

Page 14: ...14 ClearVue II Owner s Manual All manuals and user guides at all guides com...

Page 15: ...Note The Speaker button on the overhead console performs the same function Refer to Using the Headphones and Listening Over the Car Speakers for additional details 6 Equalizer This button accesses the...

Page 16: ...angles if available 25 Zoom View the same scene at different magnifications 1 Press the ZOOM button during playback to toggle between the following options x1 5 x2 and x4 2 Press the arrow buttons to...

Page 17: ...n Entertainment Systems Replacing the Remote Battery Use one CR2025 3V battery Battery life is approximately six months depending on how often the remote is used All manuals and user guides at all gui...

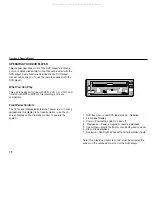
Page 18: ...Panel Controls The front panel display indicates when power is on In many appliactions this display is not readily visible use the on screen display on the ClearVue monitor to operate the system 1 DVD...

Page 19: ...has had time to evaporate before using the system Front Panel Controls 1 2 3 4 7 8 9 10 11 12 5 POWER EJECT STOP REC REC PLAY VIDEO AUDIO L R LINE IN 2 F F 6 1 Power Powers the system on and off 2 Ej...

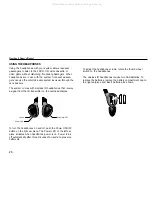
Page 20: ...from the IR transmitter on the overhead display Power LED Volume Power ON OFF To turn the headphones on and off push the Power ON OFF button on the right ear piece The Power LED on the left ear piece...

Page 21: ...PEAKER FM OFF appears on the screen Audio from the ClearVue II system is then available over the headphones only WATCHING BROADCAST TELEVISION ON TV TUNER EQUIPPED SYSTEMS You can watch television on...

Page 22: ...l among the options for your selection 4 Press SETUP MENU again to resume playback DVD Includes options for various language display audio and parental control features For more information about thes...

Page 23: ...otes To change the film rating setting the password must be used The DVD Player determines the correct film ratings to use based on the country selected in the Locale setting Not all DVD titles suppor...

Page 24: ...angle feature select GENERAL and ANGLE MARK Activating Captions and Subtitles To enable or disable captions or subtitles select GENERAL and CAPTIONS Note If CAPTIONS is set to OFF the SUBTITLE button...

Page 25: ...menu display select PREFERENCES then SMARTNAV Changing Language Settings Several language settings can be customized on the DVD Player Notes Not all language settings are supported by all discs The la...

Page 26: ...MULTI NTSC PAL AUDIO ENGLISH FRENCH SPANISH CHINESE JAPANESE SUBTITLE ENGLISH FRENCH SPANISH CHINESE JAPANESE OFF DISCMENU ENGLISH FRENCH SPANISH CHINESE JAPANESE LOCALE CHINA FRANCE HONG KONG JAPAN T...

Page 27: ...the batteries in the remote control Ensure that the infrared sensor on the overhead display is not obstructed RADIO PLAYS STATIC OR HAS NO RECEPTION Press SPEAKER to switch the car speakers from the...

Page 28: ...t com 888 GO ROSEN All rights reserved No part of this publication may be reproduced stored in a retrieval sytem or transmitted in any form electronic mechanical recording or other means without prior...

Reviews: