6
Rollerdor RD10X2ELL Control Box, Edition 2022/1
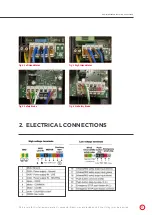
Pictures are for illustration purposes only, connector blocks are not provided and further fittings may be required.
WIRELESS KEY PAD
1
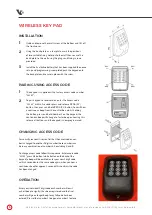
Undo and remove the small screw at the bottom and lift off
the front cover.
2
Using the back-plate as a template, mark the positions
of two suitable fixing holes onto the wall then secure the
back-plate to the wall using the plugs and fixing screws
provided.
3
Install the 9v alkaline battery that has been supplied then once
set up and programming is completed push the keypad onto
the back-plate and secure in place with the screw.
INSTALLATION
1
The keypad is supplied with a factory access code number
"12345".
2
To pair keypad to receiver box, enter the Access code
“12345”, within 5 seconds press and release PROG (P1)
button, then press and hold PROG (P1) button. You will hear
a continuous beep from the control box, whilst holding
the button press and hold Number 1 on the keypad, the
continuous beep will change to faster beep on hearing this
release all buttons and the keypad is now programmed.
PAIRING USING ACCESS CODE
For security reasons it is essential that the access code num-
ber is changed to another 5 digit number these numbers can
be in any combination of numbers 0-9, excluding A and B.
To change access code follow this sequence: Enter access code
“12345”, press M1 button (white button on the back of the
keypad) a beep will be emitted, enter your new 5 digit code,
within 1 second enter this same code again, when you hear a
continuous beep for approx. 2 seconds this confirms the code
has been changed.
CHANGING ACCESS CODE
Enter your individual 5 digit code each number will emit
a short beep to signify it has been registered and the final
number will give a longer beep to say full code has been
entered, Press either number 1 to open or number 3 to close.
OPERATION

