background image

24

ENGLISH

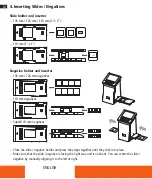
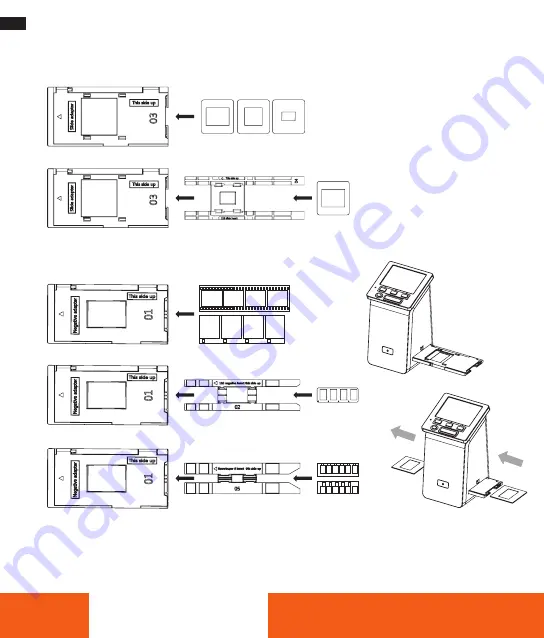
4. Inserting Slides / Negatives 

Slide holder and inserter 

–  135 mm / 126 mm / 110 mm (2”x 2”) 

–  110 mm (1”x 1”)

Negative holder and inserter

–  135 mm / 126 mm negatives

–  110 mm negatives

–  Super8 / 8 mm negatives

–  Close the slide / negative holder and press the edges together until they click into place . 
–  Make sure that the slide / negative is facing the right way and is not bent . You can centre the slide / 

negative by manually aligning it to the left or right .

2x2

1x1

Summary of Contents for DF-S 1600 SE

Page 1: ...www rollei de DF S 1600 SE Dia Film Scanner ANLEITUNG AUF DEUTSCH MANUAL IN ENGLISH ...

Page 2: ...ungs Modus 11 8 Wiedergabe Modus 15 9 Technische Daten 17 10 Sicherheitshinweise 18 Entsorgung 18 Konformität 19 Content Before the first Use 20 Explanation of Symbols 20 1 Introduction 21 2 Box Content 22 3 Product Overview 22 4 Inserting Slides Negatives 22 5 Using the Device 25 6 Recording Mode 26 7 Setting Mode 28 8 Playback Mode 31 9 Technical Data 33 10 Safety Instructions 34 Disposal 34 Con...

Page 3: ... Gerät und muss mitgeliefert werden Zeichenerklärung Die folgenden Symbole werden in dieser Bedienungsanleitung auf dem Dia Film Scanner oder auf der Verpackung verwendet Mit diesem Symbol gekennzeichnete Produkte erfüllen alle maßgeblichen Gemeinschafts vorschriften des Europäischen Wirtschaftsraums Mit diesem Zeichen gekennzeichnete Produkte werden mit Gleichstrom betrieben Geräte mit diesem Zei...

Page 4: ...innerungen auf einer SD Karte nicht im Lieferumfang enthalten oder direkt auf Ihrem Computer Sie können den Dia Film Scanner auch direkt an ein Fernsehgerät anschließen um die Bilder zu betrachten Dieses Benutzerhandbuch soll Ihnen Richtlinien an die Hand geben die sicherstellen dass der Betrieb dieses Produkts sicher ist und keine Risiken für den Benutzer birgt Jede Verwendung die nicht den in di...

Page 5: ...Lieferumfang Dia Film Scanner Negativ Halterung Dia Halterung 110 mm Film Halterung 110 mm Film Einleger 8 mm super8 Halterung USB C Kabel TV Kabel HDMI Kabel Netzgerät Reinigungsbürste Bedienungsanleitung ...

Page 6: ...m tatsächlichen Produkt abweichen 4 Einlegen von Dias Negativen Wichtig Vergewissern Sie sich dass Ihre Filme Dias sauber und frei von Schmutz und Ablagerungen sind Öffnen Sie die entsprechende Dia Negativ Halterung und legen Sie die Negative das Dia ein Jede Halterung ist mit einem Etikett versehen um sie zu identifizieren Wenn Sie sich nicht sicher sind um welchen Negativ Dia Typ es sich handelt...

Page 7: ...mm Negative 110 mm Negative Super8 8 mm Negative Schließen Sie die Dia Negativ Halterung und drücken Sie die Kanten zusammen bis diese einrasten Vergewissern Sie sich dass das Dia Negativ in die richtige Richtung zeigt und nicht verbogen ist Sie können das Dia Negativ zentrieren indem Sie es manuell nach links oder rechts ausrichten 2x2 1x1 ...

Page 8: ...en Sie die SD Karte wenn sie nicht mit dem Gerät kompatibel ist Wenn Sie den Inhalt der SD Karte behalten möchten speichern Sie ihn an einem anderen Ort bevor Sie sie formatieren Startseite Die Startseite wird angezeigt wenn das Gerät eingeschaltet wird wenn die Home Taste 2 gedrückt wird und jedes Mal wenn SPEICHERN BEENDEN ausgewählt wird Hinweis Es gibt einen Unterschied zwischen SPEICHERN BEEN...

Page 9: ...keine Speicherkarte eingesetzt ist erscheint FEHLER KEINE SD KARTE 2 Drücken Sie eine beliebige Funktions Taste 5 um die Statusleiste am obe ren Rand des Bildschirms aufzurufen Hinweis Die Statusleiste wird nach 15 Sekunden ausgeblendet oder drü cken Sie die Taste CAPTURE um zum Vorschaumodus zurückzukehren Drücken Sie die linke rechte Funktions Taste 5 um die obersten Einstellun gen zu wählen Drü...

Page 10: ...rechte Funktions Taste 5 um die gewünschte Einstellung auszuwählen verwenden Sie EV als Beispiel und drücken Sie dann die mittlere Funktions Taste 5 unter ANPASSUNG um das Einstellungsmenü aufzurufen 3 Drücken Sie die linke rechte Funktions Taste 5 um die Einstellung vorzunehmen drücken Sie dann die Funktions Taste 5 unter SPEICHERN ZURÜCK um die eingestellten Daten zu speichern und zum Untermenü ...

Page 11: ...Taste 5 um die gewünschte Einstellung auszuwählen und drücken Sie dann die mittlere Funktions Taste 5 unter AUSWÄHLEN um das Untermenü aufzurufen FILM TYP Der Filmtyp umfasst die folgenden Film Dia Formate NEGATIV 135 110 126KPK DIA 135 110 126 SUPER8 8MM SCHWARZ WEISS 135 110 126KPK 1 Drücken Sie die linke rechte Funktions Taste 5 um die Option FILM TYP im Einstellungsmenü aus zuwählen und drücke...

Page 12: ...zeige verschwindet nach 5 Sekunden speichert die Auswahl und bringt Sie zum Startmenü AUFLÖSUNG 1 Wählen Sie AUFLÖSUNG aus dem Einstellungsmenü und drücken Sie dann die Funktions Taste 5 unter AUSWÄHLEN um das Menü AUFLÖSUNG aufzurufen 2 Drücken Sie die rechte Funktions Taste 5 um 16M oder 25M M Megapixel auszuwählen und drücken Sie dann die Funktions Taste 5 unter SPEICHERN BEENDEN um das Menü zu...

Page 13: ...llt ist erkennt der Computer den Dia Film Scanner als externes Gerät 3 Wenn Sie fertig sind drücken Sie die Taste zum Trennen der Verbindung und ziehen Sie dann das USB C Kabel ab FORMATIEREN Wichtig Wenn Sie die eingelegte SD Karte formatieren werden alle Dateien auf dieser Karte gelöscht Speichern Sie die benötigten Dateien vor dem Formatieren auf Ihrem Computer Wenn die SD Karte nicht kompatibe...

Page 14: ...mittlere Funktions Taste 5 unter SPEICHERN BEENDEN um die gewählte Sprache zu speichern und zum Startmenü zurückzukehren 8 Wiedergabe Modus 1 Drücken Sie die Home Taste 2 und dann die Funktions Taste 5 unter WIEDERGABE um in den Wiedergabemodus zu gelangen 2 Drücken Sie die Funktions Taste 5 links rechts um durch die Bilder zu blättern 3 Wenn Sie ein Bild bearbeiten möchten drücken Sie die mittler...

Page 15: ...Löschmodus aufzurufen Wählen Sie und drücken dann die mittlere Funktions Taste 5 unter AUSWÄHLEN um den Diashow Modus aufzurufen DREHEN 1 Geben Sie die Einstellung Drehen wie oben beschrieben ein 2 Verwenden Sie die linke rechte Funktions Taste 5 um das Bild zu drehen SPIEGELN 1 Geben Sie die Einstellung für horizontal Spiegeln vertikal Spiegeln wie oben beschrieben ein 2 Drücken Sie die linke Fun...

Page 16: ...n Bildvorschau Modus zu gelangen 3 Drücken Sie die linke Funktions Taste 5 unter NEIN um zum Startbild schirm zu gelangen DIASHOW 1 Rufen Sie den Diashow Modus wie oben beschrieben auf 2 Drücken Sie die mittlere Funktions Taste 5 um das nächste gespeicher te Bild anzuhalten bzw wiederzugeben 3 Drücken Sie die linke Funktions Taste 5 unter ZURÜCK um zum Start bildschirm zu gelangen ...

Page 17: ...her SD MMC kompatibel bis zu 64 GB SDHC Stromversorgung DC 5 V 1 A Adapter Netzgerät Hersteller Cullpower Modell SAW06B 050 1000G Eingang 100 240 V 50 60 Hz 0 3 A Ausgang 5 V 1 A 5 W Anschlüsse UVC TV out PAL NTSC 3 5 mm Klinke HDMI USB C Anschluss Adapteranschluss Maße 10 x 9 x 18 2 cm Gewicht 513 g Sprachen Deutsch Englisch Spanisch Italienisch Französisch Portugiesisch Niederländisch Tschechisc...

Page 18: ...alle Verpa ckungsmaterialien außerhalb der Reichweite von Kindern und Haustieren auf Schalten Sie das Gerät immer aus und ziehen Sie den Netzstecker wenn Sie es nicht benutzen Trennen Sie das USB C Kabel von Ihrem Computer und ziehen Sie den Netzadapter aus der Steckdose Entsorgen Sie alle Verpackungsmaterialien sofort nach dem Auspacken des Produkts da die für die Ver packung verwendeten Beutel e...

Page 19: ...4 30 EU EMV Richtlinie 2014 35 EU Niederspannungsrichtlinie 2009 125 EG ERP Richtlinie 2011 65 EU RoHs Richtlinie Der vollständige Text der EU Konformitätserklärung ist unter der folgenden Internetadresse verfügbar http www rollei de egk dfs1600se Rollei GmbH Co KG In der Tarpen 42 22848 Norderstedt Deutschland ...

Page 20: ...upplied with the device Explanation of Symbols The following symbols are used in this manual on the flash the power supply unit or on the packaging Products marked with this symbol comply with all relevant community regulations of the European Economic Area Products marked with this symbol are operated with direct current Products with this symbol have additional or reinforced insulation and compl...

Page 21: ...ur precious memories on an SD card not included or directly on your computer You can also connect the slide film scanner directly to a TV to view the images This user manual is intended to provide you with guidelines to ensure that the operation of this product is safe and does not pose any risks to the user Any use that does not comply with the guidelines described in this user manual may void th...

Page 22: ...ISH 2 Box Content Slide film scanner Negative holder Slide holder 110 mm film holder 110 mm film inserter 8 mm super8 holder USB C cable TV cable HDMI cable Power supply unit Cleaning brush Instruction manual ...

Page 23: ...lustrative purposes only and may differ from the actual product 4 Inserting Slides Negatives Important Make sure your films slides are clean and free of dirt and debris Open the appropriate slide negative holder and insert the negatives slide Each holder is labelled to identify it If you are not sure which type of negative slide it is refer to the following illustrations 1 2 3 4 5 6 7 8 9 10 11 8 ...

Page 24: ...nd inserter 135 mm 126 mm negatives 110 mm negatives Super8 8 mm negatives Close the slide negative holder and press the edges together until they click into place Make sure that the slide negative is facing the right way and is not bent You can centre the slide negative by manually aligning it to the left or right 2x2 1x1 ...

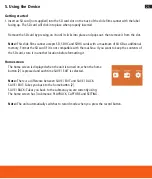
Page 25: ... memory Format the SD card if it is not compatible with the machine If you want to keep the contents of the SD card store it in another location before formatting it Home screen The home screen is displayed when the unit is turned on when the home button 2 is pressed and each time SAVE EXIT is selected Note There is a difference between SAVE EXIT and SAVE BACK SAVE EXIT Takes you back to the home ...

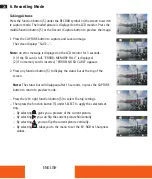
Page 26: ...EMORY FULL is displayed 2 If no memory card is inserted ERROR NO SD CARD appears 2 Press any function button 5 to display the status bar at the top of the screen Note The status bar will disappear after 15 seconds or press the CAPTURE button to return to preview mode Press the left right function button 5 to select the top settings Then press the function button 5 under SELECT to apply the selecte...

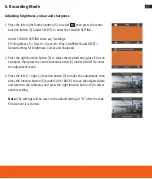
Page 27: ...s Colour and Sharpness 2 Press the right function button 5 to select the desired setting use EV as an example then press the centre function button 5 under ADJUST to enter the adjustment menu 3 Press the left right function button 5 to make the adjustment then press the function button 5 under SAVE BACK to save the adjusted data and return to the submenu and press the right function button 5 to se...

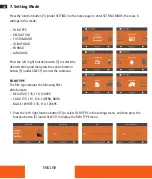
Page 28: ...ion button 5 to select the desired setting and then press the centre function button 5 under SELECT to enter the submenu FILM TYPE The film type includes the following film slide formats NEGATIVE 135 110 126KPK SLIDE 135 110 126 SUPER8 8MM BLACK WHITE 135 110 126KPK 1 Press the left right function button 5 to select FILM TYPE in the settings menu and then press the function button 5 under SELECT t...

Page 29: ...n The display disappears after 5 seconds saves the selection and takes you to the start menu RESOLUTION 1 Select RESOLUTION from the Settings menu then press the Function button under SELECT to access the RESOLUTION menu 2 Press the right function button 5 to select 16M or 25M M megapixels then press the function button 5 under SAVE EXIT to exit the menu TV STANDARD 1 Select TV STANDARD from the S...

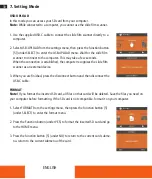
Page 30: ...blished the computer recognises the slide film scanner as an external device 3 When you are finished press the disconnect button and then disconnect the USB C cable FORMAT Note If you format the inserted SD card all files on that card will be deleted Save the files you need on your computer before formatting If the SD card is not compatible format it on your computer 1 Select FORMAT from the setti...

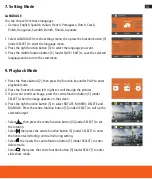
Page 31: ...er PLAY to enter playback mode 2 Press the Function button left right to scroll through the pictures 3 If you want to edit an image press the centre function button 5 under SELECT when the image appears on the screen 4 Press the right function button 5 to select ROTATE MIRROR DELETE and DIASHOW Press the centre function button 5 under SELECT to call up the selected output Select then press the cen...

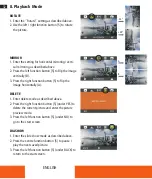
Page 32: ...ss the right function button 5 to flip the image horizontally A DELETE 1 Enter delete mode as described above 2 Press the right function button 5 under YES to delete the current picture and enter the picture preview mode 3 Press the left function button 5 under NO to go to the start screen DIASHOW 1 Enter the slide show mode as described above 2 Press the centre function button 5 to pause play the...

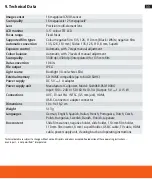
Page 33: ...ory SD MMC compatible up to 64 GB SDHC Power supply DC 5 V 1 A adapter Power supply unit Manufacturer Cullpower Model SAW06B 050 1000G Input 100 240 V 50 60 Hz 0 3 A Output 5 V 1 A 5 W Connections UVC TV out PAL NTSC 3 5 mm jack HDMI USB C connector adapter connector Dimensions 10 x 9 x 18 2 cm Weight 513 g Languages German English Spanish Italian French Portuguese Dutch Czech Polish Hungarian Swe...

Page 34: ...g materials out of the reach of chil dren and pets Always switch off and unplug the device when not in use Disconnect the USB C cable from your compu ter and unplug the power adapter from the wall socket Dispose of all packaging materials immediately after unpacking the product as the bags used for packa ging could pose a choking hazard Disposal Dispose of the packaging according to its type Use t...

Page 35: ...0 EU EMC Directive 2014 35 EU Low Voltage Directive 2009 125 EC ERP Directive 2011 65 EU RoHs Directive The full text of the EU Declaration of Conformity is available at the following internet address http www rollei com egk dfs1600se Rollei GmbH Co KG In der Tarpen 42 22848 Norderstedt Germany ...

Page 36: ...www rollei de Item No 20699 Rollei GmbH Co KG In de Tarpen 42 22848 Norderstedt Service Hotline 49 40 270750270 rollei_de rollei foto de ...

Reviews: