First Steps
8
1
2
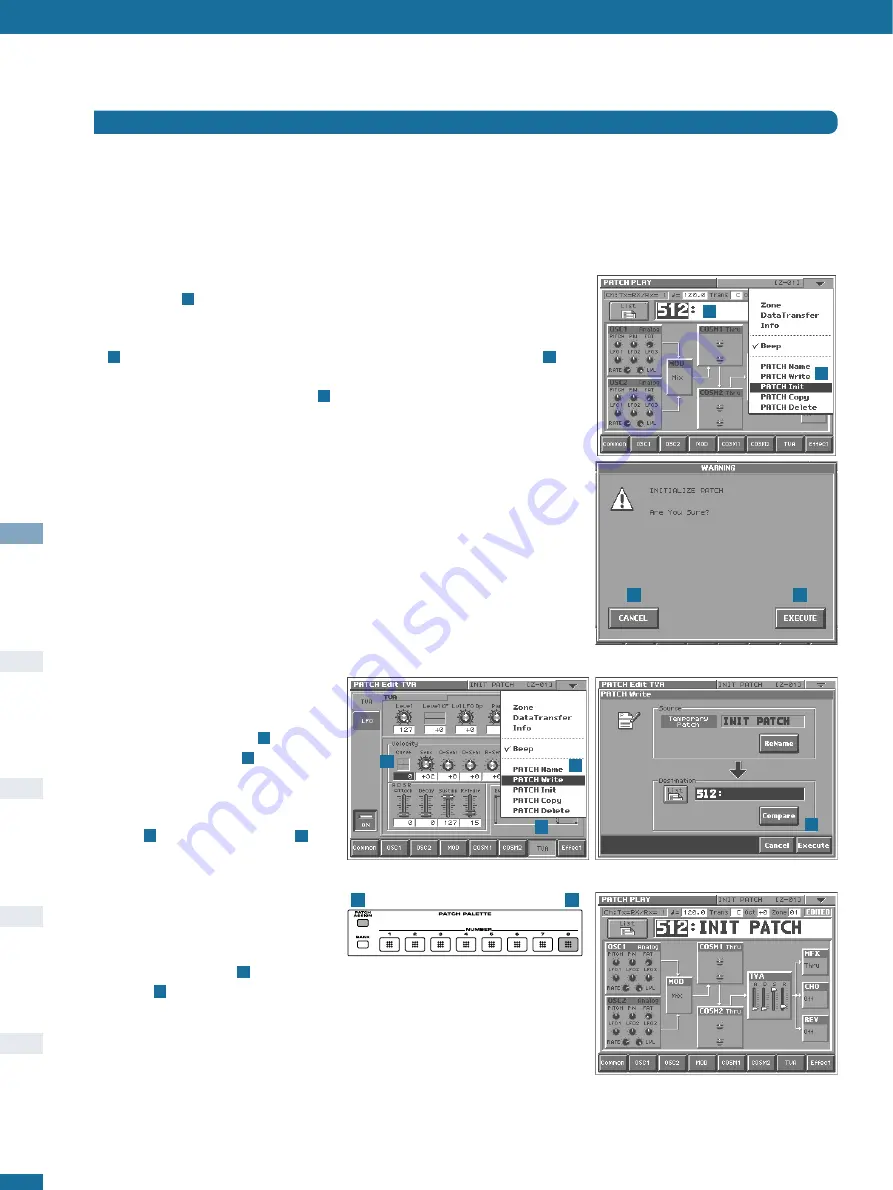
The initial patch already reacts quite
strongly to keyboard velocity, and this is
seldom desirable when creating new
patches. Touch the
TVA
pad
, then the
Velocity Curve control
. Press the
DEC/-
button (below the
VALUE
dial) to
change the curve to
0
(flat). Open the
dropdown menu again and select
PATCH
Write
. Touch the
Execute
pad in
the
PATCH Write
window.
✱
Y
Yo
ou
u w
wiillll n
ne
ee
ed
d tth
hiiss
“
v
va
an
niilllla
a”” p
pa
attcch
h
tth
hrro
ou
ug
gh
ho
ou
utt tth
he
e ttu
utto
orriia
all......
...so why not put it in the
PATCH
PALETTE
for instant recall? Hold down
the
PATCH ASSIGN
button and
press
8
. To find
INIT PATCH
, just
press button number
8
from now on.
2
1
8
7
6
5
6
5
7
8
The following instructions may seem rather long and needlessly detailed, but there is a very good reason for this – it has to be assumed
that you know absolutely nothing about the
V-Synth
architecture or menu structure at this stage. Please take your time and try to be
aware of the reason for everything you are asked to do. After you have become more familiar with the programming environment, creating
such a basic patch should only take a minute or two.
The Simplest of Patches
INIT PATCH
In
PATCH PLAY
mode, use the
VALUE
dial to select patch number
512
– the highest
one available
. Holding down the
SHIFT
button at the same time will scroll through
patch numbers in steps of 10, so this is of course the best method. Touch the triangle in
the top right-hand corner of the screen, select
PATCH Init
from the dropdown menu
, then touch the
EXECUTE
pad in the bottom right-hand corner of the screen
. If
you find you have selected a different function by mistake (e.g.
PATCH Write
or
PATCH
Copy
), simply touch the
CANCEL
pad or
press
the
EXIT
button, and try again.
Tip:
When calling functions from the drop-down menu, you may find it easier to do this
all at once: Touch the triangle and don’t release immediately. Drag your finger down until
the function you want is highlighted – then release!
4
3
2
1
1
2
3
4


