background image

Advanced Sound Programming

25

1

2

4

3

1

3

2

4

5

7

6

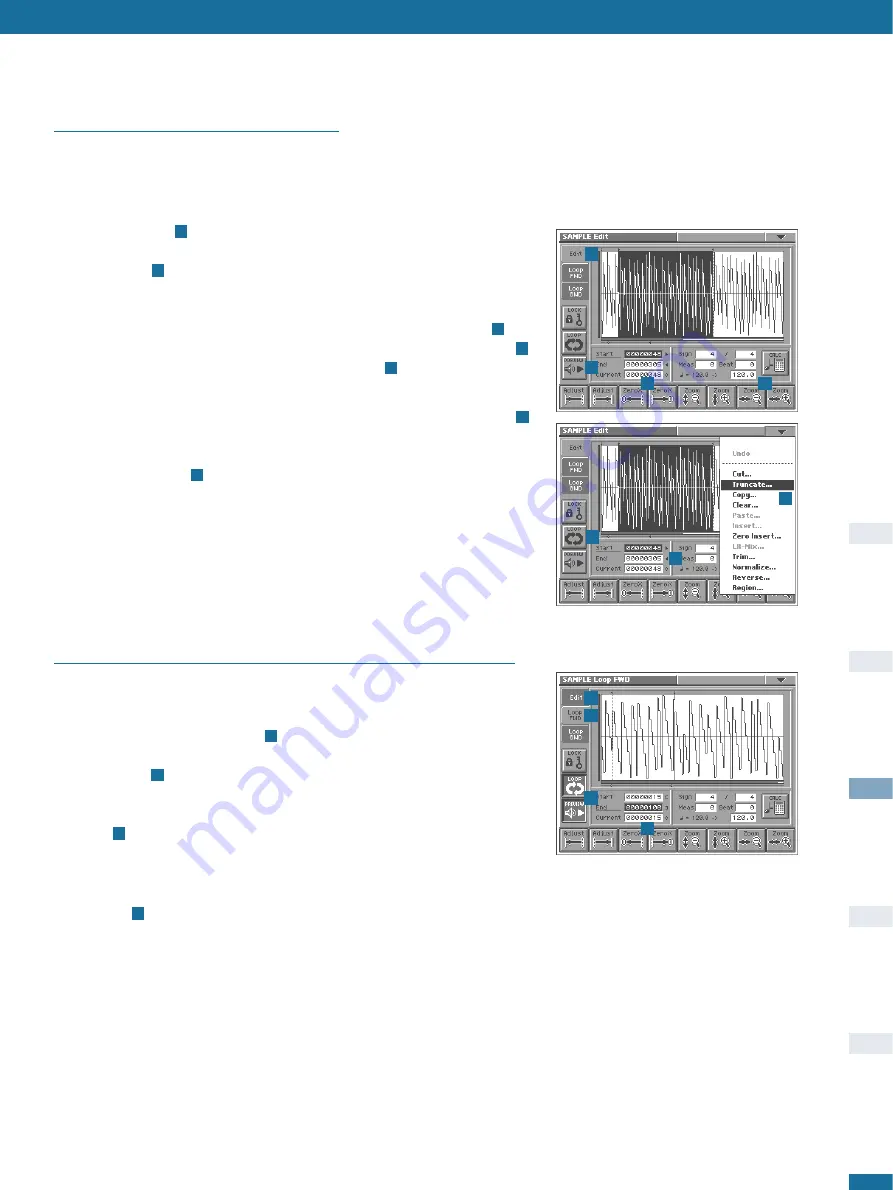
Editing Samples - Truncating

The first thing you should do is cut off any excess samples (there is usually quite a lot

at the end) using the Truncate function. The method explained below involves truncating

twice (once for the beginning and once for the end), but it is safer than trying to do this

all at once. After a little practice, this method will come naturally.

Touch the 

Edit

pad 

to enter the 

SAMPLE Edit

page. Touch the horizontal 

Zoom

+

pad a few times until you can’t see the start any more, then touch the horizontal 

Zoom

-

’ once 

. Hold 

SHIFT 

and turn the 

VALUE 

dial until the highlighted section

starts very close to the beginning of your sample. Touch horizontal 

Zoom

+

’ again and

repeat the procedure until the highlighted area starts exactly at the beginning of the

sample, where the wave crosses zero. Touch the 

Preview

pad to make sure 

. You

can use the 

ZeroX 

(zero-crossing) buttons to find the exact start automatically 

.

Select the 

Truncate

function from the 

drop-down

menu 

, read the message, then

confirm.

Zoom out completely and press the 

cursor-down

button to highlight the 

End

value .

Touch 

Preview

to check whether there are any unwanted bits at the end. If you have

recorded something you wish to loop in its entirety (e.g. a drum loop), you should

activate the 

Loop

pad 

to make sure that there isn’t a “hiccup” at the end. Touch the

Preview

pad and use the 

VALUE 

dial until you can’t hear any unwanted samples. Keep

zooming in and adjusting the end point until you are satisfied. Use the 

ZeroX

(zero-crossing) buttons. Note: If your sound “fades” to silence (e.g. a cymbal), you

should also use vertical 

Zoom 

+

’ to make sure you don’t lose the last bit of the “tail”.

When you have finished, select the Truncate function again.

7

6

5

4

3

2

1

Editing Samples - Finding the Best Loop Points

Depending upon the complexity of a sample e.g. whether it has vibrato or tremolo etc.,

finding good loop points can be difficult. I find the following method very useful:

First of all, search for a section of the wave where the volume remains fairly constant.

Touch the 

Loop FWD 

(forward) tab 

and set the 

Start 

and 

End 

points to include at

least two of the “humps” which are caused by the cyclic effect. Touch the 

Loop

and

Preview

pads 

so they are both highlighted. Zoom in a little to make sure that the

Start

and 

End

points are both at approximately the peak of each “hump”. Keep

alternating between 

Start

and 

End

with the 

cursor

buttons, and touch the 

ZeroX

buttons 

until you hear no more clicks.

If you don’t really need anything after the loop, you might be able to save a lot of

memory (in the long run) by doing the following: Now write down the 

Start

value on a

piece of paper - this is important because the loop data will be lost when you truncate.

Touch 

Edit

and move the 

Start

point to the very beginning. Truncate, touch 

Loop

FWD

and set the 

Start

point to the number closest to what you wrote down before.

Zoom in as far as possible and adjust the 

Start

point to be exactly what you wrote down.

*

* T

Th

he

e   V

V--S

Sy

yn

ntth

h''ss   ffa

acctto

orry

y--llo

oa

ad

de

ed

d   p

prre

esse

ett   w

wa

av

ve

ess   cca

an

nn

no

ott   b

be

e   e

ed

diitte

ed

d   o

orr   e

en

ncco

od

de

ed

d..

S

Se

elle

ecctt  a

a  ssa

am

mp

plle

e  tth

ha

att  y

yo

ou

u''v

ve

e  ssa

am

mp

plle

ed

d  o

orr  iim

mp

po

orrtte

ed

d..

4

3

2

1

Summary of Contents for V-Synth

Page 1: ...No part of this publication may be reproduced in any form without the written permission of ROLAND CORPORATION Visit us online at www roland co jp www v synth com All specifications and apperarances a...

Page 2: ...ion lever Performance Control p 33 Patch Palette The Simplest of Patches p 8 p 33 The Arpeggiator D Beam Performance Control p 33 p 31 The OSC1 OSC The COS N e x t G e n e r a t i o n S y n t h e s i...

Page 3: ...he Mod Section 15 The COSM Sections 17 The TVA Section 22 The Effect Section 23 Advanced Sound Programming 24 Sampling and Encoding 24 Effective Use of Envelopes 27 Getting More out of a Sample 30 Adv...

Page 4: ...ed as a time variant mixture of many sine waves known as partials or overtones A very large number of sinewave oscillators each with independent control of frequency and amplitude would be necessary t...

Page 5: ...ches 8 Basic Sound Parameters 12 The OSC1 OSC2 Sections 12 The Mod Section 15 The COSM Sections 17 The TVA Section 22 The Effect Section 23 Advanced Sound Programming 24 Sampling and Encoding 24 Effec...

Page 6: ...en physical and virtual controls those on the panel are referred to as KNOB BUTTON SLIDER VALUE DIAL whereas those appearing on the screen are referred to as PAD TAB CONTROL or even GRAPHIC depending...

Page 7: ...appreciate the wide range of sounds the V Synth already has to offer If you are not currently in PATCH PLAY mode press the EXIT button a few times the mode is always shown in the top left hand corner...

Page 8: ...itecture or menu structure at this stage Please take your time and try to be aware of the reason for everything you are asked to do After you have become more familiar with the programming environment...

Page 9: ...screen to open the PATCH Edit OSC Type page for oscillator 1 If the screen on your V Synth looks different from the right image this is probably because one of the other tabs has been selected in thi...

Page 10: ...LUE dial Touch OK to confirm then press the cursor right button to select Sens Sensitivity This parameter determines the maximum depth of the modulation in this case how much vibrato you will get when...

Page 11: ...ower case letters and symbols instead of numbers Confirm with the OK pad in the bottom right hand corner of the screen To save the sound to an unused location 300 change the Destination using the VALU...

Page 12: ...generally tiring to the ear you can always add some internal or external reverb Go to 512 INIT PATCH and touch the OSC1 pad For each of its two oscillators per Zone the V Synth gives you the choice o...

Page 13: ...tons and sliders on the panel The answer to this question may only mean 5 seconds difference for each adjustment you make but this can add up to many hours in the long run PULSE WIDTH Analog only This...

Page 14: ...d waveform is of type Ensemble see the section on Creating and Editing Samples Sample Mode in the Owner s Manual as well as the section Sampling and Encoding later on in this tutorial We need a wavefo...

Page 15: ...x sounds Press EXIT and step down and up a patch to remove all your edits Activate oscillator 2 again and change both oscillators to SINE Select FM in the MOD section and turn the OSC2 PITCH knob only...

Page 16: ...and change the Type to DYN TVF Touch the Cutoff tab and take Cutoff frequency Freq down to around 50 Freq KF to 100 and Dyn input Dynamics up until it sounds interesting Note that you might also have...

Page 17: ...PATCH select the PCM type for oscillator 1 and change the waveform to number 113 Clarinet Vib Go to Common Tune and take the overall Patch Tune Course down an octave 12 Go to COSM1 COSM Type and sele...

Page 18: ...sed on extremely short delays and can therefore be used for Karplus Strong physical modeling of plucked strings Start from 512 INIT PATCH and select NOISE for oscillator 1 Touch the OSC TVA tab and ta...

Page 19: ...knob which controls Tone in the COSM1 panel all the way down to isolate the noise component Turn it up to remove the noise i e all the inharmonic partials 3 2 1 Adding subtracting partials Start from...

Page 20: ...the ambient tail of a sound Play a note and hold it The compressor in the COSM section is fairly simple with only two main parameters Attack and Sustain but like all COSM algorithms it is polyphonic...

Page 21: ...ever by a factor of 100 to 1 You can still hear a click because the limiter needs a certain minimum time to react Turning Attack up to maximum will increase this time a little Now select the lower rat...

Page 22: ...er notes and lengthens them when you play lower notes You will hear this effect when playing a piano TVA stands for Time Variant Amplifier and this is the section which governs the overall volume of e...

Page 23: ...all three effects the MFX block has three output controls The one to the right sets the amount of MFX signal sent straight to the MAIN outputs Below the block are two more controls which can send a c...

Page 24: ...pu ut t F Fr re eq q i in n S Sy ys st te em m M Mo od de e T Th he e i in nt te er rn na al l f fo or rm ma at t o of f t th he e s sa am mp pl li in ng g f fr re eq qu ue en nc cy y o of f t th he e...

Page 25: ...g buttons Note If your sound fades to silence e g a cymbal you should also use vertical Zoom to make sure you don t lose the last bit of the tail When you have finished select the Truncate function ag...

Page 26: ...s can be played consecutively or on fixed keys C C B etc if you choose STEP or EVENT mode in the OSC Type page Touch the Encode pad in the SAMPLE TOP page The V Synth operating system automatically an...

Page 27: ...ere are a few tips to help you make the most of them Typical Envelope Shapes The ADSR envelope was originally developed to mimic the volume pitch and tonal changes of notes played on existing acoustic...

Page 28: ...and freeze any part of a wave but still include some attack at the beginning You will find a prime example of this trick in the presets In 147 GizmoVox the sound of oscillator 1 hardly resembles the...

Page 29: ...medium rate Play a note and listen to the shape of the decay it appears to be linear Now change Pit LFO Dp Pitch LFO Depth to 27 and play a note At 27 the rising LFO it was falling but the modulation...

Page 30: ...ynthesizers of getting a noticeable and rapid change in timbre when you release notes setting a negative envelope depth 5 6 7 1 2 Getting More out of a Sample One of the major selling points of the V...

Page 31: ...fun Later on you will learn step and realtime recording as well as how to handle controller data Go to 024 Nylon Floot which is suitably dynamic for our purposes and play the keyboard for a while to g...

Page 32: ...g the cursor right button a few times Move the cursor to where you deleted the note and press Tie The space has now been filled in with a effectively making the previous note at least a quaver longer...

Page 33: ...n t like what you have entered you can always use the Clear pad to start again Tip don t play too laid back otherwise several notes will appear later in the grid Having said that such mistakes can tur...

Page 34: ...ed for adding vibrato but here is a little trick which can always be used to make this more expressive Touch the Control 1 Destination 2 List pad and select 018 OSC1 LFO RATE Touch OK and set the sens...

Page 35: ...estination2 39 OSC2 LFO RATE Sens 2 Play the keyboard and push the Bender You should be able to hear that the LFOs in both oscillators have the same rate but also that they are not synchronized one ca...

Page 36: ...Patch 001 287 Wave 001 324 Patch Play Edit Temporary Area Patch Max 512 Wave Max 999 Project Internal Memory Load Project Factory Reset Save Project Patch Write Load Project Save Project Patch Write P...

Page 37: ...nk 20 MB User Sample Work Area Temporary Area 64 MB Internal Memory 16 MB Patch No 001 287 Preset Wave Dummy 6 MB Blank Patch No 288 512 User Sample 10 MB E Ea ac ch h c ca ap pa ac ci it ty y o of f...

Page 38: ...riant timbral changes Envelopes Listening to any acoustic instrument you will often hear changes in brightness and volume within each note Synthesizers make use of Envelopes to emulate these effects P...

Page 39: ...A p p e n d i c e s Sound Designers Comment 40 Howard Scarr 40 Stephane Pigeon 41 Patch List 42 Waveform List 44 Specifications 46 Other Tips 48 Index 51...

Page 40: ...e twist of a knob TIME 077 Mad Brass is a similar 012 Poppy Day Similar Events This one is based on the wave 066 137 Scat 2 a waveform which appears in different guises in several other presets notabl...

Page 41: ...Pulsatronic Pulsatronic perfectly illustrates different key features inside a single powerful patch First the arpeggiator which here turns a simple key stroke into a rich up and down pattern Settings...

Page 42: ...taluna 060 LoCo Pilot 061 Fixed Star 062 Spectroscope 063 Bird Island 064 To Space 065 Snowflake 066 TTripWhisper No PatchName 067 Galaxia 068 DBeamPsychic 069 Glass House 070 Psycho 071 GlassCluster...

Page 43: ...d 208 Cla Lead 209 Asian Lead 210 ConstructBts 211 Pulsactive 212 Thick Sine No PatchName 213 Retro Disco 214 Greasy Comb 215 Hi Lo Synth 216 V Analog 217 Wavezituar 218 On the Edge 219 STALKER 220 Le...

Page 44: ...Brass ff 105 Brs Fall 106 Trumpet Vib 107 TpHarmonMute 108 Trombone 109 AltoSax Vib 110 Flute Vib 111 Punchy Flute 112 Oboe Vib 113 Clarinet Vib 114 Bass Cl Vib 115 Bassoon Ethnic No Waveform Name 11...

Page 45: ...226 Studio Kick 227 TR 808 Kick 228 TR 909 Kick1 229 TR 909 Kick2 230 StdSnr VS 231 StdSnr 232 StdSnr RmSht 233 StdSnr Stk 234 R B Snr 235 TR 808 Snr 236 TR 909 Snr 237 TR 808 Rim 238 TR 909 Clap 239...

Page 46: ...When the unit ships from the factory 30 M bytes of this is taken up by the preset waves Sample storage memory FLASH 10 M bytes External Storage Device PC CARD slot Microdrive SmartMedia or CompactFlas...

Page 47: ...Inlet Power Supply AC 117 V AC 230 V AC 240 V Power Consumption 16 W Dimensions 1 056 W x 398 D x 111 H mm 41 5 8 W x 15 11 16 D x 4 3 8 H inches Weight 13 1 kg 28 lbs 15 oz Accessories Quick Start Ow...

Page 48: ...Trip function p 49 What kinds of audio file can be loaded p 49 What is the resampling function p 49 Preset Patches p 49 Enabling Disabling the Beep Tone p 50 Adjusting the Sensitivity of the D Beam C...

Page 49: ...m as a single sample You can conserve voices in this way 3 You could sample a phrase using arpeggiator or a passage you played with modulation using D Beam controller and or Time Trip Pad and record i...

Page 50: ...en appears 3 In the CALIBRATION MENU screen touch D BEAM The D Beam CALIBRATION screen appears When you place your hand over the D Beam controller the L or R level meter in the screen will move upward...

Page 51: ...OB 6 LEGATO 10 LFO 29 LIMITER 21 LITE 26 LO FI 21 Loop Points 25 Mad Orchestra 14 MAIN 23 Matrix 34 memory 36 Metronome 24 MFX 23 Mono 10 MULTI 23 NOTE ORDER 31 OD DS 17 OSC SYNC 16 OSC TVA 15 PAD 6 P...

Reviews: