background image

5

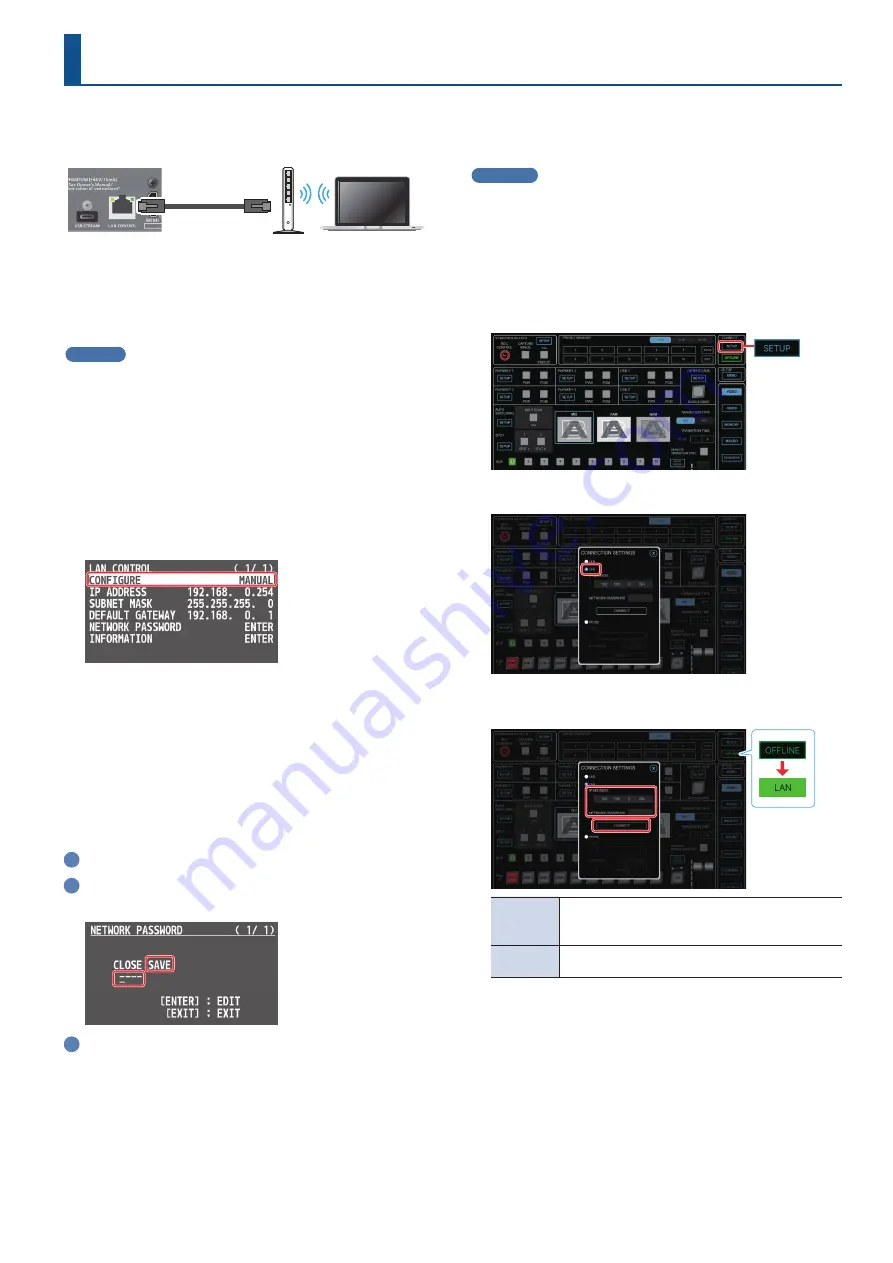
Connect the V-160HD and your wireless LAN master device using a LAN cable, so that you can wirelessly connect to the computer via the wireless 

LAN master device.

LAN cable

*  See the Owner’s Manual of the wireless LAN master device for how to use 

that device.

*  The wireless LAN (Wi-Fi) connection speed and connectivity may be 

unstable in certain network environments.

V-160HD

1. 

Use a LAN cable to connect the LAN port on your wireless LAN 

master device to the LAN CONTROL port on the V-160HD.

*  Do not connect to the internet port or WAN port.

2. 

Turn on the wireless LAN master device and enable DHCP 

server functionality on the wireless LAN master device.

3. 

Power-on the V-160HD.

4. 

[MENU] button 

Ó

 “LAN CONTROL” 

Ó

 set “CONFIGURE” 

to “USING DHCP,” and press the [VALUE] knob.

The IP address, subnet mask, and default gateway are obtained 

automatically.

5. 

Use the [VALUE] knob to select “INFORMATION,” and 

press the [VALUE] knob.

The LAN INFORMATION screen appears.

6. 

Set a network password (four characters).

Input the password that’s set here when accessing the V-160HD 

from V-160HD RCS.

Input the password using the [VALUE] knob.

Use the [VALUE] knob to select “SAVE,” and then press the 

[VALUE] knob.

Press the [EXIT] button to return to the previous screen.

7. 

Use the [VALUE] knob to select “INFORMATION,” and 

press the [VALUE] knob.

LAN INFORMATION screen appears.
When “CONNECTED” is shown in “STATUS,” the V-160HD connection 

settings are finished.

8. 

Press the [MENU] button to close the menu.

Computer

1. 

Connect your computer via Wi-Fi (wireless LAN).

For more information on how to make connections, refer to the 

respective documentation for the computer and the Wi-Fi router 

you’re using.

2. 

Launch the V-160HD RCS app.

3. 

Click the CONNECT [SETUP] button.

4. 

Select the “LAN.”

5. 

Input the “IP ADDRESS” and “NETWORK PASSWORD” 

fields, and click the [CONNECT] button.

IP ADDRESS

Input the IP address of the V-160HD.
Check this by pressing the [MENU] button on the V-160HD  

and selecting “LAN CONTROL” 

Ó

 “IP ADDRESS.”

NETWORK 

PASSWORD

Input the network password (four characters) set on 

the V-160HD.

When the status icon changes to “LAN,” the device is connected.

Connecting via Wireless LAN (Wi-Fi)

Summary of Contents for V-160HD RCS

Page 1: ...appearing in this document are registered trademarks or trademarks of their respective owners 2021 Roland Corporation V 160HD RCS is a program for remote control of the V 160HD The program runs on both Windows and Mac This app is compatible with V 160HD system program version 1 08 and later Make sure that the system program of the V 160HD is updated to the latest version ...

Page 2: ...ect the computer to the USB STREAM port on the V 160HD USB Type C port USB Type C cable USB A port USB cable USB Type C to A 2 Power on the V 160HD Computer 1 Turn on the computer and launch V 160HD RCS 2 Click the CONNECT SETUP button 3 Select the USB When the status icon changes to USB the device is connected ...

Page 3: ...ters Input the password that s set here when accessing the V 160HD from V 160HD RCS 1 Input the password using the VALUE knob 2 Use the VALUE knob to select SAVE and then press the VALUE knob 3 Press the EXIT button to return to the previous screen 6 Use the VALUE knob to select INFORMATION and press the VALUE knob LAN INFORMATION screen appears When CONNECTED is shown in STATUS the V 160HD connec...

Page 4: ...ow then click the Apply button Setting item Setting Configure IPv4 Set to Manually IP Address Set a value that does not conflict with the IP address of any other device connected to the network Set this in accordance with the connected network Subnet Mask This sets the subnet mask Set this in accordance with the connected network Settings theV 160HD RCS app 1 Launch the V 160HD RCS app 2 Click the...

Page 5: ...our characters Input the password that s set here when accessing the V 160HD from V 160HD RCS 1 Input the password using the VALUE knob 2 Use the VALUE knob to select SAVE and then press the VALUE knob 3 Press the EXIT button to return to the previous screen 7 Use the VALUE knob to select INFORMATION and press the VALUE knob LAN INFORMATION screen appears When CONNECTED is shown in STATUS the V 16...

Page 6: ...chronous asynchronous full duplex Communication speed 115 200 bps Parity none Data length 8 bits Stop bit 1 bit Code set ASCII Flow control XON XOFF 2 Turn on the power to the V 160HD Computer 1 Launch the V 160HD RCS app 2 Click the CONNECT SETUP button 3 Select the RS 232 4 Select the PORT and click the CONNECT button PORT From the drop down list select the port where the V 60HD is connected Whe...

Page 7: ...USB cable connect your MIDI controller to the computer that is running V 160HD RCS LAN connection USB MIDI controller USB RS 232 or LAN connection Some MIDI controllers might require a dedicated USB MIDI driver 2 From the V 160HD RCS menu bar choose MIDI 0 MIDI Settings The MIDI Control Settings window appears 3 In the MIDI Settings window in INPUT PORT choose the MIDI controller that s connected ...

Page 8: ...nge 0 119 0 127 1 Right click the button knob or fader that you want to map and from the popup menu choose Learn MIDI Control The message Waiting for MIDI message appears 2 Operate a button or knob of your MIDI controller When the corresponding button or knob in V 160HD RCS operates mapping is complete MEMO Viewing the MIDI mapping You can check the mapped MIDI messages by viewing them in the scre...

Page 9: ...he game controller to control PTZ camera CAMERA CONTROL screen When you click the CAMERA button the CAMERA CONTROL screen appears Adjusts the zoom position Adjusts the horizontal and vertical position Selects the camera to be operated The location of the buttons mapped to ZOOM differs depending on the manufacturer of the controller ...

Reviews: