background image

7

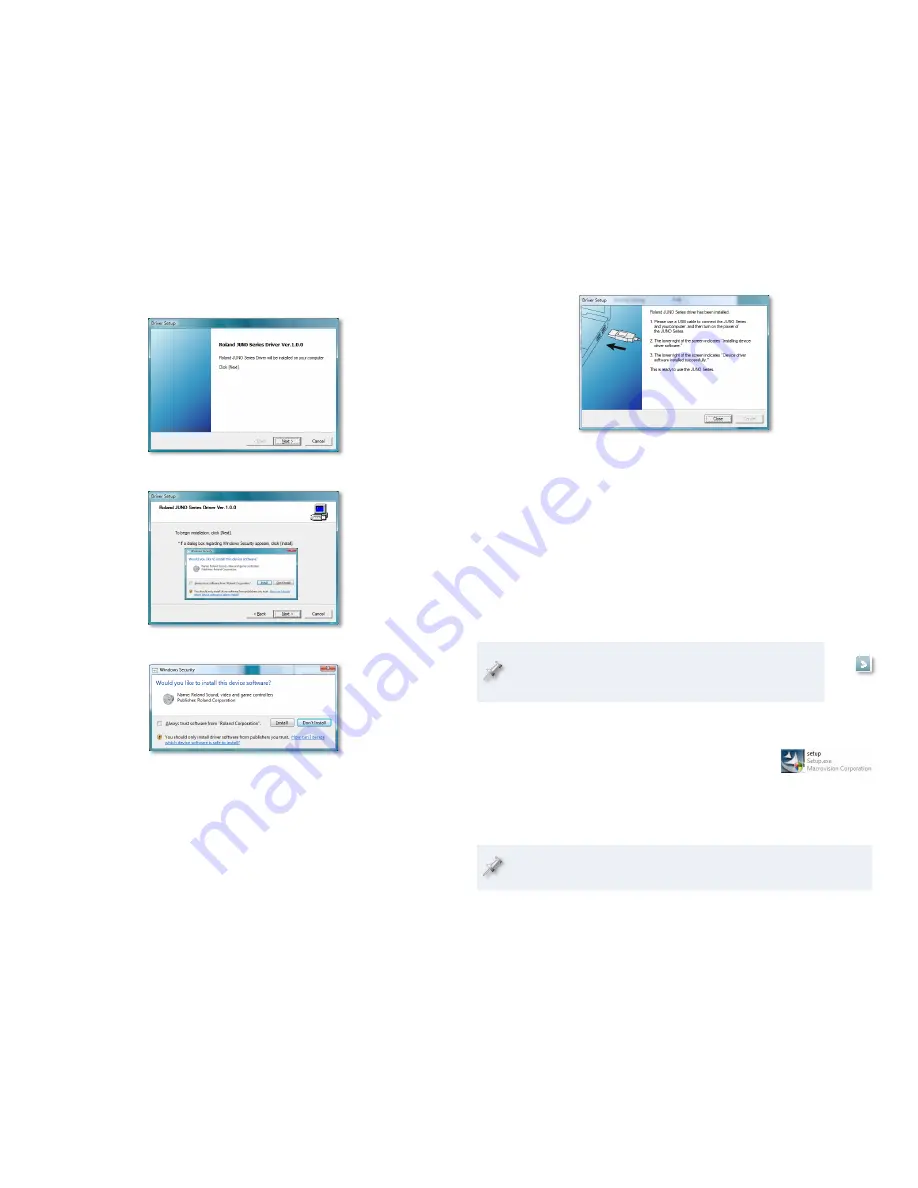
The Driver Setup window appears:

Click Next to display the Driver Setup instructions window:

Click Next.

If Windows Security asks if you’d like to install this device software—

as shown above—click Install.
The driver’s installed, and a window opens with instructions.

We’ll take you through these instructions in this booklet, so you can 
close this window, or drag it over to the side of the screen if you want 
to keep it open.
With the JUNO-Di’s power turned off, plug one end of the included 

USB cable into its USB jack, and the other end into the USB jack you 
want to use on your computer.
Turn on the JUNO-Di—after a few moments, “Installing device driver 

software” appears in the lower right corner of the screen.

When  the  PC’s  finished  installing  the  driver,  “JUNO  Series  Device 

driver software installed successfully” appears onscreen.
Restart your computer.

10 

Later in this booklet, we’ll provide some further information 
on  using  the  JUNO-Di  with  a  DAW.  Click  the  button  here  to 
jump to this section now if you like.

Installing the Editor/Librarian and Playlist Editor

You  can  install  both  the  JUNO-Di  Editor/Librarian 
software and the Playlist Editor software in a single 
operation. Here’s how to do this.

Double-click the JUNO-Di Editor Setup executable file. The installer 

opens.

If  Vista  tells  you  a  program  needs  your  permission  to  continue,  click 
Continue.

Summary of Contents for UNO-Di

Page 1: ...All rights reserved No part of this publication may be reproduced in any form without the written permission of Roland Corporation U S JDiWS02 Using the JUNO Di with a Computer Workshop JUNO Di Mobile...

Page 2: ...how to set up your MIDI connection Understanding the Symbols in This Booklet Throughout this booklet you ll come across information that deserves special attention that s why it s labeled with one of...

Page 3: ...e following computer operating OS systems Windows XP Windows Vista 32 bit Edition Mac OS X In this booklet we ll describe theWindows XP Vista and Mac OS X installation of the JUNO Di s USB MIDI driver...

Page 4: ...see About Driver Signing Options later in this booklet You can click this button to jump there now Click Next the driver is installed and instructions appear telling you 4 what to do next We ll take...

Page 5: ...ller folder contains an uninstaller You can hold onto this file or re download the driver folder later should you need it Later in this booklet we ll provide some further information on using the JUNO...

Page 6: ...pe window Highlight the Custom installation and then click Next 5 Checkmark both the JUNO Di Editor and the JUNO Di Librarian 6 software if they re not already checked and then click Next If you want...

Page 7: ...our computer Turn on the JUNO Di after a few moments Installing device driver 8 software appears in the lower right corner of the screen 9 When the PC s finished installing the driver JUNO Series Devi...

Page 8: ...one that s checked in this window When the installer displays your installation selections click Next to 6 proceed in a few moments the files are installed Click Finish to exit the installer 7 Mac OS...

Page 9: ...stall the JUNO Di USB MIDI driver 8 When you see the Install Succeeded window click Restart 9 If your Mac displays a message about reboot caches click OK When the Mac s restarted make sure the JUNO Di...

Page 10: ...Communication Using the JUNO Di as a MIDI Controller Only The JUNO Di s MIDI Controller mode makes it simple to configure the JUNO Di for use with a DAW Press the JUNO Di s MIDI CONTROLLER button to...

Page 11: ...annel corresponding to the part that plays its sound MIDI Channel 1 Part 1 PIANO 001 88StageGrand MIDI Channel 2 Part 2 GUITAR BASS 053 Cmp d Fng Bs MIDI Channel 10 Part 10 RHYTHM 001 Pop Kit 1 Piano...

Page 12: ...ng into the computer If your DAW can accept MIDI data on all MIDI channels often referred to as omni mode enable this option As we mentioned earlier there s seldom a need to match the DAW s incoming M...

Reviews: