background image

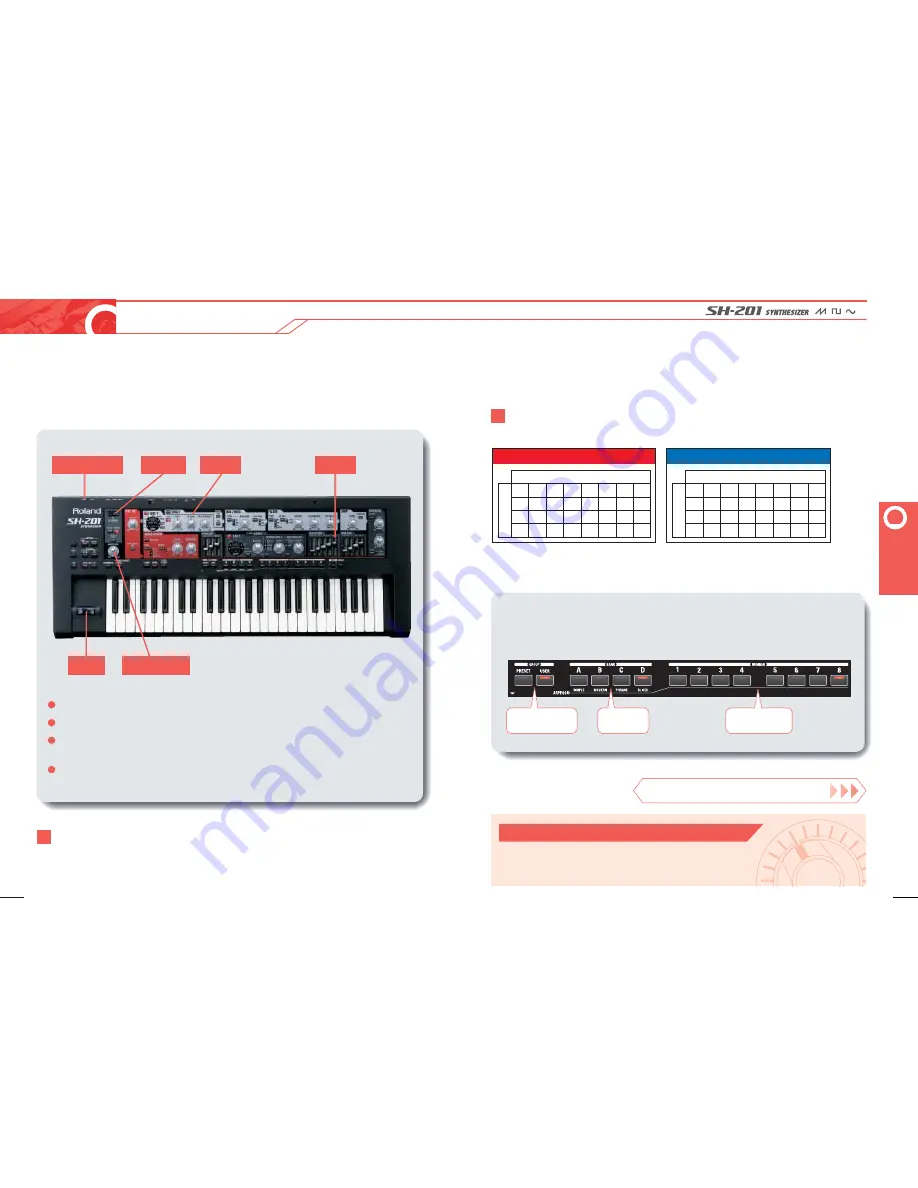
You can start playing the SH-201 as soon as you 

turn on the power. Go ahead and play the keyboard 

while adjusting the volume with the 

[MASTER VOL]

 knob. 

SH-201 allows you to store the timbres (sounds) 

you have created. These stored timbres are called patches.

MASTER VOL

Half of the SH-201’s 64 patches are user programmable. In other words, use these locations 

to store your original timbres that you have created.

Lever on the left side of the keyboard can be moved left or right to change the pitch.

Lever on the left side of the keyboard can be moved forward to add vibrato.

D Beam on the upper left of the keyboard can be controlled 
from your hand movement above to change the pitch, volume, or brightness.

Listen to the sound as you move any or all of the knobs 
and sliders gradually.

D-1 D-2 D-3 D-4 D-5 D-6 D-7 D-8

C-1

C-2

C-3

C-4

C-5

C-6

C-7

C-8

B-1

B-2

B-3

B-4

B-5

B-6

B-7

B-8

A-1

A-2

A-3

A-4

A-5

A-6

A-7

A-8

NUMBER (1– 8)

BANK 

(A–D

)

D-1 D-2 D-3 D-4 D-5 D-6 D-7 D-8

C-1

C-2

C-3

C-4

C-5

C-6

C-7

C-8

B-1

B-2

B-3

B-4

B-5

B-6

B-7

B-8

A-1

A-2

A-3

A-4

A-5

A-6

A-7

A-8

NUMBER (1– 8)

BANK 

(A–D

)

PRESET GROUP

 (read only)

USER GROUP

 (rewritable)

T

he SH-201 lets you create sound while listening to it in real time by moving knobs and sliders.

At this stage, it is okay if you don’t know how each control affects the sounds. 

Don’t worry, because you will get a hang of it as you continue with this text!

A

 total of 64 patches can be stored. The patch-storing location works like a file cabinet. 

A patch can be selected through the GROUP, BANK, and NUMBER buttons.

Once the timbres are stored, they can easily be recalled and played through 

simple button operations. Experiment with all of the patches on SH-201 

to hear the sounds created!

Let’s get into the function of each of the controls.

Power Switch

D Beam

Knobs

Sliders

Lever

Select 

GROUP

(PRESET or USER)

Select 

BANK

(A,B,C,D)

Select 

NUMBER

(1,2,3,4,5,6,7,8)

As you check out the factory-preset patches in detail, you will find many creative ideas. 

Use them as examples to create your own sounds from scratch. This method will enhance your 

sound-making skills, verses the common approach of editing a pre-existing sound.

Sound Programming for Thought

3

Chapter

Let’s Play

7

8

3

Chapter

 Let’

s Play

Summary of Contents for SH-201

Page 1: ...WE DESIGN THE FUTURE Creating Sounds with Fun and Ease Synthesizer 101 Learning the SH 201 ...

Page 2: ...gically designed to teach the basics of synthesis External input for manipulating external audio from CD MP3 players etc Built in delay reverb and overdrive effects USB port for audio MIDI connection to computer VSTi Editor software included for computer integration 1 2 1 Chapter 2 Chapter Introduction The Basic Structure of a Synthesizer 3 Chapter 4 Chapter Let s Play The Function of Controls 5 C...

Page 3: ...s was Roland s first full digital synthesizer and one of the best selling models The D 50 was a worldwide sensation due to its operating ease and stunning sound Even though this is synthesis at its friendliest the SH 201 is no toy With two beefy analog modeling oscillators complete with Roland s famous Supersaw waveform and resonant filter this little synth can blow down doors Combining stunning d...

Page 4: ...rols the initiation and termination of sounds On analog synthesizers it is also called ENV 5 Every time you play the keyboard ENV affects the volume and timbre on OSC FILTER and AMP individually as it processes its time varied elements time Key on Key off cutoff frequency A D S DEPTH R Low Pass Filter High Pass Filter Band Pass Filter Key on Key off time A D S R volume A D time DEPTH Key on pitch ...

Page 5: ... B 4 B 5 B 6 B 7 B 8 A 1 A 2 A 3 A 4 A 5 A 6 A 7 A 8 NUMBER 1 8 BANK A D PRESET GROUP read only USER GROUP rewritable The SH 201 lets you create sound while listening to it in real time by moving knobs and sliders At this stage it is okay if you don t know how each control affects the sounds Don t worry because you will get a hang of it as you continue with this text A total of 64 patches can be s...

Page 6: ...sionless To hear how the sound changes with each step play the keyboard after each process F irst determine the waveform to use as the source of the sound Play the keyboard with your left hand while switching waveforms with the WAVE button Listen to the differences in the sound of each waveform as you play the keyboard N ext let s determine the pitch Playing the keyboard with one hand while turnin...

Page 7: ...act that most of the sound frequencies have been filtered out and rejected N ext turn the RESONANCE knob Turn it all the way left MIN then gradually rightward to MAX It will start to resonate yielding a colorful howling sound On a piano its initial sound would include most of the harmonics that generates bright sound Afterward the sound would fade gradually as a decrease in harmonics will result i...

Page 8: ...und analog lead sound set it up to play monophonically single note at a time by pressing the SOLO button I n this set up when you play a key while playing another key timbre will remain unchanged but the pitch will change SOLO LEGATO This effect is similar to the trill technique used in string instruments Moving right along let s set the portamento control The portamento is an effect where the tra...

Page 9: ...sing the SHAPE button Additionally turning the RATE knob will change the speed of vibrato Try out various settings for vibrato with different waveforms and speeds For example the human voice or a violin would typically have a vibrato rate of 2 to 7 cycles per second Press the DESTINATION button and select AMP for tremolo or FILTER for growl effects 1 Low Frequency Oscillator Press PRESET Press D P...

Page 10: ...when your hand is released from the keyboard lower the R slider of the AMP ENV all the way down E xperiment with the TYPE CUTOFF and RESONANCE controls as you play the keyboard Just as the sawtooth and square waves were processed with effects your portable digital music player s music is processed with effects now I t doesn t really matter which keys you play the portable digital music player s mu...

Page 11: ...DEPTH knob and fatten the bass timbre Lastly fine adjust the DEPTH slider of the FILTER ENV to determine the overall sound 1 2 3 4 5 6 7 8 9 10 11 12 Choose PRESET D 8 The sawtooth wave is selected Turn the CUTOFF knob in the FILTER section to the two o clock position Turn the RESONANCE knob in the FILTER section to the one o clock position Let s create the initial portion of the sound Raise the A...

Page 12: ...nob to enhance the resonance 4 1 2 3 4 5 6 7 8 9 10 11 12 Choose PRESET D 8 The sawtooth wave is selected Press the WAVE button in the OSC1 section and select NOISE Turn the CUTOFF knob in the FILTER section all the way left to MIN The sound becomes inaudible Turn the RESONANCE knob in the FILTER section all the way right to MAX Raise the D and R sliders of the FILTER ENV mid way up Lower the S sl...

Page 13: ...quencies will become lower as well For example when A4 center A equals 440 0 Hz an octave higher pitch would generate twice the amount of frequency at 880 0 Hz A5 An octave lower pitch would produce half the frequency at 220 0 Hz A3 Pitch Harmonics Volume The volume of the sound is determined by the size or the width of the waves As the waves become wider vertically on the graph the louder the vol...

Page 14: ...hat time most people thought of the synthesizer as a tool to replicate real life sound In contrast listing to the latest music trend numerous sound music producers have created sounds that only synthesizers can produce and listeners are demanding these sounds as well Most of the PCM synthesizers have set their goal on the pursuit of reality or replication I am glad to see that this particular synt...

Page 15: ......

Reviews: