background image

19

Using the Compressor/Limiter

The Rubix24 and Rubix44 let you use a compressor or limiter.

Compressor/Limiter Settings

Rear Panel

*  The illustration shows the Rubix44

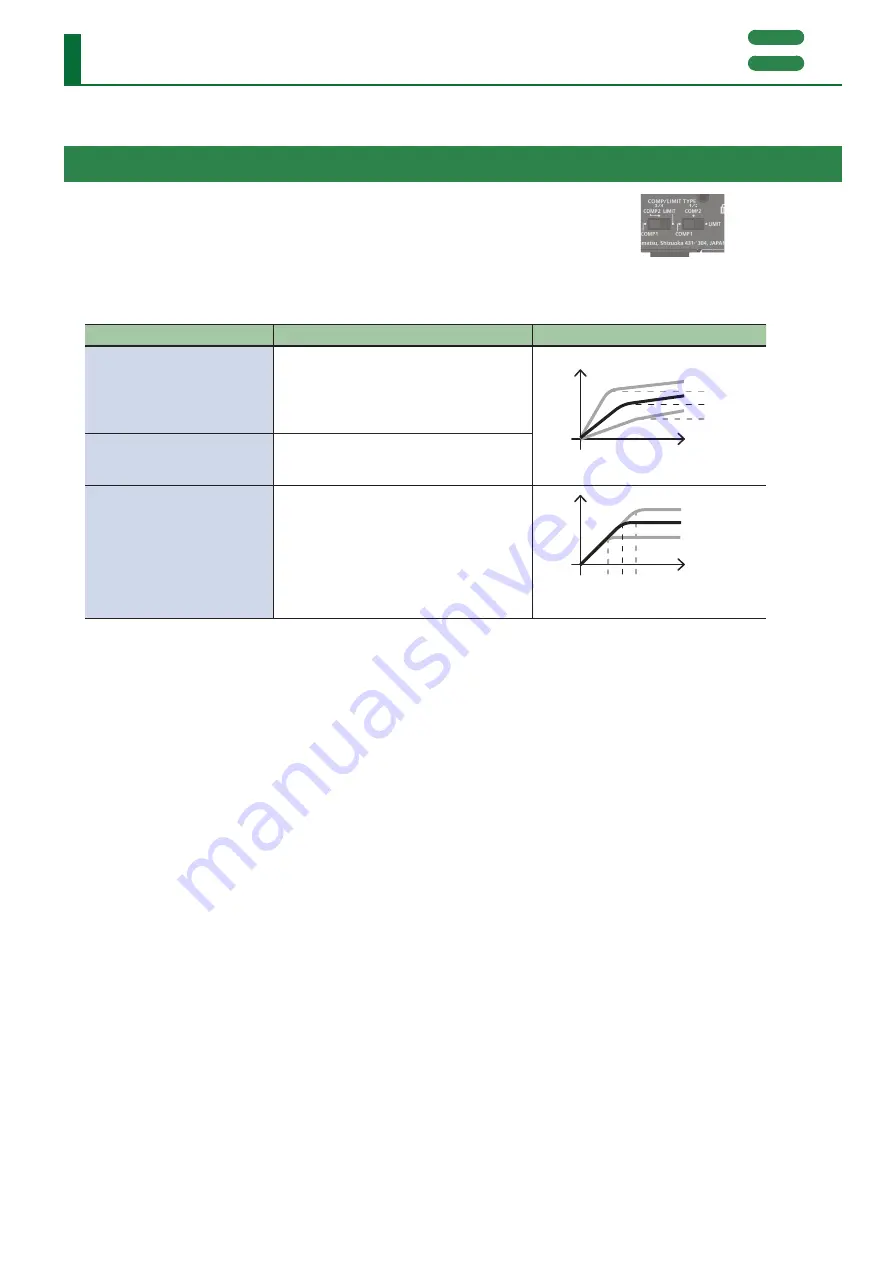
Using a compressor makes the volume more consistent. Turning the [THRS] knob toward the right 

applies the compressor more strongly, and simultaneously raises the makeup gain (boosts the output 

level).
Using a limiter suppresses excessive volume.
Use the Rubix24 or Rubix44’s [COMP/LIMIT TYPE] switch (rear panel) to change this setting.

[COMP/LIMIT TYPE] switch

Explanation

Response

COMP1

When the input signal exceeds the level 

specified by the [THRS] knob, the level is 

restrained at a fixed proportion.
This setting is suitable for instruments, such as 

percussion or guitar.

Input level

[THRS] 

knob

O

utput lev

el

COMP2

This compressor has a shorter attack time than 

COMP1, making it suitable for vocals (the effect 

applies more rapidly than COMP1).

LIMIT

This is a limiter. It prevents clipping (distortion) 

from occurring when an unexpectedly loud 

signal is input.
Signals that exceed the level specified by the  

[THRS] knob are limited.
*  Clipping distortion will occur if the input 

exceeds the capacity of the limiter.

Input level

[THRS] 

knob

O

utput lev

el

Rubix24

Rubix44

Summary of Contents for rubix 22

Page 1: ...ReferenceManual 2017 Roland Corporation 01...

Page 2: ...4 Hi Z button Determines the impedance of the INPUT 1L jack You can select high impedance Hi Z or low impedance Lo Z as appropriate for the connected equipment Hi Z button Equipment connected to the I...

Page 3: ...ard or MIDI controller 5 DIRECT MONITOR switch Determines whether the audio signals input via the INPUT 1L 2R are output directly Switch position Explanation MONO Monitor in mono STEREO Monitor in ste...

Page 4: ...audio device that is connected 5 5 Use a microphone with an XLR connector The sound level will be very low if you use a microphone with a phone type plug 5 5 When connecting a guitar or bass use the...

Page 5: ...u might hear noise when turning this knob but this is not a malfunction 10 MONO button If this is turned on the audio signal that is input to the INPUT 1L 2R jacks is monitored in mono MEMO 5 5 When a...

Page 6: ...T TIP COLD RING 5 5 The wiring of this device uses impedance balancing The audio signal is conveyed via HOT and GND in unbalanced form but since COLD and GND are connected by a resistor the electrical...

Page 7: ...The sound level will be very low if you use a microphone with a phone type plug 5 5 Whenconnectingaguitarorbass usetheINPUT1L or INPUT 3L jack The sound level will be very low if you connect directly...

Page 8: ...e connection with a USB device Power indicator Status Lit Connected to a computer or iPad Unlit Not connected to a computer or iPad Rapid blinking The power will soon be turned off automatically by th...

Page 9: ...c Connect the MIDI IN connector to a MIDI keyboard or MIDI controller 6 9 10 7 8 6 OUTPUT 1L 2R 3L 4R jacks balancedTRS type Output the analog audio signal MEMO 5 5 Pin assignment of OUTPUT jack GND S...

Page 10: ...ect it before you proceed Installing the USB Driver Before Using the Product for the FirstTime 1 With the Rubix22 Rubix24 Rubix44 not connected start up your computer 2 Download the USB driver from th...

Page 11: ...the AC adaptor so the side with the indicator see illustration faces upwards and the side with textual information faces downwards The indicator will light when you plug the AC adaptor into an AC out...

Page 12: ...th the indicator see illustration faces upwards and the side with textual information faces downwards The indicator will light when you plug the AC adaptor into an AC outlet Uninstalling the Driver Wi...

Page 13: ...13 Getting Ready to Use the Rubix 6 Follow the directions in the screen to uninstall the USB driver If any other message appears proceed as directed by the message...

Page 14: ...applications you re using and power cycle the Rubix 5 5 Disconnect and reconnect the USB cable 5 5 If you connect or disconnect another USB device such as a USB flash drive while using the Rubix or tu...

Page 15: ...click the Set as default button 3 Click the OK button Mac OS 1 Open System Preferences and click the Sound icon 2 Click the Output tab and select Rubix22 3 3 Select the model of Rubix that you re usin...

Page 16: ...data to be transferred smoothly without dropouts You can use the USB buffer setting to change the size of the audio buffer Increasing the size makes data transfer more stable but has the disadvantage...

Page 17: ...st appropriate setting Select the setting with the shortest delay that still allows stable audio playback Setting Stability Latency 1 Low Short fast 7 High Long slow MEMO Refer to How audio buffer siz...

Page 18: ...om the INPUT jacks can be sent to your DAW software and recorded To prevent malfunction and equipment failure always turn down the volume and turn off all the units before making any connections Guita...

Page 19: ...TYPE switch Explanation Response COMP1 When the input signal exceeds the level specified by the THRS knob the level is restrained at a fixed proportion This setting is suitable for instruments such as...

Page 20: ...does not resolve the issue reinstall the USB driver p 10 Is the Rubix s device name displayed Exit all software that s using the Rubix and then try the following 5 5 Reconnect the USB cable 5 5 Power...

Page 21: ...ts communications activity to Do nothing 3 Click the OK button to close the Sound window My guitar is too quiet Are you using the correct jack Connect your guitar to the INPUT 1L or INPUT 3L jack p 2...

Page 22: ...you don t see the High Performance plan click Show Additional Plans 3 In high performance click Change Plan Settings 4 Click Change Detailed Power Settings 5 In detailed settings click for Hard Disk a...

Page 23: ...and the output of the MIDI sound module be connected to the INPUT 1L or INPUT 2R jack of the Rubix Connect the MIDI sound module and the Rubix to a USB hub that connects to a power supply Have you co...

Page 24: ...Windows detects communications activity to Do nothing 3 Click the OK button to close the Sound window Windows Is the size of the USB driver s audio buffer too small Increase the size of the USB driver...

Page 25: ...ppear 5 Click the added new external device icon and then click the Show Info icon 6 Enter Rubix in the Device Name field and then click the Apply button 7 Using your mouse drag and connect the I H bu...

Page 26: ...I IN OUT Hi SPEED USB DIRECT MONITOR MONO STEREO MIDI IN D A D A PHONES SELECT PHONES OUTPUT OUTPUT 1L OUTPUT 2R OUTPUT 3L OUTPUT 4R PHONES MIDI OUT NOR LIFT NOR LIFT BLOCK DIAGRAM INPUT 1L INPUT 2R 4...

Page 27: ...1L 2R jacks 6 dBu impedance balanced Maximum Output Level OUTPUT 1L 2R jacks 8 dBu impedance balanced PHONES Maximum Output Power 20 mW 20 mW L R 47 ohms load Headroom 14 dB Input Impedance INPUT 1L...

Page 28: ...2R jacks 1 4 inch TRS phone type 18 dBu Nominal Output Level OUTPUT 1L 2R 3L 4R jacks 6 dBu impedance balanced Maximum Output Level OUTPUT 1L 2R 3L 4R jacks 8 dBu impedance balanced PHONES Maximum Ou...

Page 29: ...3L 4R connectors XLR type 2 dBu INPUT 1L 2R 3L 4R jacks 1 4 inch TRS phone type 18 dBu Nominal Output Level OUTPUT 1L 2R 3L 4R jacks 6 dBu impedance balanced Maximum Output Level OUTPUT 1L 2R 3L 4R ja...

Page 30: ...that to which the receiver is connected Consult the dealer or an experienced radio TV technician for help This device complies with Part 15 of the FCC Rules Operation is subject to the following two...

Page 31: ...31 For EU Countries WARNING This product contains chemicals known to cause cancer birth defects and other reproductive harm including lead For C A US Proposition 65...

Reviews: