background image

7

Operation Guide

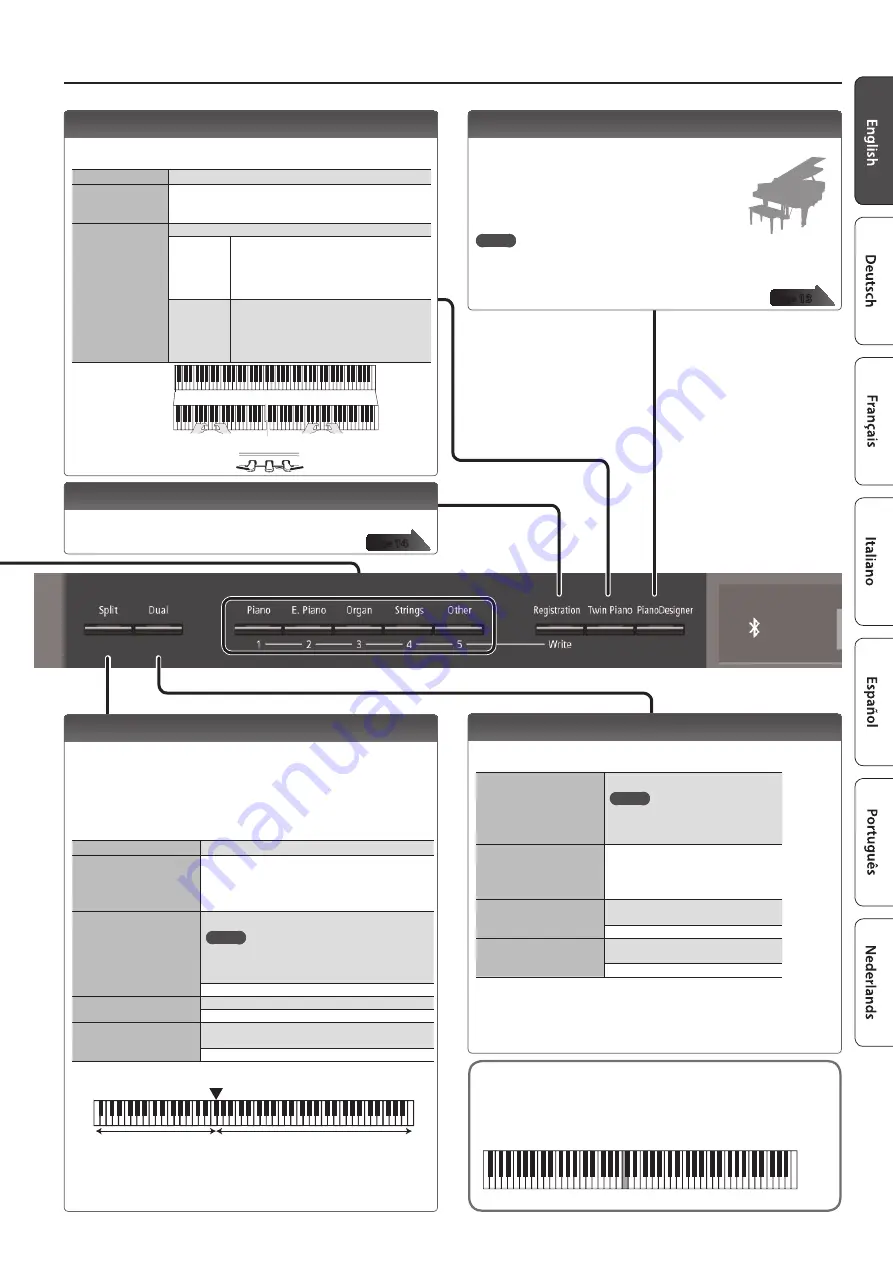
Creating Your Own Piano Tone (Piano Designer)

You can create your own piano tone by customizing the elements of 

the grand piano sound to your taste.

1. 

Press the [Piano Designer] button.

2. 

Use the [

K

] [

J

] buttons to select the item that 

you want to edit.

3. 

Use the [–] [+] buttons to edit the value.

MEMO

Piano Designer can be used to customize the sound only for [Piano] button 

tones.

page 

13

Playing Different Tones with the Left and Right Hands

(Split Play)

You can play different tones in the areas at the left and right of a 

specified key. For example, you can use your left hand to play a bass 

tone and use your right hand to play a piano tone.
This feature is called “Split Play,” and the point at which the keyboard 

is divided is called the “split point.”

Turning Split on

Turn the [Split] button on.

Changing the right-hand 

tone and left-hand tone

1. Use the [

K

] [

J

] buttons to select “right-hand tone” 

or “left-hand tone.”

2. Press a tone button.
3. Use the [–] [+] buttons.

Split Point

Changes the split point.

MEMO

You can also specify the split point by holding 

down the [Split] button and pressing the key 

where you want to split the keyboard.

B1–B6 (default value: F#3)

Balance

Changes the volume balance of Split Play.

9:1–9:9–1:9 (default value: 9:9)

Left Shift

Changes the pitch of the left-hand tone in units of 

one octave.

-2–0–2 (default value: 0)

Left-hand tone

Right-hand tone

Split point (Power-up default): F#3

F#3

*  If you select a sound from the [Piano] button as the left-hand tone, it might 

sound different than usual.

Layering Two Sounds (Dual Play)

You can play two tones simultaneously from a single key. This 

function is called “Dual Play.”

Turning Dual on

Turn the [Dual] button on.

MEMO

You can also use Dual Play by 

pressing two tone buttons 

simultaneously.

Changing tone 1 and 

tone 2

1. Use the [

K

] [

J

] buttons to select 

“tone 1” or “tone 2.”

2. Press a tone button.
3. Use the [–] [+] buttons.

Balance

Adjusts the volume balance 

(tone 1: tone 2) for Dual Play.

9:1–9:9–1:9 (default value: 9:3)

Tone 2 Shift

Changes the pitch of tone 2 in units of 

one octave.

-2–0–2 (default value: 0)

*  Depending on the combination of tones, the effect might not apply to tone 2, 

causing the sound to appear differently than usual.

*  If you select a sound from the [Piano] button as tone 2, it might sound different 

than usual.

Dividing the Keyboard for Two People (Twin Piano)

You can divide the keyboard into left and right areas so that two 

people can play the same range of pitches.

Turning Twin Piano on

Turn the [Twin Piano] button on.

Changing the Twin 

Piano tone

1. Use the [

K

] [

J

] buttons to select “Tone.”

2. Press a tone button.

3. Use the [–] [+] buttons.

Changing the way 

the sound is heard 

(Mode)

Use the [–] [+] buttons.

Pair

Notes played in the right area are louder in 

the right speaker; notes played in the left 

area are louder in the left speaker.
When using headphones, you’ll be able to 

hear the other person’s playing.

Individual 

Notes played in the right area are heard only 

from the right speaker; notes played in the left 

area are heard only from the left speaker.
When using headphones, you won’t be able 

to hear the other person’s playing.

The damper pedal 

for the left area

The damper pedal 

for the right area

Conventional 

keyboard

Twin Piano

divide point

C4

C5

C6

C7

C8

C3

C2

C1

C4

C5

C6

C3

C4

C5

C3

C6

Saving Your Performance Settings (Registration)

You can save tone settings and performance settings such as Dual 

Play or Split Play, and easily recall them when you wish.

page 

14

Reading the note name (e.g., C4)

The alphabetical indication for settings such as Split Point shows 

the name of the note.
For example, the indication “C4” means “the fourth ‘C’ from the left 

edge of the keyboard.”

C4

C5

C6

C7

C8

C3

C2

C1

Summary of Contents for LX-17

Page 1: ...ains numerous built in songs For the song titles refer to Internal Song List at the end of this manual Recording the SongYou re Practicing You can record your own playing page 8 page 9 page 10 AdjustY...

Page 2: ...ils on the internal songs refer to Internal Song List at the end of this manual Playing a song 1 2 1 Press the s button The song plays 2 Press the s button once again The song stops Song operations Re...

Page 3: ...Playback Mode SMF Play Mode 19 Selecting the Format for Recording Recording Mode 19 Changing How the Pedal Effects Are Applied Damper Pedal Part 19 Changing How the Pedals Work Center Pedal 19 Changin...

Page 4: ...on You can use the lid to conceal the panel This allows you to concentrate on performing without being distracted by the buttons or the display Lid Using the Music Rest LX 17 You can place music on th...

Page 5: ...y played resonate sympathetically resulting in a rich resounding tone Additionally when using half pedaling techniques the core of the sound disappears rapidly while a rich spacious resonance remains...

Page 6: ...y press the Ambience button and Brilliance button 2 Use the K J buttons to select the item that you want to set 3 Use the buttons to edit the setting page 18 Changing the Playing Feel of the Keyboard...

Page 7: ...buttons simultaneously Changing tone 1 and tone 2 1 Use the K J buttons to select tone 1 or tone 2 2 Press a tone button 3 Use the buttons Balance Adjusts the volume balance tone 1 tone 2 for Dual Pla...

Page 8: ...me signature of the metronome MEMO You can also change the time signature by holding down the Metronome button and use the Slow Fast buttons 2 2 2 4 3 4 4 4 5 4 6 4 7 4 3 8 6 8 8 8 9 8 12 8 default va...

Page 9: ...t left hand and right hand You can mute a specific part so that it will not sound only the parts that you want to hear will play Let a part play Make the button light for parts that you want to play M...

Page 10: ...don t select a part at this time your performance is recorded to the following buttons When playing a single tone Right button Split Play Right button and Left button Twin piano play Dual Play Right b...

Page 11: ...2 Getting ready for audio recording Getting ready to record p 11 1 Connect your USB flash drive 2 Hold down the t button and use the button to select Audio 3 Press the t button 3 Press the cursor J bu...

Page 12: ...ance button to exit Function mode Deleting a Saved Song Delete Song Here s how to delete a song that you saved on an internal memory or USB flash drive MEMO If you want to delete all songs that have b...

Page 13: ...pathy when you press the damper pedal and the resonance of the entire instrument Higher settings produce louder sympathetic resonance Key Off Resonance Off 1 10 Adjusts sympathetic vibrations such as...

Page 14: ...9 Left Pedal p 19 MIDI Transmit Ch p 20 Recalling a Registration 1 Press the Registration button 2 Press a number button 1 to 5 to choose the location where the desired registration is saved 3 Press t...

Page 15: ...ed Registration Set Registration Import Here s how a registration set that s saved on a USB flash drive can be loaded into the Registration button NOTE When you load a registration set the registratio...

Page 16: ...the position at which you want to change the character buttons Change the character 5 Press the s Enter button The settings are saved NOTE Never turn off the power or disconnect the USB flash drive wh...

Page 17: ...trations and internally saved settings to the factory set condition This function is called Factory Reset NOTE Factory Reset erases all settings that you have stored and returns them to the factory se...

Page 18: ...that have a simple melody Kirnberger I As in the Just temperaments the primary triads are consonant in this tuning Beautiful sonorities are obtained when playing songs that are written in keys appropr...

Page 19: ...y of other operations Sostenuto Sets function to sostenuto pedal Play Stop The pedal will have the same function as the s button Layer Pressing the pedal will layer on Tone 2 used for Dual Play The La...

Page 20: ...yed in the screen English Japanese Auto Off Making the Power AutomaticallyTurn off After aTime Auto Off With the factory settings the unit s power will automatically be switched off 30 minutes after y...

Page 21: ...mbience button and Brilliance button simultaneously 3 Use the K J buttons to select Bluetooth Audio and then press the s Enter button The Bluetooth Audio screen appears 4 Press the button to turn the...

Page 22: ...e MEMO 5 5 If the above steps do not succeed in establishing a connection tap the model name LX 17 or LX 7 that is shown in the Bluetooth device screen of the mobile device 5 5 To disconnect either tu...

Page 23: ...e connected to the Output jacks To prevent malfunction and equipment failure always turn down the volume and turn off all the units before making any connections USB Memory Port You can do the followi...

Page 24: ...eyboard causes internal hammers to operate and the vibrations may be transmitted to the floor or walls To minimize such vibrations you can move the piano away from the wall or lay down a commercially...

Page 25: ...bile device and establish a connection There is no need to initiate pairing from this unit Can t use the page turning function and MIDI function simultaneously The page turning function and MIDI funct...

Page 26: ...ch apply it equally over the entire surface If you apply more force in one place over another you risk losing some of the luster of the finish Store in a location that is out of the reach of small chi...

Page 27: ...e 1 Symphonic Str 1 2 Epic Strings 3 Rich Strings 4 Orchestra Str 5 Orchestra 6 Chamber Winds 7 Harp 8 Violin 9 Velo Strings 10 Flute 11 Cello 12 OrchestraBrs 13 Pizzicato Str 14 Symphonic Str 2 Other...

Page 28: ...25 Tr umerei Robert Alexander Schumann 26 Fr hlicher Landmann Robert Alexander Schumann 27 La pri re d une Vierge Tekla Badarzewska 28 Dolly s Dreaming Awakening Theodor Oesten 29 Brautchor Wilhelm Ri...

Page 29: ...r t LX 17 LX 7 in bereinstimmung mit den grundlegenden Anforderungen und den brigen einschl gigen Bestimmungen der Richtlinie 1999 5 EG befindet Estonian K esolevaga kinnitab Roland Corporation seadme...

Page 30: ...5 1 0 0 0 4 6 7 7 3 0 1...

Reviews: