background image

Switching Between Sound Modes 

19 

Switching Between Sound Modes 

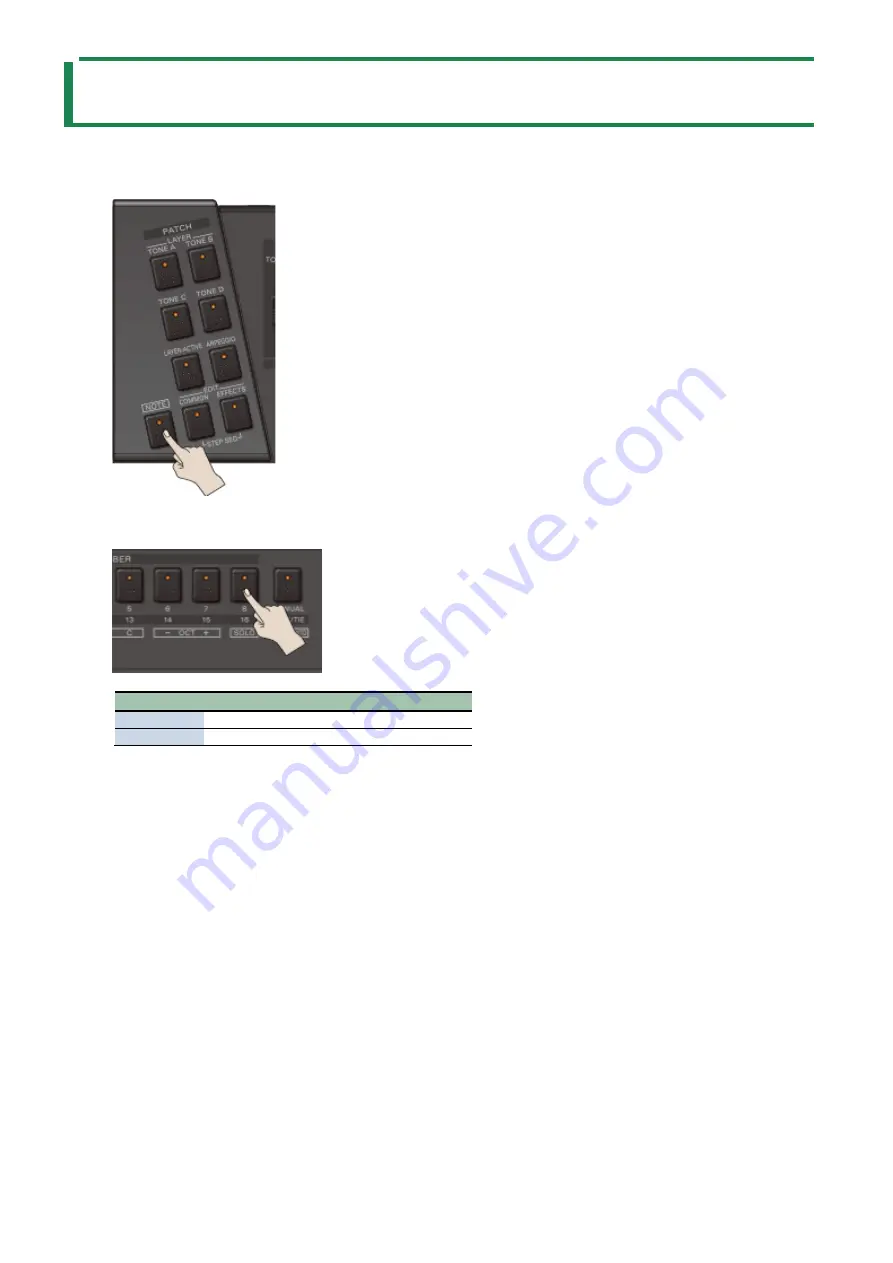
Here’s how to set the way the sound generator of the JD-08 plays. 

1.


Press the [NOTE] button to make the indicator light. 


2.


Press the [SOLO] button. 

This selects the sound mode. 


Button status 

Mode 

Explanation 

Lit 

Solo mode  Plays single tones. 

Unlit 

Poly mode  Plays multiple tones (polyphonic). 


Summary of Contents for JD-08

Page 1: ...JD 08 Owner s Manual ...

Page 2: ...t 29 Inputting Notes Step by Step Step Input 29 Recording Your Performance in Real Time 30 Setting the Note Loudness and Length Velocity Gate Time 31 Making sequencer settings 32 Saving a Pattern 33 Configuring the Effects 34 Effect A 34 Distortion 34 Phaser 35 Spectrum 35 Enhancer 35 Effect B 36 Delay 36 Chorus 37 Reverb 37 Backing Up Data 39 Restoring the Settings Restore 40 Configuring the Sett...

Page 3: ...ons of the TONE A TONE D buttons change depending on the state of the LAYER ACTIVE button ACTIVE Select the layer to edit The TONE button for the selected layer blinks LAYER Turns the layer on off The TONE button lights up for the tone that plays LAYER ACTIVE button Switches between functions for the TONE A TONE D buttons Off LAYER On ACTIVE ARPEGGIO button Turns the arpeggio on off The arpeggio s...

Page 4: ... the EFFECTS and COMMON buttons at the same time to edit the sequencer Having done this press the COMMON button again to show the sequencer settings menu EFFECTS button Displays the effects settings menu Press the EFFECTS and COMMON buttons at the same time to edit the sequencer Having done this press the COMMON button again to show the sequencer settings menu ...

Page 5: ...ogether with the 1 16 buttons to switch to different patterns EXIT button Returns to the previous screen VALUE knob Turn Edits the parameter s value Press Confirms an operation or value Display Shows the bank and patch number parameter value and tempo 1 16 buttons PAGE TIE button Use these buttons to switch between tones number bank and to input notes into the sequencer ...

Page 6: ...ese sliders control various settings for the tones Controller Parameter Value Explanation TONE A TONE D sliders Depends on the assigned parameter Sets the parameters for each tone The last parameters you operated are assigned to the PALETTE TONE A TONE D sliders ...

Page 7: ...litude increase gradually The larger the value the longer it takes for the amplitude to reach maximum Negative values make the LFO amplitude decrease gradually The smaller the value the longer it takes for the amplitude to reach minimum No time based change occurs when this is set to 0 WAVEFORM button Selects the LFO waveform TRi đ Triangle wave SAľ Sawtooth wave SQr ē Square wave S_H ĕ Sample hol...

Page 8: ...se values for pitches lower than the base pitch L1 L2 slider SUSTAIN LEVEL slider L4 slider 2 3 50 50 2 Adjusts the TVF envelope levels This sets how much to change the cutoff frequencies for L1 L2 SUSTAIN LEVEL and L4 in respect to the base levels 3 Adjusts the TVA envelope levels This adjusts the volume for L1 L2 SUSTAIN LEVEL and L4 T1 T4 sliders 4 0 100 These knobs set the envelope times Large...

Page 9: ... value set this to 0 KEY FOLLOW slider 100 50 20 10 5 0 5 10 20 50 98 99 100 101 102 150 200 Sets how much the pitch is changed when the keyboard is shifted one octave 12 semitones up To make the pitch change over one octave like regular keyboards set this to 100 To make the pitch change over two octaves set this to 200 You can make the pitch lower by setting this to a negative value To play the s...

Page 10: ...settings can produce oscillation causing the sound to distort ENV slider 50 50 This sets the intensity of the TVF envelope When the value is higher the filter produces greater change Setting this to a negative value inverts the envelope s shape KEY FOLLOW slider 100 150 Changes the cutoff frequency according to the keys you play When this is set to a positive value playing notes above C4 middle C ...

Page 11: ...VEL slider UPPER LOWER U_L The further away that the key higher or lower you play is from the key specified by the BIAS POINT the greater the volume changes according to the settings of the BIAS LEVEL slider At this time both the UPPER and LOWER indicators light up BIAS POINT slider 0 127 Sets the base key from which the volume is changed A value of 64 equals C4 middle C BIAS LEVEL slider 10 10 Ad...

Page 12: ...Panel Descriptions 12 EXT CLK IN Jack Use this jack to input clock signals from an external source You can make the steps of the sequencer advance in sync with the clock pulse that s inputted ...

Page 13: ...er Download the software from the Roland website https www roland com global support VOLUME knob Adjusts the volume PHONES jack Used for connecting headphones sold separately OUTPUT jack Connect this jack to your amp or monitor speakers MIX IN jack Used for inputting audio The sound from connected devices is output from the PHONES and OUTPUT jacks MIDI IN OUT connectors Connect a MIDI device to th...

Page 14: ...ate a malfunction 1 To turn on the power slide the POWER switch to ON When you operate the sound module such as for adjusting the angle or mounting the unit be careful not to get your fingers pinched between the movable parts and this unit In places where small children are present make sure that an adult provides supervision and guidance Do not use a USB cable that is designed only for charging a...

Page 15: ...a variety of sounds The patches are further organized by group A D bank 1 8 and number 1 8 letting you save a total of 4 x 8 x 8 256 patches 1 Press the NUMBER 1 8 buttons This selects the patch You can use the VALUE knob to select from all of the patches in order You can select separate patches for parts A and B For details on the part settings refer to Part Settings p 42 ...

Page 16: ... switch the group and bank for the patches 1 Press the BANK 1 8 buttons This selects the bank The group A D switches each time you press the same bank button 2 Press the NUMBER 1 8 buttons The selected group and bank s patch is selected the unit switches to that patch ...

Page 17: ...eason be sure to save your important settings A dot is shown in the display once you edit a tone 1 Press the BANK 1 8 buttons to select the group and bank where you want to save the data 2 Long press one of the NUMBER 1 8 buttons to select the patch number you wish to save to The display blinks several times The tone is saved in the patch number you selected ...

Page 18: ...s the NOTE button The 1 13 buttons light up At this time you can use the 1 13 buttons as if they were keys on a keyboard Use the 14 or 15 button the OCT and buttons to switch the tonal range of the keyboard in octaves Use the 16 button the SOLO button to switch between solo mode and poly mode The PAGE TIE PORTAMENTO button switches portamento on off ...

Page 19: ...ow to set the way the sound generator of the JD 08 plays 1 Press the NOTE button to make the indicator light 2 Press the SOLO button This selects the sound mode Button status Mode Explanation Lit Solo mode Plays single tones Unlit Poly mode Plays multiple tones polyphonic ...

Page 20: ...he sound mode is set to solo mode Switching Between Sound Modes p 19 1 Press the NOTE button to make the indicator light 2 Press the SOLO button Set the sound mode to solo mode the button lights up 3 Press the PORTAMENTO button Select the mode Button status Portamento mode Explanation Lit On Plays the notes by smoothly changing the pitch Unlit Off Plays the pitches of each note separately this is ...

Page 21: ...than one key at the same time in other words play a chord You can also use the step buttons on this unit as a keyboard For details refer to Using the 1 13 Buttons as a Keyboard NOTE p 18 Configuring the Arpeggio Here s how to configure the arpeggio 1 Long press the ARPEGGIO button The ARPEGGIO settings menu appears 2 Use the VALUE knob to select the parameter to set and press the VALUE knob The pa...

Page 22: ...Eighth note 5 Oct 3 3 Sets the range in octaves over which the arpeggio plays Setting this to a value makes the arpeggio play up an octave from the key s you press and setting this to a value makes the arpeggio play down an octave from the key s you press 6 trns 36 36 Shifts transposes the arpeggio notes in semitone steps 7 dvr 0 100 Sets the length of each note played by the arpeggiator Larger va...

Page 23: ...son you can record and play back two tracks of your performance per pattern Selecting a Pattern Your sequencer performance is saved in a memory called a pattern You can recall all kinds of performance patterns by selecting switching between the patterns The patterns are organized by group A B bank 1 8 and number 1 8 letting you save a total of 2 8 8 128 patterns Select the pattern to play back or ...

Page 24: ...s This selects the pattern You can also turn the VALUE knob while holding down the SHIFT button to select the bank and pattern When you press the EXIT button while holding down the START button the START button remains in a pressed down state In this case you can still select banks and patterns even if you take your finger off the START button To cancel the selection press the EXIT button ...

Page 25: ...e pattern to play back Selecting a Pattern p 23 2 Press the START button to make the indicator light This plays back the pattern By holding down the START button and pressing the LAYER TONE A or TONE B button you can mute the playback of the respective part The indicators blink for parts that are muted ...

Page 26: ...n the COMMON button and press the EFFECTS button to make the indicators light The unit enters sequencer mode The current tempo is shown on the display 2 Turn the VALUE knob to set the tempo You can switch between the tempo and patch displays with each press of the VALUE knob ...

Page 27: ...utton and press the NOTE button 4 Press the 1 13 buttons to input the notes Inputting notes using the K 25m sold separately You can use the K 25m sold separately to directly input notes from the scale on the keys into the steps to record 1 Select the pattern to record Selecting a Pattern p 23 2 Hold down the COMMON button and press the EFFECTS button The unit enters sequencer mode STEP SEQ The cur...

Page 28: ...ge 3 Steps 33 48 Page 4 Steps 49 64 You can switch pages up to the number of steps that you set as the pattern length 4 To select the step to record hold down the desired 1 16 button and press the NOTE button 5 Press the 1 13 buttons to input the notes Selecting the Part for Recording Notes The sequencer has two parts PART A and PART B to which you can individually record a sequence Here we select...

Page 29: ... holding down a step button a tie is repeatedly input into the steps following the next step When you press the 1 16 buttons where notes have already been input which turns the LED off those notes are deleted When you input a tie the note connected by the tie is input into the next step For this reason the notes already input are deleted Inputting Notes Step by Step Step Input You can input notes ...

Page 30: ...e adjustment refer to the K 25m s Owner s Manual Recording Your Performance in Real Time You can record notes from the scale on the keys and note lengths that you play on the keyboard just as you performed them 1 Select the pattern to record Selecting a Pattern p 23 2 Hold down the COMMON button and press the EFFECTS button to make the indicators light The unit enters sequencer mode STEP SEQ The c...

Page 31: ...ld down the COMMON button and press the EFFECTS button to make the indicators light Sequencer mode turns on and the current tempo is shown 3 Hold down the 1 16 buttons and press the VALUE knob to select the step to edit The step number to be edited is shown 4 Press the VALUE knob The current velocity is shown Example indications Explanation U 1 Velocity1 U 127 Velocity 127 5 Turn the VALUE knob to...

Page 32: ...F_R Plays forward from the first step and plays backward after reaching the last step InV Inverts and plays back the even numbered and odd numbered steps rnd Plays steps randomly k trg The sequence plays back normally while you are playing the keyboard 5 CC OFF On When this is on the unit outputs a control change message whenever you change the patch s settings when you operate the controls on the...

Page 33: ... a pattern and then long press the START button a dot is shown next to the pattern number in the display 1 Press the BANK 1 8 buttons while holding down the START button to select the group and bank where you want to save the data 2 Long press the NUMBER 1 8 buttons while holding down the START button to select the save destination pattern number The display blinks several times The pattern is sav...

Page 34: ... Sets the pan position of the effect A sound 7 A LEU 0 127 Sets the volume of effect A 8 SEQ B C D R R D C Configures the connection order for effect B Effect B p 36 9 dLy Configures the delay settings Delay p 36 10 Cho Configures the chorus settings Chorus p 37 11 rEU Configures the reverb settings Reverb p 37 12 B bAL Adjusts the volume balance between the dry original sound and effect sound for...

Page 35: ... 100 Sets the volume of the phased sound You can also press a corresponding step button to select the parameter items Spectrum Step buttons Parameter Value Explanation 1 SP Sľ OFF On Turns the spectrum on off 2 bnd 1 15 15 dB Sets the gain amount of boost cut in the 250 Hz range 3 bnd 2 15 15 dB Sets the gain amount of boost cut in the 500 Hz range 4 bnd 3 15 15 dB Sets the gain amount of boost cu...

Page 36: ...for the delay audio output from the left when the L Syn is off 8 L not 64t 1_64 32t 1_32 16t 1_32 1_16 1_8t 1_16 1_8 1_4t 1_8 1_4 1_2t 1_4 1_2 1t 1_2 1 2t 1 2 About note values p 37 Sets the delay time as a note length for the delay audio output from the left when the L Syn is on 9 L LEU 0 100 Adjusts the volume of the delay sound from the left 10 R Syn OFF On When this is set to on the delay audi...

Page 37: ...takes from the start of the original sound to when the chorus effect begins Larger values produce longer delays creating a wider sound 5 Fb 98 98 Adjusts the proportion of the chorus sound that is fed back into the effect Negative values invert the phase 6 LEU 0 100 Adjusts the volume of the chorus sound Reverb Step butt ons Param eter Value Explanation 1 rIJ Sľ OFF On Switches the reverb on off 2 ...

Page 38: ...l work separately For this reason the early reflection can still be heard even when the reverb level is 0 5 hf dN 500 530 800 1k 1 25k 1 6k 2k 2 5k 3 15k 4k 5k 6 3k 8k 10k 12 5k 16k Hz byPS Sets the frequencies to cut in the high frequency portion of the reverberation The high frequency portion of reverb sounds decays differently depending on the wall material This parameter simulates this kind of...

Page 39: ...ge mode The JD 08 is recognized by your computer as an external storage device It takes around 20 seconds for the connection to be recognized 3 Open the JD 08 on your computer The BACKUP folder is located in the JD 08 4 Open the BACKUP folder The backup file appears 5 Copy drag and drop the backup file to your computer 6 Disconnect the JD 08 from your computer If you re using Windows click the Saf...

Page 40: ...r the unit to be recognized 3 Open the JD 08 on your computer The BACKUP folder is located in the JD 08 4 Delete the BACKUP folder 5 Copy drag and drop the backup file that you backed up on your computer to the RESTORE folder on the JD 08 6 Disconnect the JD 08 from your computer If you re using Windows click the Safely Remove Hardware icon in the taskbar and then click Eject JD 08 If you re using...

Page 41: ...t Part Settings p 42 2 LAYr Configures the settings for the selected layer Configuring the Layer Settings p 43 3 LFO Configures the LFO related settings for the selected layer Configuring the LFO p 44 4 ľG Configures the WG related settings for the selected layer Configuring the WG Waveform Generator p 45 5 Enu Configures the envelope related settings for the selected layer Configuring the ENV Env...

Page 42: ...layered for a unison effect 6 PrtA This sets the playing style for applying portamento norN Portamento is always applied LEgA Portamento is only applied when you play in legato style playing one key and then playing the next while holding down the first one 7 Prt t 0 100 When portamento is used this sets the time taken for the pitch to change Higher settings make the pitch take longer when gliding...

Page 43: ... of each envelope according to how hard you press the keys the velocity The envelopes that produce change are PITCH TVF and TVA 1 2 3 4 2 HOLd OFF On Sets whether the tone sustains when you operate the hold pedal 3 F AFt 50 50 Sets how much the aftertouch you use changes the cutoff frequency 4 F AFt 50 50 Sets how much the aftertouch you use changes the volume ...

Page 44: ... Unit 44 Configuring the LFO Step buttons Item Value Explanation 1 1 SYn OFF On When this is turned on the LFO 1 cycle is synchronized with the tempo 2 2 SYn OFF On When this is turned on the LFO 2 cycle is synchronized with the tempo ...

Page 45: ...his is set for LFO1 the LFO1 waveform is used for vibrato and when this is set for LFO2 the LFO2 waveform is used for vibrato Set this to 0 to turn vibrato off 4 AFt b OFF On Sets whether MIDI aftertouch bend messages are received ON or not OFF The pitch changes when a MIDI aftertouch message is received This is set for each layer that s selected as ACTIVE the TONE A TONE D buttons blink 5 AFt S L...

Page 46: ...L 50 50 Sets how much the TVF envelope is changed according to how hard you press the keys velocity Larger values absolute value produce a greater effect 4 F UE t 50 50 The T1 time parameter of the TVF envelope changes according to how hard you press the keys velocity Higher values absolute value produce longer times 5 A UEL 50 50 Sets how much the TVA envelope is changed according to how hard you...

Page 47: ...y range for TONE B 4 Rg B H C G9 Sets the upper limit of the key range for TONE B 5 Rg C L C G9 Sets the lower limit of the key range for TONE C 6 Rg C H C G9 Sets the upper limit of the key range for TONE C 7 Rg D L C G9 Sets the lower limit of the key range for TONE D 8 Rg D H C G9 Sets the upper limit of the key range for TONE D These parameters set how much the pitch bend controller changes th...

Page 48: ... the amount of boost cut of the low frequency range 4 Nid F 20 999 Hz 1 00 16 00 kHz Adjusts the amount of mid frequency boost cut 5 Nid q 0 5 16 0 Sets the width of the mid frequency range Higher values make the width more narrow 6 Nid G 24 0 24 0 dB Adjusts the amount of boost cut of the mid frequency range 7 Hi F 20 999 Hz 1 00 16 00 kHz Sets the center frequency of the high range 8 Hi G 24 0 2...

Page 49: ...he velocity value changes in response to how hard you play the keys 1 127 Sets the velocity at a fixed value 3 U CRU Specifies the keyboard touch LIGH Sets the keyboard feel to respond with a lighter touch Nid Sets the keyboard feel to respond with a standard touch HEUY Sets the keyboard feel to respond with a heavier touch You can also press a corresponding step button to select the parameter ite...

Page 50: ...external MIDI keyboard OFF Select this when a MIDI keyboard is not connected Normally you will leave this OFF NiDi Select this when connecting to the MIDI connector USB Select this when connecting to the USB connector 5 SynC This specifies the synchronization signal that this unit s sequencer follows Avto Automatically detects the signal inputted to the jack InT The unit operates according to its ...

Page 51: ...whether the unit will turn off automatically after a certain time has elapsed If you don t want the unit to turn off automatically choose OFF setting The setting is disabled the power does not turn off automatically when the unit is connected via USB 3 tunE 415 3 466 2 Hz Adjusts the overall tuning The value shown is the frequency of the A4 key middle A on a piano keyboard You can also press a ste...

Page 52: ...iting Step buttons Parameter as displayed Explanation 1 P CLr Initializes the selected pattern 2 T CLr Initializes the selected tone 3 L CLr Initializes the layer of the selected tone 4 F CLr Initializes the effects of the selected tone 5 T rnd Replaces the currently selected tone with a random tone ...

Page 53: ... defaults 1 While holding down the 2 button turn on the power The PAGE TIE button blinks To cancel the factory reset turn off the power 2 Press the PAGE TIE button Initialization begins Once the JD 08 is restored to factory default settings donE appears in the display 3 Turn the power of the JD 08 off and then on again ...

Page 54: ...hen you connect the unit to another USB port This lets you use this unit on battery power while the USB port is connected to a device that can t supply it with power 1 While holding down the PAGE TIE button turn the power on This makes this unit operate on batteries If you handle batteries improperly you risk explosion and fluid leakage Make sure that you carefully observe all of the items related...

Page 55: ...32 Mr Brass A 33 Bruiser Tines A 34 Wet Bass A 35 Throaty Clav A 36 Rockin Wire A 37 Iceman A 38 Ming Dynasty A 41 Planetarium A 42 Pulse Pad A 43 All Stops Out A 44 Fusion Solo A 45 MIDI Guitar A 46 Pain Injury Keyz A 47 Deep Breath Pad A 48 Harlequin A 51 Slow Bell Pad A 52 Analog Brass A 53 Ac Piano 1 A 54 Modular Bass A 55 MIDI Clav A 56 Voco ST A 57 Invocation A 58 Ethnic Logs A 61 2 way Slid...

Page 56: ...er B 23 Rubber Dulcimer B 24 Space Bowls B 25 Legend Stories B 26 Vapor Organ B 27 JD B 28 Glitch Bass B 31 That Rubber Band B 32 Sacred Dist B 33 String Too Long B 34 Hyper Marimba B 35 Fake EP List of Waveforms This is a list of waveforms you can use in the WG section No WAVEFORM name 1 Syn Saw 1 2 Syn Saw 2 3 FAT Saw 4 FAT Square 5 Syn Pulse1 6 Syn Pulse2 7 Syn Pulse3 8 Syn Pulse4 9 Syn Pulse5 ...

Page 57: ...ba 47 Xylo 48 Marim Wave 49 Log Drum 50 AgogoBells 51 Bottle Hit 52 Gamelan 1 53 Gamelan 2 54 Gamelan 3 55 Tabla 56 Pole lp 57 Pluck Harp 58 Nylon Str 59 Hooky 60 Muters 61 Klack Wave 62 Crystal 63 Digi Bell 64 FingerBell 65 Digi Chime 66 Bell Wave 67 Org Bell 68 Scrape Gut 69 ST Atk 70 Hellow Bs 71 Piano Atk 72 EP Hard 73 Clear Keys 74 EP Distone 75 Flute Push 76 Shami 77 Wood Crak 78 Klmba Atk 7...

Page 58: ...EP Atk 91 TVF_Trig 92 Flute Tone 93 Pan Pipe 94 BottleBlow 95 Shaku Atk 96 FlugelWave 97 French 98 WhiteNoise 99 Pink Noise 100 Pitch Wind 101 Vox Noise1 102 Vox Noise2 103 CrunchWind 104 ThroatWind 105 Metal Wind 106 Windago 107 Anklungs 108 Wind Chime ...

Page 59: ...X B LEVEL 13 FX B REVERB TIME 14 LFO1 RATE 15 LFO1 DELAY 16 LFO1 FADE 17 LFO1 OFFSET 18 LFO1 KEY TRG 19 LFO1 WAVEFORM 20 LFO2 RATE 21 LFO2 DELAY 22 LFO2 FADE 23 LFO2 WAVEFORM 24 LFO2 OFFSET 25 LFO2 KEY TRG 26 PITCH ENVELOPE TIME KEY FOLLOW 27 PITCH ENVELOPE L0 28 PITCH ENVELOPE T1 29 PITCH ENVELOPE L1 30 PITCH ENVELOPE T2 31 PITCH ENVELOPE T3 35 PITCH ENVELOPE L2 41 BENDER RANGE UP 46 FILTER ENVEL...

Page 60: ... DEPTH 89 TVF KEY FOLLOW 90 TVF LFO SELECT 91 FX B REVERB LEVEL 92 FX B DELAY L LEVEL 93 FX B CHORUS LEVEL 94 FX B DELAY C LEVEL 95 FX B DELAY R LEVEL 96 LFO1 RATE Rate sync 97 LFO2 RATE Rate sync 102 TVF LFO DEPTH 103 TVA LEVEL 104 TVA BIAS POINT 105 TVA BIAS LEVEL 106 TVA BIAS DIRECTION 107 TVA LFO SELECT 108 TVA LFO DEPTH 110 LEVEL 111 LAYER 112 ACTIVE 115 SOLO 116 LEGATO 117 PORTAMENTO 118 POR...

Page 61: ...nsmitted Recognized Remarks Omni On Works the same as all notes off Mono Mode On Works the same as all notes off Poly Mode On Active Sensing System Reset Notes Mode 1 OMNI ON POLY Mode 2 OMNI ON MONO Mode 3 OMNI OFF POLY Mode 4 OMNI OFF MONO Yes No ...

Page 62: ...en the selected part and the system Note Off Aftertouch Key s Transmits receives between the selected part and the system Channel s Pitch Bend Control Change Program Change 0 127 0 127 Selects the step sequencer pattern System Exclusive System Common Song Position Song Select Tune Request System Real Time Clock Start Continue Works the same as start Stop Aux Messages All Sound Off Reset All Contro...

Page 63: ...B Type C Audio MIDI Power Supply Ni MH battery AA HR6 x 4 or Alkaline battery AA LR6 x 4 USB bus power Current Draw 500 mA USB bus power Expected battery life under continuous use Ni MH battery Approx 6 hours When using batteries having a capacity of 1 900 mAh This can vary depending on the specifications of the batteries capacity of the batteries and the conditions of use Dimensions 300 W x 128 D...

Page 64: ...Main Specifications 64 JD 08 Owner s Manual 01 2021 Roland Corporation ...

Reviews: