background image

19

3DISON PRO

 User Manual V.1

E. Making a print with CreatorK 8

E2.  How to use CreatorK 8

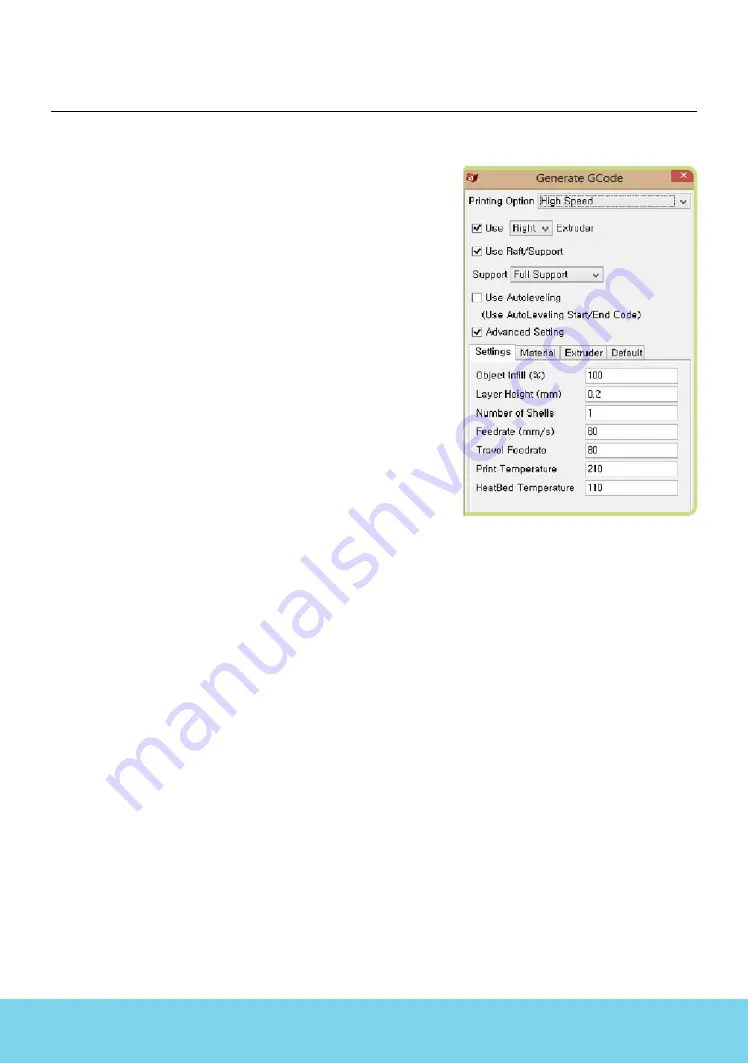
3. Once you finished, click on the G-code icon on the 
far left to generate G-code. Then a pop-up window will      
show up to save or not to save the .stl file which you    
have edited in location or size etc. After this, you can 
see this display.

Tip. 3DISON’s software CreatorK 8 is based on the Skeinforge, 
which has a plenty of settings. We are providing about 9 appro-
priate printing options so that any users can set up the profile easily. 

But, please note that you should enter each settings unless you 
choose specific a printing option. (Uncheck the mark in the Ad-
vanced Setting item.)

Following are specific explanations about the items 
you  should set up before generating G-code. Your 
print-out’s quality and time will be affected.z

1) Printing Option


There are basic profiles optimized to print out what you want conveniently.


(suggested but not required)


 If you don’t want to use these printing option, generate your own printing 


option by selecting GCode-Edit Slicing Profiles and clicking any profile and Copy.


① 

High Speed : 0.2 mm layer height for big-sized object 


 - 700 mm/sec on 3dison Pro and 3dison H700


 - 300 mm/sec on 3dison Multi


 Standard : 0.2 mm layer height for mid-sized object 


  - 100 mm/sec on 3dison Pro and 3dison H700


  - 100 mm/sec on 3dison Multi


 High-Precision : 0.05 mm layer height for small-sized object 


 - 40 mm/sec on 3dison Pro and 3dison H700


 - 40 mm/sec on 3dison Multi


 Supreme-Precision : 0.025 mm layer height for small sized  and smooth surface


  - 40 mm/sec on 3dison Pro and 3dison H700


  - 40 mm/sec on3dison Multi 


  ※

 The thinner the layer height the more the time is required to finish 3D printing


 Laser : to cut 3 mm-thick acryl and 2 mm-thick plywood


 Metal(Silver), 

 Metal (bronze), 

⑧ 

Metal (Cooper), 

 Metal (Steel) 

※  When generating Gcode before starting metal printing, be sure to choose the corresponding ‘printing option’ depend

-

ing on materials. These settings are optimized to the material and theses are provided by the developers of ROKIT Inc. 

Summary of Contents for 3DSION PRO

Page 1: ...your experience with 3DSION PRO In order to achieve great results you will need to experiment and tinker That s why it s so crucial to take the time to learn about your new machine In this User Manua...

Page 2: ...inting bed D1 Filament Loading and Unloading D2 Leveling the printing bed E Making a print with CreatorK 8 E1 CreatorK 8 Overview E2 How to use CreatorK 8 F Troubleshooting F1 Troubleshooting FAQ F2 S...

Page 3: ...TION Wearing protective glasses is recommended before using the laser engraver CAUTION When opening the 3DISON PRO for service ensure that the power supply is turned off and the cord is disconnected f...

Page 4: ...is method works by laying down consecutive layers of material at high temperatures allowing the adjacent layers to cool and bond together before the next layer is deposited Printing Specifications Met...

Page 5: ...ompatible File Format Input Output Connectivity Average Operational Noise Dual Extruder System Universal Extruder X 8mm Y Z 12mm 2GT Belt Pulley O O for checking the working status O O available for P...

Page 6: ...PRO Overview Door LCD thermometer of the heated bed Printing bed Extruder Roof case LCD keypad Arrows and OK button SD Card slot USB drive port Power socket Power switch 1 3 7 10 11 2 4 8 9 5 6 Front...

Page 7: ...his User Manual on our website 2 Carefully remove a cardboard and protective air bag covering the body of 3DISON PRO and now you should see a glimpse of your 3DISON PRO Take the box with the accessori...

Page 8: ...t Spool x 2 700g 1 EA Power Supply and Cable USB Cable Spare nozzle Tweezers for removal Universal Extruder for Paste type Printing DISON PRO Premium Laser Kit WIFI Camera Embedded Battery Please visi...

Page 9: ...e switch ON the 3DISON PRO is turned on and should start up Press the power button to start NOTE It is recommended to only turn off the DISON PRO when it is NOT in use 3 Once you see the LCD display a...

Page 10: ...me Total operation time of 3DISON PRO Last Print Last build time Filament Total amount of filament used in meter Fil Trip Amount of filament used for the last build in meter FilamentOdometer Notonlyth...

Page 11: ...rt the filament into the hole in the middle of the roof case NOTE Put left filament into the front hole and right filament into back hole on the roof case 3 After opening the front door check to see i...

Page 12: ...oad Right or Unload Left depending on which side you want to remove the filament 2 When the extruder is completely heated with an alarm locate the extruder to the middle 3 Pull the filament out of the...

Page 13: ...NOTE At this time it is important that you should turn the round knobs as same degree as possible at the same time using both hands If knobs are turned to the left the gap between the nozzle and the...

Page 14: ...Card on the top of the printer and select the file on LCD panel It starts to print with auto leveling function NOTE In CreatorK check the mark in the Auto leveling item when generating Gcode 2 When th...

Page 15: ...SD Card Connecting When you connect your computer and CreatorK8 with USB cable Disconnecting Build When you want to print out the x3g file directly through USB cable Pause Generating G code to use Las...

Page 16: ...cing program named Skeinforge to activate 3 Go to the Desktop and you can see the CreatorK generated Once you opened CreatorK 8 select Machine Machine Type You should select corre sponding Machine Typ...

Page 17: ...SD card Connecting to Printer on CreatorK 8 1 Connect your computer to the printer with the USB cable 2 Go Select Machine Connection SerialPort and choose one of the detected serial ports on the same...

Page 18: ...le arrow icon you can rotate the object as you wish to print out When clicking the right mouse button you can see the screen below You can rotate the object by X Y Z axis or by dragging it with the le...

Page 19: ...ted but not required If you don t want to use these printing option generate your own printing option by selecting GCode Edit Slicing Profiles and clicking any profile and Copy High Speed 0 2 mm layer...

Page 20: ...ox 4 Advanced Settings I If you check advanced setting box you can find several setting optionsforprinting Therearefourcategoriesinthisadvancedsetting 3 Support Settings Object Infill You can enter a...

Page 21: ...ed Temperature 70 80 for PLA 145 150 for ABS Whenyouusedifferentdiameteroffilaments youshouldinputcorrespondingdiameters Material Default Click Set Default Value if you want to change values which wer...

Page 22: ...lick Merge stl for Dual Extrusion to merge into one g code file NOTE You CANNOT use support function in the dual nozzle system For two files cannot mesh with each other if the supports are printed 2 C...

Page 23: ...y outputted it means that there is a problem in a gap between the nozzle and the output board If this problem occurs select Utilities Standard Leveling adjust a round knob underneath the printing bed...

Page 24: ...owed Manufacturing and designing of 3D modeling file must use 3D design program A1 Dedicated 3DISON s software CreatorK supportsWindow and Mac operating systems These operating systems can easily be i...

Page 25: ...umber or email below T 82 2 867 0182 F 82 2 865 0182 Email 3dison rokit co kr Please refer to our website for more information and latest news and questions regarding our products on our website http...

Page 26: ...is contained and extruding device which discharges required quantity 1 Ceramic tile used as print bed 1 Motor cable 1 Stainless steel brush for processing after firing 1 Nozzle 1 Extended stopper for...

Page 27: ...l the metal extruder by fastening the bolts with a hex wrench Connect supplied motor cables to the motor and PCB Take the syringe out of the box and insert the yellow nozzle in the head of the syringe...

Page 28: ...in length Image 1 Image 2 Put the ceramic tile on the bed after save x3g file in the SD card Select file to print and start printing NOTE In case the thickness of layer is out of the range 0 7 1mm wh...

Page 29: ...is not completely dry might be difficult to get complete firing and liable to crumble Put the dried print out in the electric kiln and set temperature at 780 C and fire it for 10 minutes Then silver...

Page 30: ...ample out of the cube and brushing the sample using stainless steel brush NOTE Cube and carbon are recyclable only the part which has not changed into white ash by oxidation TIP Be careful of scald wh...

Page 31: ...aver please make sure to be EXTRA PRECAUTIOUS when handling the laser engraver 1 How to install This symbol stands for warning in using lasers Power must be off before installation for your safety Sep...

Page 32: ...NOTE Before exchanging the existing extruder please make sure that the hot end reaches the printing bed 1 How to use Put the plate plywood acryl to cut on the print ing bed of the printer Perform 3D m...

Page 33: ...generated Gcode to another Gcode optimized to use the laser function by clicking La ser Icon Save the generated Gcode for laser use in the format of x3g in SD Card Then directly insert it in the print...

Page 34: ...er Click an added camera to set IPCAM for wireless connect ion Camera settings WIFI settings WIFI Manag er select a currently used wireless SSID finish by inputting PIN Enter Add Camera after executio...

Page 35: ...time is required after removal of LAN cable connected to the camera When the wireless SSID is not set with PIN simply click OK button without inputting the PIN EnterAddCameraafterexecutionoftheprogra...

Page 36: ...ut ton click OK button after inputting PIN After about 1 2 minutes you can pull out the LAN Cable since the message saying you can pull out appears NOTE The wireless connection may generate a problem...

Page 37: ...R c ROKIT Inc B 1106 Kabul Great Valley 60 5 Gasan dong Geumcheon gu Seoul Korea E http www 3disonprinter com T 02 867 0182 F 02 865 0182 E mail 3dison rokit co kr Multiple Perfection Desktop 3D Print...

Reviews: